| Construction Rating: | starstarstarstarstar_border |
| Flight Rating: | starstarstarstarstar |
| Overall Rating: | starstarstarstarstar |
| Manufacturer: | Quest  |
Brief:
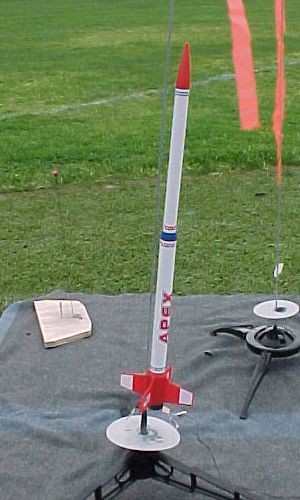
The Quest Apex is an OOP Quick Kit for 18mm motors. Motor retention is by
plastic bayonet ring similar to some Estes RTF models. The rocket breaks in the
middle with an upper payload section, which is long albeit still quite narrow.
At 59cm (23.2 inches) complete, it is a good sized model. Recovery is by 35.6cm
(14 inch) parachute. Total weight without motor or recovery parachute/wadding
is 52 grams (1.84oz) 18mm Quick Kit with sounding rocket styling. No finishing
required.
Construction:
This was an eBay purchase of a handful of OOP Quest kits. I bought this kit
specifically for my kids (12 and 14) to assemble. The fleet was looking a bit
depleted due to an attack of rocket eating trees, so we needed some easy to
build kits of a reasonable size to bulk out the numbers. I am used to seeing
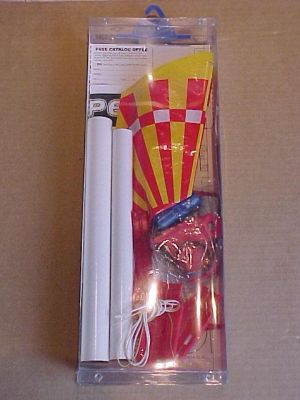
kits in plastic hang bags. This kit was different, packaged in an acetate box
with a hang tag on top. Not having seen a great number of Quest kits in stores,
I wasn't sure whether this was regular packaging or not. The kids are now of an
age where they can assemble simple kits with a minimum of supervision. This was
their second solo build. All parts were present, complete, and undamaged.
Instructions are clear and concise. Illustrations are excellent quality and
easy to follow.
 The Apex requires no
painting. The body tubes are white, the engine mount/fin can is red, and there
is a blue plastic transition. The body tubes are of good quality, a crisp gloss
white with obvious, but not too deep spirals. The kit includes a plastic
display stand, which is an added bonus. The kit is a combination of plastic and
cardboard components. There is no balsa in the kit at all. Motor retention is
via a bayonet locking ring, as seen on some RTF models from Estes. Decals are
peel and stick, and appear to be of good quality. Decal background is white.
The Apex requires no
painting. The body tubes are white, the engine mount/fin can is red, and there
is a blue plastic transition. The body tubes are of good quality, a crisp gloss
white with obvious, but not too deep spirals. The kit includes a plastic
display stand, which is an added bonus. The kit is a combination of plastic and
cardboard components. There is no balsa in the kit at all. Motor retention is
via a bayonet locking ring, as seen on some RTF models from Estes. Decals are
peel and stick, and appear to be of good quality. Decal background is white.
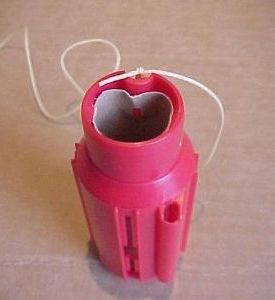
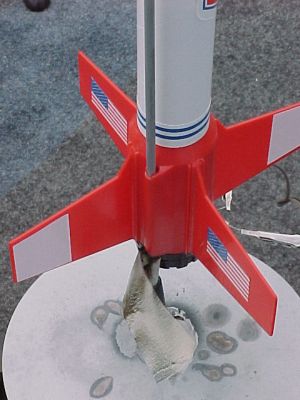
Construction begins with tying the trademark Quest Kevlar® shock cord and round section elastic shock cord together. Total shock cord length is about three times the length of the lower body tube. The plastic motor housing is then assembled from two plastic halves and a cardboard motor mount tube. As can be seen, the very top of the motor tube is somewhat distorted when the housing is assembled, but it doesn't appear to affect anything. The instructions call for plastic cement to join the motor housing halves. We used Tamiya liquid cement.
Plastic fins have tabs to lock into the motor housing body. The fins are glued into place. Again, we used the Tamiya liquid cement. The fins are a loose fit, so correct alignment isn't assured. Be sure to check the alignment and adjust if necessary. There is a bayonet locking ring to hold the fins in position and provide correct spacing for the motor lock ring.
The motor housing also has the launch lug molded in. This is the only lug provided, and it seems very low on the rocket. I may add another lug on the main tube later.
By the time you have built the motor housing and fitted the fins, the rocket is almost complete. All that remains is to attach the plastic transition to the upper body tube and attach the lower body tube to the motor housing. We used CA gel for both of these.
Assemble a parachute and that's it. You are done. Decal application adds perhaps another minute to the project. Total rocket assembly time for my kids was about half an hour, which included my introduction to the use of brush on liquid plastic cement.
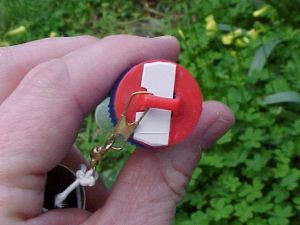
The only gotcha is in assembling the transition. This has two parts, a blue body and a red base. The base is the attachment for the shock cord and parachute and as such has a large plastic loop on it. However, there is a large gap under the plastic loop which would allow the ejection charge up into the upper body tube/payload section, effectively gassing or cooking anything you have in there. There is also the possibility that if the transition is a firmer fitting than the nose cone, you could blow the nose, instead of separating the rocket at the transition. Instant lawn dart!
If I had realized this earlier, I would have blocked the hole from inside the transition before the top tube was glued on and had a neat, tidy, invisible modification. Oh well, a small piece of plastic attached under the loop with CA does an acceptable job of sealing. It is not as pretty but almost as effective. Chalk that one up to experience.
Finishing:
None is required.
Construction Rating: 4 out of 5
Flight and Recovery:
I flew the Apex twice on Estes B6-4 motors, no payload. The wind was dead calm,
boost was straight. Man, does this thing go! Helped by its light weight and
sounding rocket skinniness, the Apex boosted to 112 meters (367 feet), checked
with Estes Altitrack. Perfect chute deployment, nice return less than 10 meters
from the pad. The second flight was an exact copy of the first. I noticed after
the second flight that the grippers on the chute were coming loose. Again,
easily fixed with a bit of tape.
Overall Rating: 5 out of 5
 |
 |
Flights
|
|