| Manufacturer: | Quest  |
Brief:
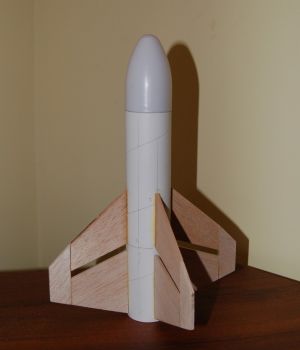
Kit bash of a Quest Harpoon AGM into a short, squat 2-stage rocket.
Modifications:
First I cut the body tube, I used a "TLAR" approach for the sustainer, and cut the body tube to about +/-
2.25" (I don't remember exactly how long it is, oops!) An Estes tube marking guide was used to mark the tubes and
then a careful hand with a sharp X-Acto knife yielded reasonably clean edges.
I also cut a shorter piece of tube to act as a coupler between the booster and the sustainer by cutting a slit in it and stuck it into the booster. I marked how much needed to be cut off, cut it, and voilà--a coupler is born. I glued it into the booster tube but ended up needing to sand the exposed portion for a good fit into the sustainer.
Motor mount time! I assembled the motor mount per instructions (including the shock cord mount) and installed it into the sustainer. Had I been thinking, I would have recessed it a bit further into the tube so that it wouldn't stick out the back quite so much. Unfortunately, I wasn't thinking! I needed another motor mount, so I bought a Baby Bertha with a 40% off HL coupon (go Hobby Lobby!) planning to cannibalize it for parts. I get the motor mount out and start playing with the centering rings and am in for a nasty surprise--it won't fit! I take the BT-60 tube from the Baby Bertha and sure enough, it slides down over the Quest tube with a little bit of slop. Doh! A simple email to Quest takes care of that though! I ask how I can buy a set of centering rings, and they say, "what's your address? We'll send you one!" So now back to the build, sans one motor mount.
 On the fin front, I used all 12 fins. I took the upper set and glued them to the outside
edge of the lower set. It just so happens that you could also glue the middle set on to get a big trapezoidal fin with
a "slot" in it but I didn't do that! I wanted to glue the middle fins to the sustainer and the composite fin
to the booster but then align them so that it looked like one big booster. After assembling and sanding the fins, I
glued the 4 fins on the sustainer tube. (Wood glue and the double glue technique rocks!) Give that a day to dry, and
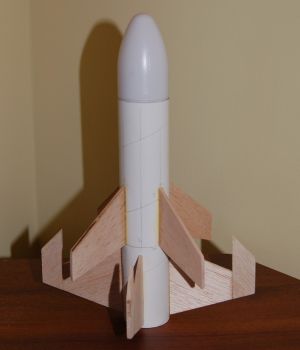
now it's time for the booster! I mark the booster tube, put a little number by each marking, put a similar number on
each booster fin, and mark the sustainer fins as well (although I think I did that on the tube, not on the fin itself).
After much sanding (mostly sanding down the sustainer fins), the booster fins will all fit over the appropriate
sustainer fin and it's time to glue them on! I leave the two tubes mated for this process so I can get good alignment
of the booster fins with the sustainer fins. (It's supposed to look like one big fin after all.) Double glue technique
to the rescue again and voilà. Four nicely aligned fins. Stick that up on a high shelf to prevent small
children or dogs from knocking it over!
On the fin front, I used all 12 fins. I took the upper set and glued them to the outside
edge of the lower set. It just so happens that you could also glue the middle set on to get a big trapezoidal fin with
a "slot" in it but I didn't do that! I wanted to glue the middle fins to the sustainer and the composite fin
to the booster but then align them so that it looked like one big booster. After assembling and sanding the fins, I
glued the 4 fins on the sustainer tube. (Wood glue and the double glue technique rocks!) Give that a day to dry, and
now it's time for the booster! I mark the booster tube, put a little number by each marking, put a similar number on
each booster fin, and mark the sustainer fins as well (although I think I did that on the tube, not on the fin itself).
After much sanding (mostly sanding down the sustainer fins), the booster fins will all fit over the appropriate
sustainer fin and it's time to glue them on! I leave the two tubes mated for this process so I can get good alignment
of the booster fins with the sustainer fins. (It's supposed to look like one big fin after all.) Double glue technique
to the rescue again and voilà. Four nicely aligned fins. Stick that up on a high shelf to prevent small
children or dogs from knocking it over!
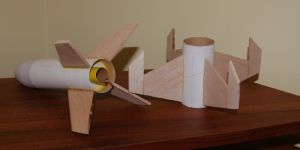
The rings from Quest arrived, and I put together the motor mount for the booster. I cut it a little short and made sure ~1/4 to ~1/2" sticks out the bottom of the booster so that I've got something I can tape to for motor retention on the booster. The big fins with forward projections will hopefully make this booster tumble rather than lawn dart. Since I'd been reading about vent/gap staging on The Rocketry Forum, I cut a pair of ~1/8" holes in the centering rings (one hole in each ring) and aligned them with each other to act as a vent.
 The final step was to cut the bottom off the nose cone and epoxy two 1/4oz egg sinkers into
the front, along with the shock cord.
The final step was to cut the bottom off the nose cone and epoxy two 1/4oz egg sinkers into
the front, along with the shock cord.
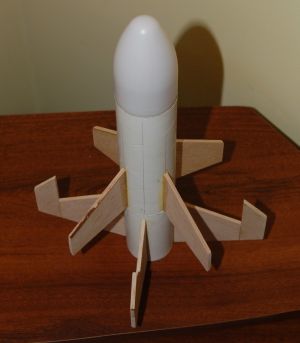
While playing around with it, I discovered that when separating the two pieces, the fins could bind if it didn't come off straight. I decided to fly it with the fins offset 45 degrees from each other rather than aligned. It still looks pretty cool that way!
Construction:
Parts list:
- 1 piece of Quest body tube (cut into booster section, short sustainer section, really short piece used for a coupler, and a big piece left over)
- 12 fins (3 shapes)
- 18mm motor mount (rings were kind of curly)
- Quest style shock cord and chute
- Two 1/4oz egg sinkers (nose weight)
- Bertha-esque nose cone (with the bottom cut off)
- Another 18mm motor mount (stole the tube from a Baby Bertha, Quest supplied free centering rings)
Finishing:
Err, well, I haven't painted it yet.
PRO: Easy!
CON: Ugly!
After it flies, then it has earned a paint job.
Flight:
I like to get my rockets back, so my first flight was on a B6-0 to an A8-3. B6-0s are unobtainable these days, but
thankfully Roy Green had a stash and he traded me a B6-0 for one of my B4-4s. Motor prep is simple. Stuck the A8-3 in
the sustainer (Quest clip holds it in place), stick the B6-0 into the sustainer, and tape it in place. It sticks out
the back quite a bit but it works!
Wadding was rather interesting--the engine comes up flush with the top of the motor mount and the nose cone shoulder goes all the way down to the motor mount. I filled the tube with wadding and stuffed the chute up into the nose cone. The chute was a royal pain to assemble as the shroud lines were so slippery that my knots kept coming untied!
Beautiful lift, nice staging--all in all a great maiden flight!
Recovery:
Standard Quest Kevlar®/elastic
shock cord was used and assembly was fine. Unfortunately, the chute didn't inflate and the whole thing tumbled in
pretty fast. There wasn't any significant damage and the tube looks just a little worse for wear but nothing some paint
won't cover up! It landed pretty close due to its fast decent rate. I'm thinking I need to find a different chute,
maybe a small lightweight nylon one and find a way to prevent shroud tangles.
Summary:
I like it! Kitbashes are fun. Short, stubby rockets are fun, and more than one engine is fun! I was never attracted
much to staging, but I really enjoyed flying this little guy. I enjoyed building him too.
PROs: Cute short, stubby look. Two-stage rocketry and kitbashing is fun!
CONs: Not much room for recovery device (as it has to stuff into the nose cone). Really needs a B6 booster for the local field and those aren't readily available (on larger fields it'd be fine with a C6 booster).
 |
 |