Quest Navaho AGM

Quest - Navaho AGM {Kit} (3003)

Contributed by Jason Orosco

Construction Rating: starstarstarstarstar_border
Flight Rating: starstarstarstarstar
Overall Rating: starstarstarstarstar
Diameter: 0.98 inches
Length: 20.25 inches
Manufacturer: Quest
Skill Level: 3
Style: Scale
Quest Navaho

Brief:
Quest Navaho AGM is a 2-stage rocket with a 14" parachute. It's rated as a level III model kit. This is my first Quest rocket I've built. I decided to try a different 2-stage rocket kit.

Construction:
I was very impressed with the quality of the parts.

The parts list:

  • 1 14" White Body Tube
  • 1 3" White Body Tube
  • 2 Motor Clips
  • 2 Blue Thrust Rings
  • 2 Yellow Motor Mount Tubes
  • 4 Red Centering Rings
  • 1 Water Slide Decal Sheet
  • 1 Plastic Nose Cone
  • 1 Tube Coupler
  • 1 Launch Lug
  • 1 24" White Elastic Shock Cord
  • 1 Instruction Sheet
  • 1 Launch Procedures Sheet
  • 1 21" Yellow Kevlar® Shock Cord
  • 3 26" Shroud Lines
  • 6 Tyvek Labels
  • 1 14" Parachute
  • 1 Laser Cut Balsa Fin Set
Quest Navaho

The instructions are easy to follow and well illustrated. The construction of this rocket was easy for being rated a level III build. I do like the heavy motor mount tubes. Make sure you follow the fin aliment to the letter or it will cause stability problems. A friend of mine learned that the hard way. I used white glue and wood glue to assemble this rocket.

Finishing:
First thing I did was add two coats of sanding sealer to the fins, sanded with 320 grit sandpaper, added a third coat, and sanded again. I also did the forward stakes too.

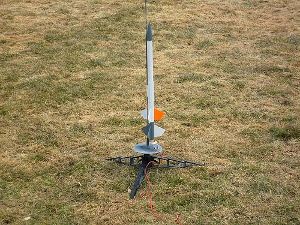
I primed the whole model with white primer and used 320 grit sandpaper to make it smooth. I used gloss gray spray paint on the NC and lower booster. You will want tape off one fin and spray paint that fin with gloss white. The upper section with one fin tape off was sprayed with white gloss paint. The covered fin was later sprayed with gloss orange.

The decals went on easily and they are rather thick. I still need to finish adding the rest of the decals.

Construction Rating: 4 out of 5

Flight:
My first flight was using Estes A8-0/A8-3. The second stage didn't light and crashed, but there was no damage. The second flight was Estes B6-0/A8-3. Great flight really took off towards the sky.

Recovery:
Parachute opened beautifully, I didn't think I was going get it back as the wind kicked up and the rocket drifted into a neighbors backyard. I recovered it with no damage. I will find a bigger flying area for this rocket next time.

Flight Rating: 5 out of 5

Summary:
Nice 2 stage rocket to fly. Make sure you have a large flying field for this rocket land and launch in little or no wind.

Overall Rating: 5 out of 5

Other Reviews
  • Quest Navaho AGM By Jim Bassham (February 24, 2009)

    Brief: Two-stage scale rocket. Construction: Paper tubes, die-cut balsa fins, plastic nose cone, Kevlar ® /elastic shock cord. Motor retaining clips. This was a really straightforward kit that went together easily. The instructions were well written and clear. The assembly went smoothly. This kit is designed like other Quest kits with their Kevlar ® shock cord ...

  • Quest Navaho AGM By Tai Fu (January 3, 2008)

    Navaho is a 2 staged rocket made by Quest. I bought this in Hobby Lobby because I thought I'd give a 2- stage another chance (the first one failed me by coming down in flames after stage separated). The rocket comes in a clear plastic bag just like most Estes rockets. No broken parts. I kinda liked the tab mounting of parachutes because it's easier to put on, however, it's not as strong as ...

Flights

Comments:

avatar
D.K. (November 1, 1999)
The Quest rockets are often more interesting than Estes kits, and the Navaho is no exception. The price for this is that they are sometimes a little less rugged and need a little more 'babying' to get them to work right. But the Navaho is actually one of their better ones. We sent the Navaho up on successively more rocket power. It kept giving us good, straight flights so we went to the maximum recommended C6-0, C6-7 combination. We figured it would go over 2000 feet, so we put in a streamer instead of the supplied parachute so it would stay in our area code. We had a clear day and lots of club people around to help watch. It definitely went over 2000 feet, and out of sight. I put a lot of talcum powder on the wadding, so a club member just caught it at ejection. We launch on a grassy field, so the fairly fast decent on the streamer resulted in no damage on landing. It really goes. The staging and recovery worked perfectly on every launch.
avatar
T.E.B. (October 26, 2001)
This was a fun rocket to build, but I didn't notice that it's a good four inches shorter than it should be until after I had it all finished and was putting on the decals! There must have been a mistake with the main body tube length when the kits were being made as the reviewer had the same problem. (Wonder if they were cutting using metric units when the instructions were using inches?) I did add a section of tube to the top of the rocket with a coupler, but the result is that the decals are now placed wrong. It won't be up to contest standards this way so I guess it won't be entered in any scale events. It makes up for the spoiled decals in the flying, though - it flies great!
avatar
N.A.S. (November 9, 2001)
Flight: 10/27/01 The reviewer seems pretty well right on. This was the first kit I built since reentering rocketry. All went smoothly for me, having flown *a lot* of rockets as a kid. I agree whole-heartedly with the comments regarding the decals, but I found no issues with not having vent hole for the staging. I only got three flights out of it, losing it on the third flight c6-0 to c6-7), but all three flights staged perfectly. I'm not sure if it was due to the tube being too short, but the flights seemed only marginally stable during the first stage boost, with a little bit of wobble, but it flew like an arrow after staging. The streamer is the way to go, if you have a soft field, especially if you are flying a C-C combination. It really goes! Overall, I thought it was a great kit and definately had "one up" on the Estes kits I have built in the strength of the recovery design (using kevlar attached to the moter mount).
avatar
C.C.C. (December 7, 2001)
My parents bought me this rocket one friday night when I was bored. The construction is simple and not of Skill Level three difficulty. But the finishing is another thing. The painting itself is easy but placing the decals proved to be quite difficult. The Decals themselves are cheap. The coloring on them smears when you place them on and try to smooth them. But after the clear coat they proved to be adequate. One thing that I like from all Quest kits is the Kevlar shock-cord system and the easy grip tabs for the recovery system. This kit needs a streamer instead of a parachute. But overall it was fun to build.
avatar
R.B. (February 11, 2005)
My first two-stage since returning to rockets after a 25 year hiatus. Nice kit, however, the fins which came with the kit were terrible (mine were probably the exception, gotta happen eventually). Made my own fins (correct balsa size and of course, proper grain direction), and all went well from there. Of course, time and patience are a must to achieve exact fin alignment with 12 fins. Would prefer water-slide decals, but the rocket still looks nice after several clear coats. (Note: my kit was correct length, no issue with decal placement). Flight-wise, I am very pleased. Super-straight, stable flights. I did not make a vent hole. Staging has been flawless so far. Used traditional wadding, perfect chute deployment with zero chute burn. Used smaller chute than the 14" one that came with the kit. With the altitude this rocket achieves and its light weight, a big chute is a recipe for a far-away landing. Very positive experience with this rocket and will be very disappointed if I ever lose this one.
avatar
M.A. (September 27, 2009)
This is a great kit. It is the first 2-stage rocket I have built in 40 years. I built it stock and found it to be a very sound and tough rocket. I did not drill any vent holes and it staged without any problems. I had a little problem with the coupler and I had to cut about 3/4 inch off to make it fit flush. The finish of the tube was OK. I used CA glue to tack down the fins until I could run a fillet on them. The paper covering tore a little, but after filleting the fins with Elmer's glue they held fine. The first flight I used a C6-0 and a C6-5. The booster fired and the rocket left the pad with a little wobble. The sustainer fired and the stages separated perfectly. The second stage flew out of sight and I lost sight of it but luckily some of the others at the launch spotted it and it landed about 100 feet from the pad. The booster landed on a dirt road and cracked a fin. It was repaired on site. The parachute didn't fully inflate, but it acted as a streamer and it landed just right. I would recommend this kit for anyone that flies rockets no matter their skill level. This is a cheap and easy kit to build and it is a lot of fun to fly. I would like to see this rocket made big enough to fly on 24mm motors.

comment Post a Comment