| Manufacturer: | Quest  |
![[Picture]](/images/archive/images/ratings/rating_quest_pulsar.gif) (10/20/02) I like to try
different kinds of kits and therefore when Quest came out with their new line
of Quick-Kit™, I wanted to give one a try. I purchased the Pulsar because
of its futuristic looks. The Quick-Kit™ concept is that the rocket is
"ready to launch in 15 to 45 minutes". The Pulsar was about 20
minutes for me.
(10/20/02) I like to try
different kinds of kits and therefore when Quest came out with their new line
of Quick-Kit™, I wanted to give one a try. I purchased the Pulsar because
of its futuristic looks. The Quick-Kit™ concept is that the rocket is
"ready to launch in 15 to 45 minutes". The Pulsar was about 20
minutes for me.
The kit was packaged in a plastic box with cover art and descriptions on all but the back. Through the back you can look at the pieces of the kit. It is advertized as having self-adhesive decals, a 14" parachute, and a Quick-Kit™ plastic fin-unit. Also, that it will have flights up to 1200 feet. Lastly, it appears that all Quick-Kit™ rockets come with a display stand.
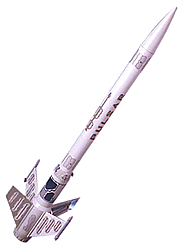 The Pulsar is 18"
tall and is advertised as 0.98" in diameter. The rocket actually
transitions twice from 1.25" to 0.98" to 0.81". This length is
made up of the plastic fin-unit, which included a Motor Lock Ring, a 2"
length of 0.98" body tube, a transition, and an 8.5" length of
0.81" body tube. Lastly, there is a 2.5" long plastic nose cone. The
rocket has plastic fins and the plastic 1/8" launch lug is built into the
fin-unit motor housing (which comes in two pieces). True to Quest's design
there is 18" length of Kevlar®
stock tether and 18" of white elastic shock cord. Recovery is by way of a
36" length by 1" wide plastic streamer. There is a note in the
instructions that says the streamer is provided instead of the parachute, which
is mentioned above, for better performance. The kit comes with a bunch of extra
plastic pieces (retro rockets, exhaust ports, boosters, etc) to customize your
kit. There is also a sheet of self-adhesive stickers and the two-piece display
stand.
The Pulsar is 18"
tall and is advertised as 0.98" in diameter. The rocket actually
transitions twice from 1.25" to 0.98" to 0.81". This length is
made up of the plastic fin-unit, which included a Motor Lock Ring, a 2"
length of 0.98" body tube, a transition, and an 8.5" length of
0.81" body tube. Lastly, there is a 2.5" long plastic nose cone. The
rocket has plastic fins and the plastic 1/8" launch lug is built into the
fin-unit motor housing (which comes in two pieces). True to Quest's design
there is 18" length of Kevlar®
stock tether and 18" of white elastic shock cord. Recovery is by way of a
36" length by 1" wide plastic streamer. There is a note in the
instructions that says the streamer is provided instead of the parachute, which
is mentioned above, for better performance. The kit comes with a bunch of extra
plastic pieces (retro rockets, exhaust ports, boosters, etc) to customize your
kit. There is also a sheet of self-adhesive stickers and the two-piece display
stand.
CONSTRUCTION:
The instructions are 4 pages of well illustrated guidance to ensure the kit is built correctly. You will need plastic cement and a hobby knife. I used Super Glue Corporation's Model/Hobby Cement to build my Pulsar. Two of the pages of instructions are basically flight preparation and launch procedures. There is also a small box for display stand assembly and for customizing your rocket with the extra plastic pieces.
 The most difficult part of building the rocket is the fin-unit and
that is not difficult. There is a paper 18mm motor tube that is placed in one
of the motor housing halves and the second motor housing half is glued to it.
The Kevlar®
stock tether is tied to a loop in the motor housing and the 18" of white
elastic shock cord is tied to the other end of the Kevlar®.
Then the short body tube is glued in place.
The most difficult part of building the rocket is the fin-unit and
that is not difficult. There is a paper 18mm motor tube that is placed in one
of the motor housing halves and the second motor housing half is glued to it.
The Kevlar®
stock tether is tied to a loop in the motor housing and the 18" of white
elastic shock cord is tied to the other end of the Kevlar®.
Then the short body tube is glued in place.
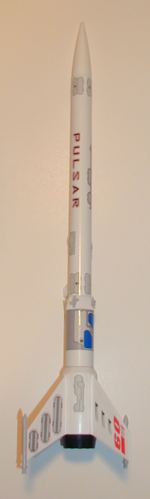
Next, the fins are attached. I for some reason installed my fins upside-down. The instructions are clear, the picture on the box is clear, but I just did it. It changes the looks of the rocket but not the performance. (compare the above picture, which is how it was supposed to be, to my pictures). After the fins are in place, a lower fin locking ring is installed. This shores up the whole fin-unit and provides the means for the motor locking ring (motor retention) to be used.
After the fins are in place, the plastic transition and upper body tube are attached. A cap is glued onto the bottom of the nose cone and the elastic shock cord is tied to the cap. The streamer is attached and the Pulsar is now ready for decals.
The rocket used white plastic and white body tubes so painting is not needed. The decals bring color and life to the kit. For customizing, the various plastic parts can be added. The cover art gives some ideas.
Done, 20 minutes.
Overall, for CONSTRUCTION I would rate this kit 5 points. The parts all fit great and it was quick and easy to build.
FLIGHT/RECOVERY:
 Quest recommends the A6-4 for first flight and then B6-4, C6-3,
and C6-5 motors for flying the Pulsar. My first flight was on an A8-3.
Quest recommends the A6-4 for first flight and then B6-4, C6-3,
and C6-5 motors for flying the Pulsar. My first flight was on an A8-3.
Rocket prep includes using wadding to protect the shock cord and streamer. The motor slides into the motor tube and the motor lock ring presses in and with a twist is locked in place.
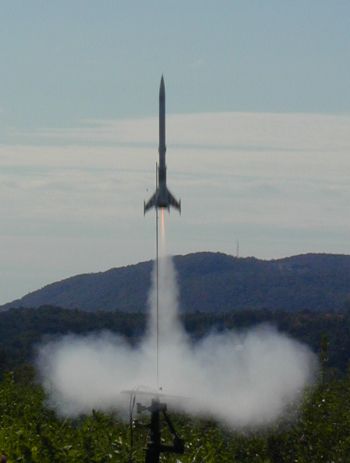
The first launch of this rocket on the A8-3 was straight, stable and fast with low altitude. Quest indicates the rocket weighs 1.8 ounces and my finished weight was 1.9 ounces so the A8-3 is a good match.
The next flight was on a B6-4 and the flight was much higher. The streamer brings the rocket down very fast, but the plastic fin-unit can take the impact (probably even better if the fins where put on correctly).
The third flight was in our front yard on another A8-3 and again it flies straight and returns quickly.
For FLIGHT/RECOVERY, I would rate this kit 5 points. With the streamer the recovery is quick. The Kevlar® and elastic system has traditionally held up nicely in my previous Quest kits. Motor retention system is excellent. Next big field will see this rocket fly on a "C" and I'm not terribly worried about loosing it with the long pink streamer which is highly visible.
I give the kit an OVERALL rating of 5 points. Based on what Quest was trying to do with their new line of Quick-Kit™ rockets, the Pulsar has met that goal. I feel the Pulsar is best looking out of their eight Quick-Kit™ models, but the others will most likely give a similar experience. I bought my kit from Discount Rocketry who has all the kits available ranging from $7.50 to $9.35. So, if you want to build up a rocket fast or have an easy rocket to have a young person build, try one of these Quick-Kit™ rockets.
 |
 |
Flights
|
|