| Construction Rating: | starstarstarstarstar_border |
| Flight Rating: | starstarstarstarstar_border |
| Overall Rating: | starstarstarstarstar_border |
| Published: | 2010-08-09 |
| Diameter: | 1.58 inches |
| Manufacturer: | Quest  |
| Skill Level: | 4 |
| Style: | Futuristic/Exotic, Glider |
 Brief:
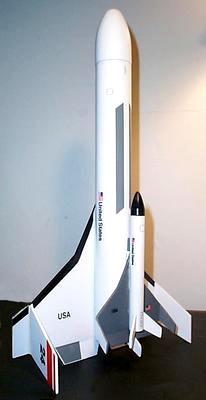
Quest's new Shuttle Intrepid is a booster glider combination. The booster is based on a T40 tube. The glider rides "piggy back" on the top of the booster. At ejection the Booster deploys a 14" parachute and the glider is released into a slowly spiraling decent.
Modifications:
Minor assembly sequence changes and a relocated launch lug.
Construction:
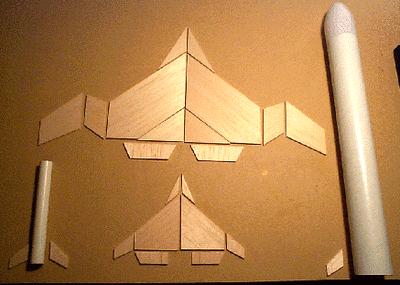
The components consist of:
- 1)motor mount clip
- 1)18mm set of motor mount parts
- 3)sheets of die-cut balsa
- 1 ea)Large and small nosecones
- 1)12" long booster body tube
- 1)4.375"long glider body tube
- 1)coupler for the small nosecone
- 1)1/8x2" launch lug
- 1)1/8x1" launch lug
- 1)1/8x1" dowel
- 1)18"length of elastic cord
- 1)18" length of Kevlar cord
- 1)14" parachute
- 1)pack of 26" shroud lines
- 1)set of tyvek gripper tabs
- 1)set of waterslide decals
 The instructions were well presented and treat the booster and glider as two separate projects.
This is a skill level 4 kit, and deservingly so. There is a lot of lumber to fill and sand. The need to trim the glider makes the kit a little more challenging, as well.
I did not deviate from the instructions except for two items.
The rear edge of the main wing on the booster shows one wing deck glued to the center of the main wing,the kit supplied two wing decks and I glued both of them in place.
I built the Booster and the Glider wings at the same time as I felt it was easier to glue and sand on one set while the other was drying.
I built the wing assemblies on wax paper and weighted them down with books as they dried
I masked off the balsa areas that were to be glued with tape and applied fill and finish.Once the sealer dried I removed the tape and sanded the surfaces smooth.
The second item I did differently was the placement of the 1" launch lug on the main tube. The instructions show a dimension of 3.125 from the rear of the lug to the rear end of the main tube. I believe this is wrong. The correct dimension should be 2.875.
I called Quest about this mistake, but I never got through to the right person. Other than this mistake, if the directions are closely followed, the kit will go together well.
Finishing:
The finishing job was a little tedious. The suggested paintscheme consists of 3 colors (White,Black,Grey).
The Finishing instructions are very detailed and give a lot of good tips for painting and decaling the model. The decals are very nice and include a lot of different colors and details. The finished model looks great! With a little time and patience you will have a sharp looking flier.
Construction Rating: 4 out of 5
Flight:
The last 2 pages of the instructions provide tips on trimming the glider and prepping the rocket for flight.
For best results the glider should be painted as lightly as possible, if at all.
I made the mistake of applying too much paint to my glider, and it suffered somewhat from the added weight of the paint.
Using the C6-3, the ejection charge was a little past apogee.
My model came out at 2.4oz without motor and performs quite well on the C6 reaching about 450ft altitude.
Good for flying on a small field.
 Recovery:
I found I didn't need to add noseweight to the glider but it came down in a somewhat steep spiral. Overall not too bad of a glide, just a little fast.
The Booster recovers on a 14" chute and just slow enough to keep damage to a minimum. The winglets are easily damaged and will not fair well on a hard surface landing. I suggest building the wings nice and strong.
Flight Rating: 4 out of 5
Summary:
I bought The Quest Shuttle for a few dollars less than an Orbital Transport typically goes for.
With the diecut balsa, Quest's Shuttle is not as challenging to build as Estes' Orbital Transport, but it still deserves the skill level 4 designation.
This kit would make a good upscale or kitbash project, as well.
Overall Rating: 4 out of 5
Other Reviews
- Quest Space Shuttle Intrepid By Bill Michaels (July 8, 2007)
Brief: Rocket releases small glider. Construction: Booster has large balsa wing-like fins with smaller fins on the wingtips. NC is plastic. Shock cord is the typical Quest Kevlar ® string attached to the motor mount that transitions to an elastic cord. A 14 inch parachute is used. Laser cutting on the fins is excellent. The parts are precisely cut and fit well. ...
 |
 |
Flights
|
|
C.E.D. (July 10, 2004)
|
|
J.T.L. (April 2, 2004)