| Construction Rating: | starstarstarstarstar |
| Flight Rating: | starstarstarstarstar |
| Overall Rating: | starstarstarstarstar |
| Diameter: | 1.38 inches |
| Length: | 33.00 inches |
| Manufacturer: | Quest  |
| Skill Level: | 1 |
| Style: | Sport |
Brief:
The Triton-X is one of ten kits Quest Aerospace (currently) has in their line
of Quest Quick-Kits, models that do not require painting or finishing beyond
the application of decals and can often be completed in 15 to 45 minutes. The
Quick-Kits are the perfect solution to the "fears" of first timers.
These kits are designed to be "goof-proof." The molded fins slide
right into the base for perfect alignment. Big, easy to understand
illustrations will guide the model builder through a quick assembly--right onto
the launch pad.
The Triton-X featured for this product review belongs to my son, Davey, who is now nine years old. He won this kit as a door prize at the last NASA Houston Rocket Club (Section # 365) BBQ Party and club launch on May 15, 2005.
Construction:
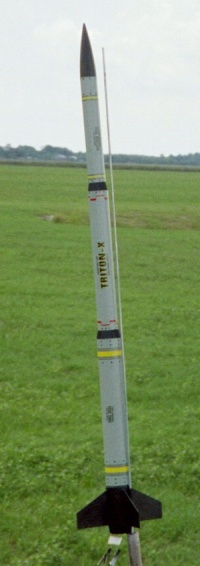
The Triton-X consists of the following parts:
- Plastic nose cone
- Small payload tube
- Small reducer
- Reducer base
- Large payload tube
- Large reducer
- Body tube
- Motor housing
- 4 Fins
- Gray motor mount tube
- Fin locking ring
- Motor lock ring
- White (elastic) shock cord
- Yellow (Kevlar®) shock cord
- 2 26" long shroud lines
- 2 Gripper tabs
- 2 14" parachutes
- Display stand
- Decal sheet (self-adhesive)
- Custom parts
All of the plastic parts are molded in black and the body tubes are glossy gray. This model requires no painting whatsoever. The custom parts that are included (but optional) are all red. The custom parts includes: RCS nozzles, hatches, flares, sensors, antennas, radar pods, exhausts, and fin tips that can be added to the Triton-X at the modeler's descretion.
The Triton-X instructions are very well illustrated and easy to follow. There's no way anyone can go wrong building this model. The only tools needed for construction are a hobby knife and tube type plastic cement.
There are seven steps in all. Steps one through four are the actual assembly of the model, steps five and six concern the recovery system, and step seven the application of the decals.
The only change I made on Davey's rocket is on step four, where I went ahead and glued the nosecone to the payload tube, as we were not really intending on launching any payloads on this model. And we made the decision to recover the Triton-X on only one parachute instead of two. The instructions have the model returning with the payload section separately from the main body section. We didn't want to have to look out for and chase after a rather small payload section on a 14" chute along with a much larger main body section also on a 14" chute.
Finishing:
Finishing the Triton-X is a given. Anyone who takes the time to do a careful
job will come out with a very handsome looking rocket. The only minor issue I
had is the self-adhesive decals. After a short period of time, some of the
edges tend to unpeel from the model's surface, which is why I prefer the water
slide decals. If the edges unpeel, simply press them back down and that should
pretty much do the trick.
Construction Rating: 5 out of 5
Flight:
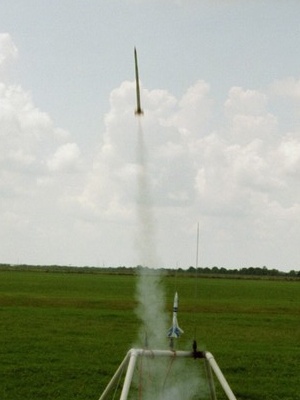
The recommended motors are: B6-2, B6-4, C6-3 and C6-5. For our first and only
flight so far, we used the C6-5. Since the Triton-X has quite a bit of plastic
parts, it's already a fairly heavy model so using a C6 on its first flight in a
rather large launch site should be a no brainer.
About four or five squares of recovery wadding, packed loosely, followed by a carefully folded parachute (dusted) inserted into the main body section. Just make sure the base of the small reducer isn't too tight, but sand as needed if it is.
Install the motor selected into the motor mount tube and use the motor lock ring to secure the motor in place. Install the igniter designed for the motor selected and your Triton-X is ready to go.
We flew this model at the Challenger 498 club launch at Rushing Park, Katy, TX on July 23, 2005. The C6-5 took it up to a repectable altitude that kept it in sight fairly easily. Model flew very straight.
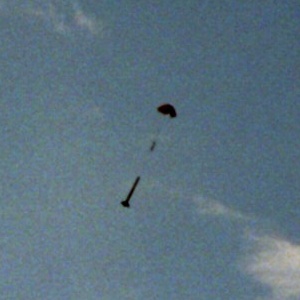
Recovery:
The shock cord using the Kevlar®/elastic
combination seems to work very well for these Quick-Kits by Quest (we also have
the Mirage). Since we decided to forego using the dual parachute combination as
instructed by the kit, we used an 18" single chute for this flight. We
simply attached the shock cord to the base of the small reducer so the entire
model will return as one piece. The 18" parachute we used had a small snap
swivel for ease of interchangability.
For the day of this launch, there was absolutely no wind, so we had no issues regarding drift for recovery of the Triton-X. In fact, the model landed only about 50 feet upwind from the launch pads. The model's drift under the single 18" chute was about what is expected for a model of this size, and there was no damage visible after recovery.
Flight Rating: 5 out of 5
Summary:
Everything about this kit is superb. It's perfect for what it was designed for:
A first time model rocketeer who has fears of building a traditional model
rocket with balsa parts and white glue and doesn't have the desire and hassles
of painting a model. I can't think of any cons for this kit.
Overall Rating: 5 out of 5
Other Reviews
- Quest Triton-X (QK) By John Lee (February 9, 2008)
Brief: Almost ready to Fly, twin parachute, missile-esque 4FNC. After working on some projects that are taking a bit of time, I decided I wanted some quick gratification and pulled this rocket out of my "build bin". It went together quickly and gave me an excuse to try the Future acrylic tip I had read about. Besides, I kind of like the picture on the package. ...
 |
 |
Flights
|
|
D.W.M. (August 14, 2006)
|
|
P.D. (July 25, 2006)