Red River Rocketry Starliner DST
Red River Rocketry - Starliner DST (K-005)
Contributed by Bill Eichelberger
| Construction Rating: | starstarstarstarstar_border |
| Flight Rating: | starstarstarstarstar_border |
| Overall Rating: | starstarstarstarstar_border |
| Diameter: | 0.98 inches |
| Length: | 15.00 inches |
| Manufacturer: | Red River Rocketry  |
| Skill Level: | 2 |
| Style: | Futuristic/Exotic |
Brief:
The Starliner DST is an interesting looking futuristic passenger liner design
that employs a fairly unique method of achieving stability using a tail
cone/shroud and fins. The result is a profile unlike anything else that you
might see at the pads and the finished bird makes for a truly sharp looking
addition to any low-power fleet.

Construction:
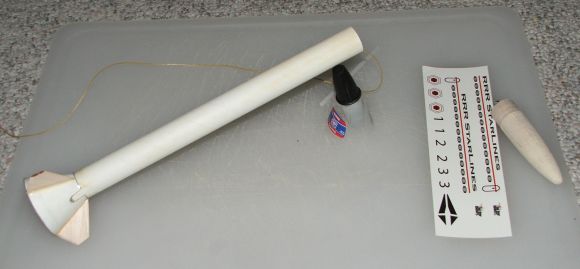
The kit includes:
- BT-50 Main body tube
- Balsa nose cone
- Laser cut balsa fin stock
- Cardstock shroud
- Shroud brace (centering ring)
- 18mm engine mount
- Sewing elastic shock cord
- Mylar parachute kit
- Small screw eye
- 36" Kevlar® shock cord mount
The kit includes a nicely printed set of instructions that are well-detailed and easy to follow. There was nothing resembling a gotcha anywhere in the construction process. In fact, I was amazed at how quickly the build progressed once I got started. I've had trouble with cardstock shrouds in the past, so I copied the pattern before I cut this one out. (As it turned out, this was a precaution that I could have skipped, but it's one I'd still recommend just in case.) I carefully cut the shroud out, leaving the small cut-out for the launch lug in place for the time being, then began curling it by slowly pulling it out from under the edge of a steel ruler. As with any shroud, the curl won't be perfect, but it will allow the edges to be glued together with less chance of creasing. Once the shroud has the curl you want, then cut out the paper where the lug fits through. After this was taken care of, I smeared the flap with LocTite Gel CA and, after carefully lining up the edges, held it until it was obvious that the two ends were going to stay together. This part was set aside while I sealed and sanded the spirals in the body tube, which I've found is much easier than doing it after everything is together. I assembled and glued in the engine mount, but used a long piece of Kevlar® tied around the engine mount to anchor the shock cord. The elastic seemed short by itself and I've long since given up on the old tri-fold shock cord mount. The Kevlar® would give me a lot more room to work with when the probable shotgun ejection charges fired. I did use the elastic supplied in the kit.
The shroud was installed next, along with the centering ring that slipped over the body tube and acted as a support for the cardstock shroud. Care must be taken to line up the cut-outs in the shroud and the support ring as this is where the launch lug will be installed.
Finishing:
I love finishing a rocket like the Starliner DST. After killing off the tube
spirals and balsa grain with thinned Elmer's Fill 'n' Finish and stiffening up
the shroud with a generous coating of thin CA, I sprayed the completed rocket
with Valspar primer and sanded away any imperfections that this brought to
light. When I was satisfied with the finish, I sprayed the whole rocket with
two light coats and a heavier finishing coat of Valspar gloss white. At this
point the only thing left is the decals, but I didn't have time to do them
before the first flight. When the time came to apply them, I was very impressed
with how easy they were to work with. I first sprayed them with a protective
coat of mystery clear (no label and no idea of how long I've had it), then
followed the standard procedure of warm water and a drop of dishwashing liquid
to apply them. Like I said, they were great to work with, applied easily, and
really make the rocket. The difference is amazing.
Construction Rating: 4 out of 5
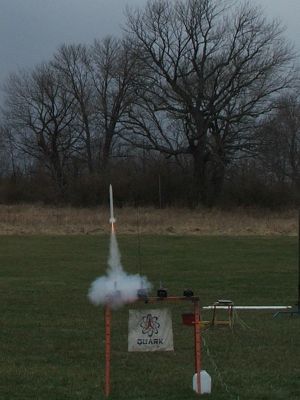
Flight:
I chose to go with the three recommended motors, the A8-3, B6-4, and C6-5, for
the first three flights of this rocket. It was a breezy, cold day with
occasional gusts that reached 10mph but a decent launch day for Cincinnati in
March. I started at the bottom and chose the A8-3 for the first flight. Though
understandably not much on altitude, this flight was perfectly stable and
ejected just as the rocket lost its upward motion. The mylar chute filled
immediately and the rocket drifted gently back to within a few hundred feet of
the pad. All in all, it was a perfect first flight and it looked great doing
it.
The second flight, this time on a B6-4, was an obvious improvement in altitude while still not overflying a smaller field. Ejection was again perfectly timed, but this time the Mylar chute didn't unfurl and the rocket dropped rapidly, landing hard on the gravel next to the cursed access road. I checked the shroud, thinking that it would be the most likely part to be damaged, but it looked fine, no doubt because of the heavy coat of thin CA it received before the final finishing. At the time I didn't notice that the body tube itself had crimped slightly in several places on the spiral. The damage wasn't fatal, but served to further my dislike for Mylar parachutes.
The third flight, a C6-5 flight, was the one I was looking forward to most. Having already managed a decent launch shot, I relaxed and prepared to just enjoy the flight for what it was: a cool little rocket on a big motor. (Big being a relative term here.) Instead of the stable, high flight I was expecting, the rocket began chasing its tail as soon as it cleared the rod. It made several loops before crashing to the ground under power, then ejected itself into a mud puddle. I rescued it and cleaned it off for inclusion in my B6-4 and under fleet.
Flight Rating: 4 out of 5
Summary:
This is a great looking kit and Red River is addressing the issue of the
questionable stability on a C6-5. John Dyer contacted me and asked if I'd build
another Starliner with a lengthened body tube, a project that I'll be sure to
review also. The only other issue I have with the kit is the recovery system. I
don't like Mylar chutes and I'm not comfortable using the old Estes style shock
cord mount and short elastic cord anymore. Today's ejection charges have too
much kick for this kind of system.
PROs: Cool styling and great looks. Decals were great looking and easy to work with. Overall ease of the build.
CONs: Recovery system. Questionable stability on the C6-5.
Overall Rating: 4 out of 5
 |
 |
Flights
|
|
|
|
J.A.D. (April 24, 2006)