| Construction Rating: | starstarstarstarstar |
| Flight Rating: | starstarstarstarstar |
| Overall Rating: | starstarstarstarstar |
| Diameter: | 1.33 inches |
| Length: | 42.00 inches |
| Manufacturer: | Red River Rocketry  |
| Skill Level: | 2 |
| Style: | Sport |
 Brief:
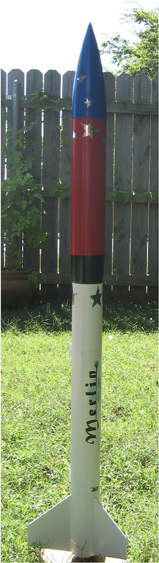
John provided me with the kit to do a beta test. Woohoo! This is a fantastic rocket that includes a large payload
section and a baffle to reduce the need for recovery wadding. It flies on 29mm motors and recovers by parachute. The
rocket is 42 inches tall and has a payload diameter of 2.56 inches with a 2.25-inch booster. This is a great rocket for
transition into mid-power rockets and the payload gives you the option of easily adding electronics, heavy-duty body
tubes and basswood fins make it a sweet option for a Level 1 certification project.
Construction:
The parts are high quality and are all laser cut making for a relatively easy build. Instructions are numbered and
easy to follow. The BNC-80 balsa nose cone is very nice and required very little finishing effort. The booster and
payload tubes are also heavy duty, joined by a hefty balsa reducer. An eye screw is epoxied into the rear of the
reducer for attachment of the parachute and shock cord, leaving a nice payload area in the 9-inch upper tube that is
glued onto the larger end of the reducer.
The rear tube is slotted to accept the through-the-wall laser-cut basswood fins that are designed to fit into a channeled motor mount. The motor mount is fantastic! The centering rings are laser cut lite-ply and come with slats that connect from one ring to the next to form a channel for the fins. Once the basswood fins are epoxied into the channels you have one really strong fin/tube/motor mount joint. My fins fit a little loosely in the slots after sanding, so I installed them one at a time. It’s probably a good idea to put some masking tape over the tabs to keep from sanding away the fit! The kit also includes an internal baffle that really works!
The two centering rings for the baffle are also laser cut to fit the two baffle tubes perfectly. The two baffle tubes are glued together, side by side and offset by 1/2” and then glued into the centering rings. It’s important to position the tubes into the centering rings before gluing so that the whole unit is symmetrical and will roll easily on a table. If not, the centering rings will not flush up against the body tube. A length of Kevlar® is included that is slipped through a hole in the forward centering ring, with a knot then tied and epoxy applied to keep it in place. Tie a loop in the end of the Kevlar® to attach the 1/4” elastic shock cord. With the long motor tube and the size of the baffle, not much room is left for the parachute and shock cord. The instructions indicate to epoxy the baffle about 6 to 7 inches from the top of the tube. I used yellow glue and installed the baffle at the 7-inch mark, but it might be better to glue it in at 6 inches - more on that in the flight discussion. About the only shortcoming for the rocket is that there isn’t anything provided for positive motor retention. The motor must be friction fit to keep it from spitting at ejection.
Two 1/4” launch lugs are glued to balsa standoffs; with trim monokote and water slide decals provided for decoration and a big high quality 24” ripstop nylon parachute for recovery. The parachute was already assembled and had small grommets to which the shroud lines were tied; it’s a very nice parachute. After the launch lugs are installed, you’re ready for finishing.
Finishing:
I used Elmer’s Light Fill ‘n Finish®
to fill the body tube seam lines and for the nose cone. Minimal effort was involved in this step, as the seam lines
were easily covered and the nose cone was very smooth. Only a light coat of filler was used on the fins, as well, as
the basswood was very smooth after sanding with 400-grit sandpaper. I sprayed the entire model with a light coat of
Kilz™
to seal off the glue and provide a solid base coat. Next, I lightly sanded the entire model with 240-grit sandpaper and
then sprayed on a coat of primer. Next, sand and primer, and sand again with 400-grit sandpaper. I painted the model
following the four-color red, white, black and blue as shown on the awesome cover art and applied the monokote and
decals after the paint dried for a couple of days. I tore the big water slide decal in about four places trying to put
it on and finally removed it; John later provided me with a replacement peel and stick test version later. I decided to
vary from the package art and cut the trim monokote into stars that I attached where the stripes were indicated and
also put a few on the nose cone. I thought they transitioned from the Merlin decal much nicer, but it certainly was a
lot of work!
Construction Rating: 5 out of 5
Flight:
Its maiden flight was at NARAM-50. The model is rated for F and G motors but John suggested a L1 certification
attempt using an Aerotech H128. Jack Sprague, one of my fellow DARS members that had also come to the event, ran the
specs through RockSim. That indicated it would get about 3,500 feet with 6 ounces of nose weight, if I remember
correctly; the waiver on the field was 4,000 feet so we were trying to stay under that. A rolled up T-shirt was just
about the right nose weight, so I loaded that into the payload bay. I just happened to have the Aerotech 29-180 casing
with me but no end closures; however, Jay Calvert of Impulse Buys was on the field and had both closures and the motor.
So, it was off to the pads with fingers crossed. The up part was fantastic! The rocket zoomed straight up to about the
expected altitude but then separated at apogee with the top section under chute landing in some electric wires and the
lower section fluttering down separately. The lower section landed in some soft grass and sustained no damage. Also,
the upper section, hanging in the wires with the baffle wrapped around them was recovered a couple of days later with
minimal damage – just a couple dings in the nose cone and a few slight scratches from the recovery effort. Note:
recovery was by a professional crew; don’t attempt to recover rockets from electrical wires without proper
training and tools. The failure was probably my fault for not following instructions. Remember I said I used yellow
glue rather than epoxy to install the baffle. Well, I also soaked the sides of the centering rings in CA, not epoxy.
Post-flight inspection revealed that the ejection charge crystallized the CA and almost burned through one corner of
the baffle’s centering ring. The baffle tube closest to that buckled, breaking the upper centering ring away from
the body. I haven’t run the calculations, but the compression behind the baffle may have also contributed to the
failure; so when I install the replacement baffle, WITH EPOXY, I will glue it in at the 6-inch installation point for
an extra inch of space behind the baffle. Once that’s done, Merlin will be ready to fly again.
Flight Rating: 5 out of 5
Summary:
Overall, the Merlin is a fantastic rocket. The engineering that has gone into the kit assures that it will last for a
long time. It is very sturdy, and is impressive on the launch pad and in flight. I love the fact that I don’t have
to use recovery wadding, too. Just put in a motor and go!
Overall Rating: 5 out of 5
 |
 |
Flights
|
|