Red River Rocketry Redstar
Red River Rocketry - Redstar {Kit} (K-016)
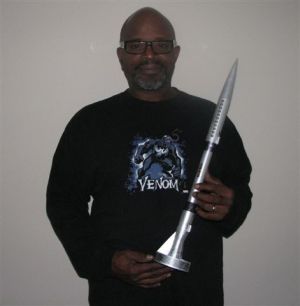
Contributed by Jewel B. Butler Jr.
| Construction Rating: | starstarstarstar_borderstar_border |
| Flight Rating: | starstarstarstar_borderstar_border |
| Overall Rating: | starstarstarstar_borderstar_border |
| Diameter: | 1.33 inches |
| Length: | 24.50 inches |
| Manufacturer: | Red River Rocketry  |
| Skill Level: | 2 |
| Style: | Futuristic/Exotic |
Brief:
This is another beautiful ring fin rocket designed by Red River Rocketry. I had to have it. It is a single stage ring
fin with a few transitions to add a lot of style to the rocket. I also used a pink parachute in honor of Breast Cancer
Awareness Month. I also think this kit is a skill level three for an experienced rocketeer.
Construction:
The parts list:
- 1 BNC55-ACP nose cone
- 1 BT50-14
- 1 BT55-2
- 1 BT55-5
- 1 BT101-1
- 1 laser cut fin sheet
- 1 20-50 motor mount kit
- 1 PK-12 parachute kit(I did not use this I made my own chute)
- 1 LL1 launch lug(used a 3/16 Launch lug)
- 8 CR-55 centerings rings
- 1 screw eye (did not use the one in the kit--I used the #206 at Home Depot. It is a 1/4 inch, adds a little nose weight for more stability, and cut down on float aways.)
- 10" Kevlar® cord
- 1 SC-148 elastic shock cord (did not use--I used a 3ft piece of pink cord instead)
- 2 Redstar decal sheets
- 1 Instruction sheet
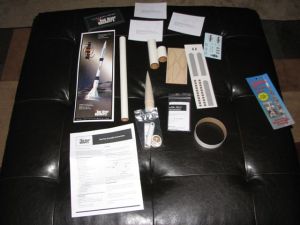
I ordered my kit directly from Red River Rocketry and received it in three days with no bent tubes. Read the instructions twice as the shrouds are tricky since you get to make four. Start with the fins by getting them ready to attach but wait till you CA the shrouds on. Then the motor mount, which I attached the Kevlar® to, I did not like where they put it. Then you mark the main body tube for the shrouds and centerings. Be very careful when you cut out your shrouds stay outside the black line or use these dimensions: 0.990" for the small end, 1.328" for the big end, and 1 inch long in the shroud maker program with cardstock and you should be OK. The BT-55 body tubes slide over the centering rings real nice. After I connected the shrouds and tubes I attached the pink nylon cord to the Kevlar® and the nose cone.
Finishing:
I CA'ed the shrouds this adds stiffness to the paper. Now I attach the fins you must bring them down as far as
possible to make sure the BT-101 fits. Mine didn't so I had to take out a 1/2 inch piece and re-glue. After which I
wood and water puttied the small sections of tube that had seams. I sanded with 320 grit sandpaper. I painted it Krylon
silver and used a black magic marker for the black sections. I had a good time applying the decals as long as they
weren't too small. The peel and stick decals were a breeze.
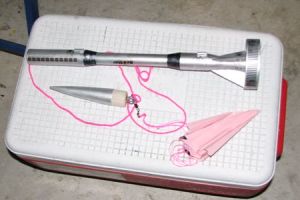

Construction Rating: 3 out of 5
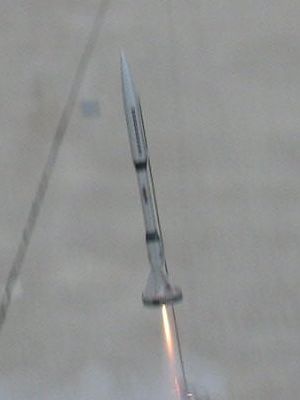
Flight:
First two flights were on B6-4s. The last flight was on a C6-7. It prepped easy and I used dog barf for wadding. All
flights were straight and true. This is a really nice rocket.
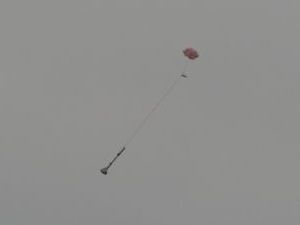
Recovery:
I used the Kevlar®
to nylon cord and made a pink plastic bag from the Breast Cancer Awareness Walk into a 12 inch chute.
Flight Rating: 3 out of 5
Summary:
I love ring fins and tubefins. I made the changes to this rocket because I build that way. The only thing that you
need to be wary of is how you cut those shrouds. I might by another one to make it 24mm, but I'd need to add some nose
weight if I do.
Overall Rating: 3 out of 5
Other Reviews
- Red River Rocketry Redstar By Chan Stevens (October 27, 2009)
Brief: This is slick looking futuristic design featuring a large tail ring and lots of transitions, resulting in something a far cry from the ordinary. Construction: Parts were good quality, and working from nose to tail include the following: Balsa nose cone BT-55 upper body tube BT-50 main body tube BT-55 lower body tube BT-101 ring fin Laser-cut balsa ...
 |
 |
Flights
|
|