| Construction Rating: | starstarstarstarstar |
| Flight Rating: | starstarstarstarstar_border |
| Overall Rating: | starstarstarstarstar_border |
| Manufacturer: | Red River Rocketry  |

Brief:
The SlipStream from Red River Rocketry is a nice 3FNC rocket. I like the look of it, and it was an enjoyable build. This was my first low power rocket in a while, and it was nice to build something small and simple again.
The SlipStream would be a good first rocket and makes for nice flights at the local soccer field or park. Reaching almost 800' on an Estes C6, or only 150' on an A8, this rocket can fly to suit the recovery capabilities of a variety of launch sites.
Construction:
The kit included:
- One 1.325" Body Tube
- One 1.325" Balsa Nose Cone
- Three Laser-Cut 3/32" Balsa Fins
- One Piece of Kevlar and One Piece of Elastic (recovery harness)
- The Makings of One 12" Mylar Parachute
- One 18mm Engine Mount Kit
- One Screw-Eye
- One Washer (nose weight)
- One Sheet of Water-Slide Decals
The kit came with a set of well written, easy-to-follow instructions. If you have built several rockets before, you really wouldn't need the instructions for most of the build. There are, however, some steps that differ slightly from traditional construction so one should read them over first. The instructions included black and white illustrations.
One of my favorite features of this rocket was the solid balsa nose cone. I know that some people don't like these, but I like how they can be made glass-smooth just with a coat of wood filler. I also like how solid they feel compared to hollow plastic.
Construction begins with the traditional MMT-a-la-Estes routine...almost. The SlipStream deviates from this by having you install the Kevlar part of the shock cord by tying it around the motor tube and running it through a notch cut in the forward centering ring. I elected to leave out the engine hook. I've come to like masking tape retention and the hook would have prevented the completed rocket from being able to sit upright.
Next were the fins. After removing them from the laser-cut sheet and rounding off the leading and trailing edges, I applied a coat of thinned wood filler and let them dry overnight before sanding them to a smooth finish. The nose cone also got a coat of filler and a good sanding.
After installing the engine mount, I glued on the fins with wood glue and applied wood glue fillets once they dried.
Next was the nose weight and screw eye for the nose cone. One noteworthy detail is that you must attach the washer first as it will not fit over the screw eye.
My rocket came out at two ounces even.
Finishing: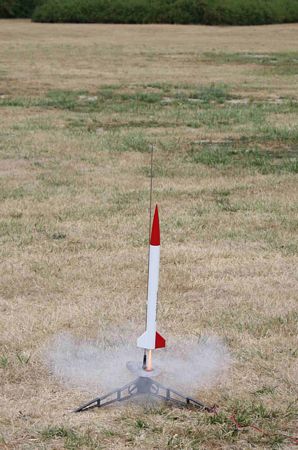
All of the wood parts got a coat of wood filler and a good sanding (as explained in the build section). The body tube had the smallest spirals I had ever seen. They were so tight that I couldn't have filled them if I had tried. A couple coats of primer and the tube was perfectly smooth.
I painted the nose cone while the rest of the rocket was being assembled. First was three thick coats of Rustoleum primer, followed by a 220 grit sanding, followed by a 400 grit sanding. Next was two coats of Rustoleum red to finish it off.
Once fully assembled, the body tube got three coats of the same primer. After that, one fin was masked off and the airframe was painted Rustoleum gloss white. Then the masking was reversed and the unpainted fin was painted red.
The decals on this kit were of good quality. Unfortunately I managed to mess one up. Luckily the one I accidentally ripped was one the design could still look good without, so I called it finished.
While attaching the nose cone to the rest of the rocket after all the painting was done, I managed to drop it and break off the tip and put a small dent in the side. A new tip was made from wood filler, and the dent was left unfixed.
Construction Rating: 5 out of 5
Flight:
The SlipStream's first flight occurred on what appeared to be a nearly windless day from my house. Once I got to my local park, however, it was a different story.
The wind had picked up to a brisk 10mph or so. RockSim predicted that an A8 would get it to about 240'. I also had some 1/2A-6 engines (not recommended by the manufacturer) that would boost the rocket to 70' according to a flawed RockSim file from Apogee Components. My weight-corrected simulations, which I forgot to look at for this motor, only predicted 34'. I didn't see this until after I wrote my flight log for this flight so please excuse my error.
Even in the brisk wind, I was determined to launch it. I went with a 1/2A-6 and waited for a break in the wind to launch. Upon ignition, the SlipStream flew to 15-20 feet. The 2 second delay on the 1/2A-6 fired the ejection charge a mere 7' off the ground. The parachute inflated surprising quickly and the rocket recovered without damage.
The next two flights occurred later that day after the winds had died down. The second flight of the SlipStream was on an A8-3. It flew very straight to what looked like the RockSim estimated 120'. The chute deployed just after apogee and the rocket recovered safely.
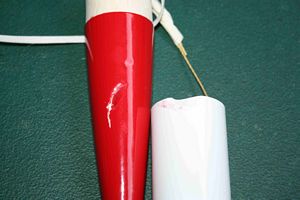
The third flight was on a B4-4. This also isn't a recommended motor, but it worked quite well. It boosted the SlipStream to a RockSim estimated 320'. This particular motor had a strong ejection charge. The nose cone blew off so hard that the elastic snapped it back into the top of the body tube. This dented the tube and severely dented the nose cone. Both are easily repairable and the rocket will definitely fly again.
 Recovery:
On the first flight, I was impressed by how quickly the 12" Mylar chute inflated and how quickly it slowed down the rocket. I did not, however, get to see if the chute was letting the rocket down too slow.
On the other two flights, the 12" chute performed well and brought the SlipStream down safely. My only complaint for recovery was the shock cord being both made of elastic and a little on the short side. I would advise anyone else wanting to build a SlipStream to either use a longer piece of elastic or use a long piece of Kevlar for the shock cord.
Flight Rating: 4 out of 5
Summary:
The SlipStream is a great rocket. It's easy to build and has very high quality components. All of my flights were perfectly straight with only a very slow spin. After seeing what it did on A and B engines, I can't wait to fly it on a C6. I feel I must remove a half point for the shock cord, but other then that I'm very satisfied with this rocket.
Overall Rating: 4 out of 5
Other Reviews
- Red River Rocketry SlipStream By James Gartrell (July 5, 2008)
Brief: I was provided with my SlipStream for beta testing. It is reminiscent of the Cherokee-D, only shorter and with different fins. Oh, and it uses 18mm motors, not 24mm. Uh, maybe it really isn't that similar! Well, the nose cone and body diameter is the same. It is a BT-55 based rocket complete with a nice sheet of waterslide decals, balsa nose cone and flies on 18mm motors. The ...
 |
 |
Flights
|
|