Estes Orbital Transport
Estes - Orbital Transport {Kit} (1242, 1259, K-42) [1969-1985]
Contributed by Jason Vennard
| Construction Rating: | starstarstarstar_borderstar_border |
| Flight Rating: | starstarstarstarstar_border |
| Overall Rating: | starstarstarstar_borderstar_border |
| Diameter: | 0.98 inches |
| Length: | 23.00 inches |
| Manufacturer: | Estes  |
| Skill Level: | 4 |
| Style: | Futuristic/Exotic, Glider |
Brief:
This is a limited-edition re-release of the Orbital Transport, new for 2002. Single 18mm motor booster with a single glider that sits piggy back on the main rocket, and is released at apogee. Skill Level 4 kit.

Construction:
There is a large number of parts to this kit. Two body tubes, one for the booster and one for the glider, likewise two nose cones. three sheets of uncut balsa for fin material, Estes-style motor hook, launch lug material, small wooden dowel, elastic shock cord, water slide decals, and an unassembled parachute.
 Having built over 40 Estes kits in the last year, I was very disappointed with this kit. May very well be just a fluke that got by quality control, but I'll describe what I ran in to.
Construction is in-depth but not really hard, you just have to take your time and do one step at a time. There are 21 steps in the assembly instructions. They are typical Estes instructions, very well illustrated and simple enough to understand.
You begin with assembling the motor mount as is custom with Estes. Next you move on to forward wing assembly. The motor mount is then installed into the booster tube, the tube marked, and wings and fins are then applied.
The kit comes with fin templates that need to be cut out, then traced onto the balsa fin material, then cut out. The instructions have you cut out fins as needed, I deviated and cut them all out at once. I also labeled with a pencil each fin it's appropriate number so that they would be easier to distinguish later in the instructions. You end up cutting out if my count is correct 32 fins/parts from the balsa sheets.
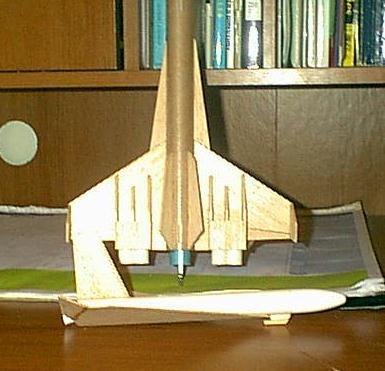 After all fins are attached to the booster you move on to construction of the glider. If you've done something like the ARV Condor you will find this glider fairly simple to construct. Instructions are thorough and then include testing and trimming out the glider.
Booster recovery is the typical Estes trifold mount to the inside of the body tube. I deviated from this with a quest style mount with Kevlar® shock cord, attaching it around the motor tube below the upper centering ring, and running it out the top of the tube where regular elastic shock cord was attached.
Cons: The booster body tube I received did not seem to be wound correctly. Several places on the tube had edges at the spirals where it seemed to be wound very poorly. I've never run into a body tube that was this bad. There are two green adapter rings, cardboard, for the motor mount. Motor tube is inserted into these and then these are glued into the body tube. Both of mine were again of very poor quality, and needed excessive sanding to get the motor tube to fit, and then they fit the body tube poorly also.
Pros: This is a pretty extensive kit if you like building, that's a big plus. Directions were exceptional and in a logical order. A neatly designed kit that could also be bashed into several other variations.
Construction I would rate at a 3.5
Finishing:
Finishing should have been fairly simple. Rocket is primed, and then the entire bird is painted white.
Knowing there was no way I was going to get rid of the ridges from the badly wound tube, I just opted with three coats of Krylon white primer, sanding after the 2nd and 3rd coat. Then three coats of Krylon semi-gloss white were applied.
The inside of the orbiter's nozzle, and inside of the scramjet tubes are to be painted black. I used a paint pen to accomplish this. This paint scheme is very simple to accomplish, and the decals come in to give it an exceptional look. If they work right.
My decals were horrible. These are water slide decals that are to be cut out, then placed into warm water for 30 seconds, then applied to the rocket.
I would hold the decals in the water 30 seconds, lift them out of the water and as they cleared the water they would tear from their own weight, and curl under/over and every other way. Once applied to the rocket I could get no movement at all, which is what the directions imply, however blotting them dry they would tear and flake off.
I've used water slide decals before and never had such a problem. Again I don't know if this was just another fluke that got by quality control or what? If so though, that's three flukes inside of one kit.
Finishing I would rate at a 2.5
Construction Rating: 3 out of 5
Flight:
The maiden flight was finally made 8-4-03. The first flight was on a B6-4 and had a nice slow lift-off and low level flight, hefty ejection charge but everything held together fine and glider came down smoothly.
The second flight was on a C6-5 and we had a really nice flight, good, straight boost and decent altitude, ejection was a little late but not bad and the glider again came down nicely. The 12" plastic 'chute seemed to be adequate to bring down the rest.
The final flight was on a C6-3, another nice boost and flight but seemed to be a delay blow-by with a very early ejection. The 'chute tangled but no damage was suffered. Overall flight rating is 4.5, a pleasant surprise as I didn't think it would fly that well.
Flight Rating: 4 out of 5
Summary:
This rocket has a great look that attracted me to it, however it was very frustrating when the decals were nearly impossible to work with.
The parts problems I could work around, but the decals make the kit's appearance. After completion it looks ok, but knowing where the tears are and the two completely missing decals are drives me crazy (they disintegrated in the water)!
Overall Rating: 3 out of 5
 |
 |
Flights
|
|