| Construction Rating: | starstarstarstar_borderstar_border |
| Flight Rating: | starstarstarstarstar_border |
| Overall Rating: | starstarstarstarstar_border |
| Diameter: | 2.60 inches |
| Manufacturer: | The Launch Pad  |
| Skill Level: | 3 |
| Style: | Scale |
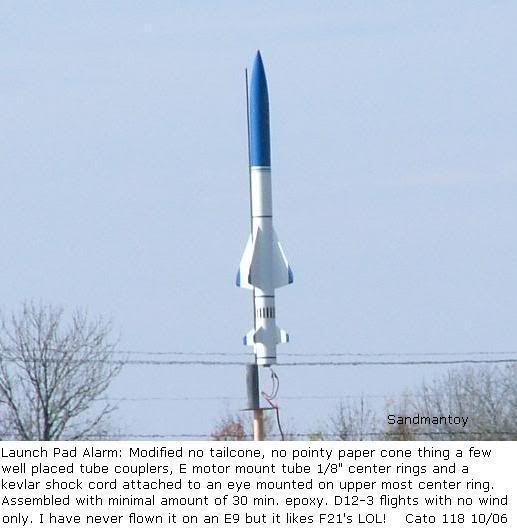
![[Alarm Pic]](images/archive/images2/rp_lp_alarm.jpg) The Launch Pad, a company specializing in military-style rockets and missiles, created this ‘scale’ kit of the Air Launched Anti-Radiation Missile (ALARM). The real ALARM is manufactured in Great Britain.
The Launch Pad, a company specializing in military-style rockets and missiles, created this ‘scale’ kit of the Air Launched Anti-Radiation Missile (ALARM). The real ALARM is manufactured in Great Britain.
Digging into the components, the 2.6" body tubes and plastic nose cone are Estes strength (might actually be Estes parts). There seems to be some complaints about the balsa in LP kits, and this one was no exception. The included balsa was softer than I’d select for my personal use. A couple of impressions on the rest of the parts; the 18" copper-colored mylar chute is pretty cool, the provided shock cord (1/4" elastic) is too short, and there are no decals for this kit. All of it is pretty standard Estes type stuff.
The instructions are very good, but basic. Listed as a level 3 kit, many things are assumed, such as putting the launch lug in the right place and knowing what a cruciform is when laying out the fins. What this means is that you are free to use your own techniques as you go. You do get fin and transition templates.
When looking at the fin template, we thought we’d discovered a problem. LP marks the root edge of the fin on the template, and I thought it was a ‘grain direction’ mark. This would’ve made for extremely weak fins, but the instructions do specifically state "grain parallel to the leading edge". The problem was me misinterpreting the mark on the template.
After cutting out the fins, you soak them in thin CA for strength, and the finished product is tougher than I expected.
The ALARM features a boat tail and a cone over the tip of the nose cone (to change the profile). Both use heavy paper painted with CA to strengthen them. Don’t rush things here, be prepared for several rounds of filler and sanding, and the results will be much better. I also made some practice templates on a copier, to get a feel for how the curves would form.
The 24mm motor mount is recessed into the boat tail a bit, so we painted the inside of the boat tail with CA for durability. Motor retention is by a supplied motor hook.
You’ll need to make your own fin alignment wrap (I used VCP). With eight fins (two sets of four) alignment gets tricky, but getting them straight up and down is probably more important than being perfectly in-line. I replaced the supplied shock cord with a piece about 3 times the body length. I also cut the supplied 3/8" launch lug in half and glued a piece into the root fin of each set – upper and lower.
Finishing is simple. Fill, prime, sand and paint. The ALARM is red with a few ½" black stripes. We were going to use pinstriping tape from the local auto-parts store, but I couldn’t find any wide enough. What I eventually did was print the stripes onto blank decal paper and apply them like any regular decals. The final touch was a few light mistings of clear-coat to protect the decals.
The finished rocket looks very good, and seems to be stronger than I thought it would be.
The recommended motors are D12-3, E15-4, E30-7 (all single use 24mm), and the F25-7 RMS. For it’s first flight, we used an E15-4. The boost was a little squirrely, leaving a smoke trail that looked like a sidewinder tracking a moving plane. It straightened out nicely and the chute ejected fine. There was no damage upon recovery. I’m going to add some nose weight to try and straighten out that boost, this might also mean I’ll have to increase the chute size.
Construction: 3 out of 5 - Careful construction rewards the builder.
Flight/Recovery: 4 out of 5 - This is an exciting rocket that delivers.
Overall: 4 out of 5 - I like the building aspect of rocketry, so this was a satisfying project.
Don’t rush construction, and your kit will look and fly great. It’s big (44"), and the smallest motor suggested here is the D12-3, so I recommend building light.
* SPECIAL NOTE off of RMR from Chuck Barndt, President of The Launch Pad
Other Reviews
- The Launch Pad ALARM By Sean Walker
The Launch Pad Alarm is a single staged rocket that is modeled after an intercepting missile used by the U.S. government. Two body tubes came with this kit, but I wasn't too impressed with them. Instead of the solid tubes I was expecting, I got Estes type tubes instead, but they turned out okay and they really made this kit light. There are two sets of fins with one set very high up on the ...
 |
 |
Flights
|
|
J.A. (June 1, 2001)
GS (February 14, 2007)
CB (March 2, 2007)
T.N. (March 17, 2007)
Sponsored Ads


")


|
|
J.C. (April 1, 2001)