| Construction Rating: | starstarstarstarstar |
| Flight Rating: | starstarstarstarstar |
| Overall Rating: | starstarstarstarstar |
| Manufacturer: | Scratch |
Brief:
While the Estes Condor was without a doubt my favorite regularly flown rocket as a kid, the kit that headed up the list of great unflown rockets of my fleet was the Estes Andromeda. Received as a 15th birthday present, the Andromeda had the misfortune to be on the building table when my flying buddies decided that they had better use for their time than model rockets. While I occasionally flew after this, I never found myself on a field large enough to make me feel comfortable launching the big black bird. Years later when I started college, I gave the Andromeda away to the younger brothers of a friend. (Sadly he has no recollection of this.) When I discovered the joys of cloning in 2001, the Andromeda was high on the list of rockets to be cloned. While I started the project in May of 2001, it was only recently that I found myself with all of the parts needed to complete the project.
Construction:
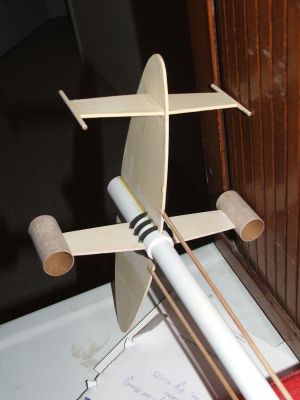
Andromeda plans can be found here. The parts list:
- 2 BT-20 main body tubes (18")
- 2 BT-50AH ram tubes (1 7/8")
- BT-50H parachute compartment tubes (7.75")
- BT-50S reactor body tube (4")
- BNC-50J (original Estes part)
- JT-20C tube coupler
- EW-49 shroud
- 3 AR-2050 adapter rings
- 3 5055 fiber centering rings (BMS)
- EH-2 engine hook
- 2 1/8" dowels
- WD-2 antenna dowel
- 2 LL-2A launch lugs
- screw eye
- 48" sewing elastic shock cord
- medium snap swivel
Despite the five years that passed between the start of this project and the rockets first flight, construction itself was surprisingly easy. I had the tubes together and the fins ready for attachment on the first weekend but without a source for the AR-5055 fiber rings that were critical to the design. (I hadn't heard about BMS back then.) They had been made from cardstock on the original Andromeda, but I didn't trust myself to cut even vaguely circular rings from cardstock. The BMS pieces were a perfect fit and should have spurred me toward completing the project, but they got misplaced on my desk and didn't resurface for quite a while.
With the embarrassing five year anniversary rapidly approaching, I made it a point to hunt up the parts needed for completion.
Finishing:
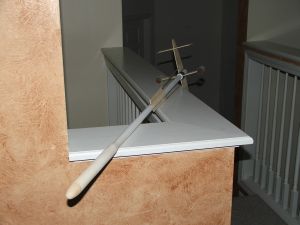
Lots of tube surface for this one and an equally large area of balsa, so this wasn't a job I was looking forward to. That said, it wasn't that bad when I finally got around to it. The worst part was trying to hide the seam in the rather clumsily made paper transition, but even that eventually reached "good enough" status. Filling was done with thinned Elmer's Fill 'n' Finish, after which the whole rocket was sprayed with Valspar primer. The ram tubes were sprayed with fluorescent orange from the same no label can that I've been using for years. Once they dried sufficiently I slid expended 24mm motor casings into them and sprayed the rest of the rocket with Valspar gloss black. A set of 2001 vintage Jim Z decals will eventually complete the look. With the exception of the missing foil sticker, (and the bent BT-5 tube,) this could be my 1977 model all over again.
Construction Rating: 5 out of 5
Flight and Recovery:
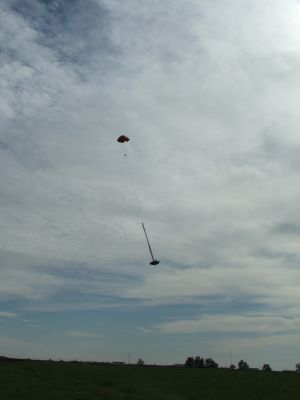
As with a lot of my rockets, the first flights took place without paint, but no one seemed to mind. Even in primer, the Andromeda is a head turner. While it seems almost too delicate to fly, the Andromeda is a surprisingly robust performer. Not wanting to risk a B6-4 flight, I loaded it with a C6-5 and waited until the breeze had died down before taking it to the pad. The first flight arced slightly and gently to the north as it left the rod and climbed to a respectable altitude for such a long rocket. Ejection occurred just as it began to tip over, but the chute fouled on the large rear sail and the whole rocket began to fall in a horizontal position. With everything sticking out in the wind, the descent was a surprisingly gentle one. It was falling toward a large section of ankle deep grass, so I didn't think the impact would cause much, if any, damage. It didn't, and I immediately swapped the heavier nylon chute out for a Mylar one for the next flight.
The second flight was also on a C6-5, but it was flown toward the end of the day when the wind had shifted somewhat. Once again the Andromeda arced into the breeze, this time back over the flight line. Ejection again occurred just as the rocket tipped over, and for a moment it looked like another adventurous recovery because the Mylar chute at first failed to fill. Even with the chute acting as just a streamer the descent was fairly gentle. The chute filled a moment later and the rocket drifted to within 20 feet of the pad for an almost perfect recovery.
Flight Rating: 5 out of 5
Summary:
PROs: Truly classic futuristic design. Surprising performance. Loved this bird as a kid.
CONs: Fragile. Never flew the one I had as a kid. Lots of stuff hanging out to foul the chute.
Overall Rating: 5 out of 5
Related Products
 |
 |
|
|
Rich DeAngelis (August 17, 2011)
I had an original Estes kit I started building back in the 1970's, but I never finished it...until this year 2011. It was a lot of work sanding and finishing, but I took my time to try and get it right. Of course, I had to replace the rubber shock cord which was rotted. Another problem I had was that apparently over the years it developed a bit of a warp not really visible to the eye. On launch day I couldn't get the two launch lugs to slide lightly on the rail, they appear to have a bit of a mis-alignment. I still don't know how to fix that without destroying the paint job. Anyway I flew it on a different rod that felt better - perhaps it was a bit straighter. It reached almost 300 feet on a C6-3, but I would be afraid to try it on a B6 motor - I think it would barely get high enough.
I decided to paint it gloss black instead of flat, and it seems to look nicer that way. I also added Testors silver paint to trim around the edges of the engine pods, the antennas, the edges of the rings surrounding the motor and the two little cardboard rectangles on the pods. It looks pretty nice with that little bit of silver sparkle! After applying all the original 35-year-old decals, I gave it a few coats of clearcoat. I used a Home-Depot brand that caused trouble with the decals, the clear film of the decals clouded up pretty bad. Fortunately as it dried they cleared up a bit, but it looks pretty bad around the window 'dots' in the crew compartment. The other problem with the clearcoat was it seemed to disolve the silver paint on the body tube rings edges. I painted them very carefully and precisely and now the silver edges run on the rings and it looks pretty sloppy. I know what you are thinking but no, I waited 48 hours for the decals to dry and another 48 hours waiting for the silver paint to dry before clearcoating. When I was string-stability-testing the model, it folded right in half above the dowels and ripped open the body tube!!! I was able to fix it by cutting off about 2 inches and using a tube coupler. I decided to only glue it to one side and use masking tape for a tight fit so it would be easier to transport. Just in case though, I glued the ends of about one foot of kevlar thread to the inside of each tube just in case it seperated at deployment - that way the lower half will still hopefully be attached to the parachute. I re-tested it but this time I taped a launch rod to the side of the rocket to stiffen it, but that wasn't so easy because each time I had to move the CG point of the string, I had to also move the launch rod's CG to the exact same point. In the end, I had to give my model about 15 grams or so of noseweight to get it to pass using the C6 motor. I don't know for sure if it really needed it, but although it surely reduces the peak altitude, it should help the model fly straighter. In spite of all the trouble, I really like this model so much that I might NOT fly it much so I can avoid risking total destruction of it. It is an antique you know, not a knock-off, so I should probably take care of it. Who knows - maybe it will end up in a musuem someday?