| Construction Rating: | starstarstarstar_borderstar_border |
| Flight Rating: | starstarstar_borderstar_borderstar_border |
| Overall Rating: | starstarstar_borderstar_borderstar_border |
| Manufacturer: | Semroc  |
Brief:
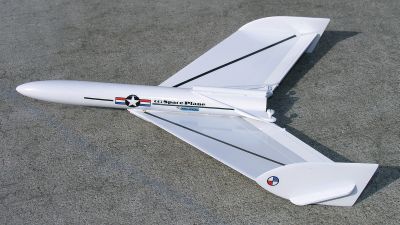
The Semroc cc:SpacePlane glider is an example of an ingenious marketing plan and business strategy. The rocket design
is an out-of-production model from another company. Semroc puts the parts together in a kit including nice laser-cut
fins and some other upgrades from the original. Yet Semroc doesn't include assembly instructions...you have to download
those from an archiving website. Semroc tells you to look here. I am a
big fan of Semroc. In my opinion, Semroc offers some of the best value in the hobby--great kits with quality parts at
very reasonable prices with easy assembly. Plus, Semroc's customer service ranges between exemplary and amazing. This
small company knows how to run a business better than most big companies in any arena. Considering my love of boost
gliders, I was ready to like this kit. However, I would recommend that you try some of Semroc's other kits since the
cc:SpacePlane didn't work very well for me.
Construction:
Assembly is mostly straightforward. The instructions are quite precise and the assembly order is carefully
orchestrated. One difficulty I had was that the old instructions did not include a photograph of the finished rocket,
especially the tail area. Instead, there were 2-D drawings of the top and rear view. Having never seen a finished
SpacePlane before, I was not entirely clear about how the motor/elevon system was supposed to look or function. Heck, I
didn't even realize right away that the motor is supposed to eject! Anyway, this led me to a couple small points of
confusion. First, the elevon lock tab assembly is easily completed using the drawing, but its function isn't quite
clear. Because of this, I carelessly put the lock tabs on backwards at first but caught my mistake while the glue was
still wet during a final check of the figure. I also had a bit of confusion about the placement of the elevon stops.
Regarding assembly order, the glide control tabs are supposed to be attached after the wings. However, this is a little tricky if you have big fingers or you want to make clean fillets. It seems that nothing would go wrong if you glued these tabs first. Also, I did not install the elastic elevon spring until after painting was completed (as the instructions ask you to do it much earlier). My approach avoided fouling the elastic with paint.
The instructions give very precise instructions on balancing the glider. I managed to mess these up in two ways! You are supposed to measure from the top of the body tube, not the top of the nose cone. Also, the balancing should occur with the motor installed, not empty. I did both of these wrong, yet the two mistakes nearly canceled each other out. After painting and photos were all done, I realized my error and drilled a small hole in the nose cone to add a bit of extra weight to correct matters. With a little putty and paint touch up, it was good as new. I trimmed the glide before noticing my balance error and did not re-check the glide after the correction. We'll see if that was a mistake.
(While prepping for the first flight, I noticed that the rear 0.5in of the seam between the elevon stops had split from the pressure of the motor installed the previous night. The elevon lock tabs are big enough to create quite a lot of pressure when the motor is installed. I don't think such pressure is necessary and would suggest that you consider reducing the height of the lock tabs a bit. I filled the crack with a little epoxy.)
Finishing:
This is certainly no performance glider, so I went for a smooth look with lots of filling, sanding, priming, and
light paint coats despite the added weight. All fin edges were beveled. The decals were great but limit you to a white
bird if you want good contrast.
Construction Rating: 3 out of 5
Flight:
The first opportunity to fly the cc:SpacePlane was canceled due to 20+mph winds. So the rocket sat in my basement for
another five weeks. I had to repair a wing tip fin broken by shifting gear in the car during the previous trip to the
launch site. Both these events had unfortunate consequences during the first launch in nearly calm conditions with a
B4-4.
The cc:SpacePlane shot straight up far higher than I had ever expected: perhaps 800 feet. (Semroc's website predicts 400ft with a B4-2, but this can't be right.) Ejection was good, close to apogee. The glider then nosed downward and began a twisting death plunge and lawn darted in the prairie dust. Remarkably, the glider was completely undamaged despite the core sample. Upon inspection, I found that the elevons had failed to be pulled into glide position by the elastic. The problem was that one elevon had been stuck in boost position by an errant drop of glue during repair. The other elevon had been set in boost position for 5 weeks with the motor installed and was a bit stiff.
I fixed these problems and tried again. This time, the B4-4 lifted the cc:SpacePlane up in a tight corkscrew, not as high. Ejection was again fine. The flight was slightly better: a semi-ballistic corkscrew. Despite the impact, the glider was again undamaged.
Flight Rating: 2 out of 5
Overall Rating: 2 out of 5
Other Reviews
- Semroc cc: SpacePlane By Geof Givens
Brief: I had been flying my 1967 vintage Astron Spaceplane when a unusually powerful ejection charge broke both elevon stops and blew away 1/3 of the right elevon. I decided to retire it and build a replacement. The cc:Spaceplane is one of the "carbon copy" kits put out by Semroc. Semroc supplies all the parts including laser cut fins and decals, which were not included in the ...
Sponsored Ads
 SEM-KM-10")
 SEM-KM-11")
 (2pk) SEM-KM-10")
 SEM-KM-11")


 |
 |