Contributed by - Art
Treiman
The Astron Matzo-Fly
This concept came to me as I was sitting during Passover and planning my
Easter themed rocket for launch at our clubs upcoming Easter/Eggloft/Oddroc
themed launch. Munching away on my matzo (which is pretty much all you do for
the eight long days of Passover) I looked at the box and started thinking. I
had been considering doing a Happy Meal, but that’s been done before. To
my knowledge, in the 40 odd years of model rocketry, a box of matzo has never
been flown. The box had such beautiful colors and nice lines, I couldn’t
not fly it!
Design and construction were fairly straightforward.
Parts List
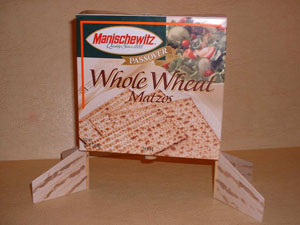
- One 10 oz empty box of your favorite Matzo (I felt the more common 16 oz
box had too large a cross section), opened at top and sealed at bottom
- 7" length of BT-20 (your dimensions for this and other parts may vary
depending on the box of matzo size, this box is a little over 6 ¾"
high)
- Two 9 ½" pieces of 3/16" dowel
- 1/8" balsa for fins
- 5"x7" heavy card stock (I used the backs of legal pad)
- 1/8" launch lug
- Engine hook
- 12" parachute
- 16" of ¼’ sewing elastic for shock cord
- spent engine casing (18mm Estes)
- Brown acrylic paint
.
Directions
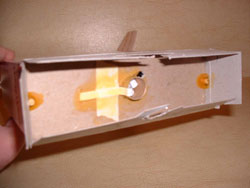
- Using the bottom of the matzo box as a pattern, trace onto the card stock
and cut out two rectangular pieces (2 ½" x 7" in this case) to
serve as "centering rings/supports" to center the motor tube in the
matzo box. Cut these just inside the lines and trim them so they can fit
properly inside the matzo box.
- Measure one of the rectangular pieces exactly and find it’s exact
center. Using a compass or spent casing, draw a circle exactly over the center
and cut out. Trim and/or sand until the bt-20 can fit thru it smoothly. Use
this as a template to draw the same circle at the center of the other rectangle
and at the top and bottom of the box of matzo. Cut out all these circles.The
bt-20 should be able to fit nicely thru all the holes.
- Build the motor mount by attaching the motor hook so that ¼" of
motor protrudes from the rear end, hold down w/ several wraps of masking tape
about 1" from the end, then cut a piece of the spent casing and glue this
in as an engine block. Apply glue over the masking tape too to prevent it from
unraveling over time.
- Glue the launch lug in the middle of the bt-20 motor/body tube 180 degrees
apart from the engine hook.
- Choose which cardboard rectangle will be the rear support and which will be
forward. Cut two notches 180 degrees apart in the rear box closure and
cardboard support to allow the engine hook and launch rod to pass through. Cut
one notch thru the front support and top of box (opened but still able to be
reclosed w/ one of those "tab in slot" type deals) at the same place
as the launch rod notch. This step is important - be sure to test fit before
doing any gluing. The notches must all line up correctly.
- Glue the rear support rectangle onto the motor mount tube 3/8" from
the rear end of the tube. When this sets, apply glue to the bottom of the matzo
box and around the lower sides and insert the motor tube/rear support assembly
and press firmly so glue catches. At this point, motor tube should protrude
about ¼" from rear and be flush w/ front of matzo box.
- Glue the front support in, but set it 3/8" to ½" down from
the front end of the box.
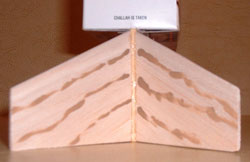
- Cut out four fins from the balsa stock. The fins are a clipped delta with a
3" span, 2 ½" root cord, and 1 1/4" tip cord. Airfoil these
if you desire.
- Take one dowel and glue a fin with the fin’s trailing edge flush w/
the rear end of the dowel. Glue a second fin to this dowel at a 90 degree angle
to the first.
- Repeat with the second dowel and 3rd and 4th fins.
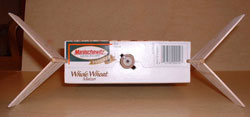
- Measure the short side of the matzo box (the depth dimension when looking
at the box from the front) Drill four 3/16" holes just flush with the
sides of the matzo box exactly midway between the front and back of the box
through the bottom of the box and the top of the box and top support cardboard.
Drill these so you can slide the dowel with the fins in thru the bottom holes
on each side and slide up through the top cardboard. The dowels should pass
through the top support but not past the top lip of the box. If the test fit is
good, glue the dowel/fin assemblies in. be sure the fins angle away from the
box at 45 degrees so they are symmetric.
- Glue the shock cord to the top support cardboard panel using your
preference for technique (I put a piece of masking tape over it and covered w/
wood glue.) By not placing it in the body tube it gives more room for the
parachute.
- Attach parachute to shock cord. (I chose a 12" because the BT-20 is a
tight fit for an 18" chute)
- Sand the fins smooth and paint lines w/ brown paint to simulate matzo fins.
- Wait till next spring to fly for Passover!
|
|
Launch Report
 While it was impossible to Rocksim, swing tests in both long and short
axis’s confirmed the model is very stable. I chose a C5-3 for the first
flight. Weight was light enough that a C6-3 would also probably be fine.
While it was impossible to Rocksim, swing tests in both long and short
axis’s confirmed the model is very stable. I chose a C5-3 for the first
flight. Weight was light enough that a C6-3 would also probably be fine.
The first flight was at the South Jersey Area Rocketry Society field
in Gloucester County, New Jersey. Sky was partly cloudy, winds were nil, and
temperature was 70’s. Not a bad day!
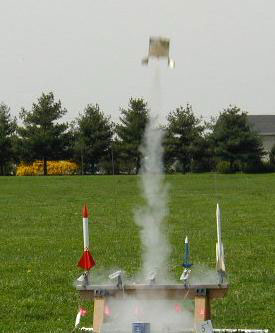
The rocket got off the pad nicely and perfectly stable. As it got
about half way to it’s 200’ or so max altitude, it started doing a
very cool oscillation. Most of us there felt that the flat front was likely
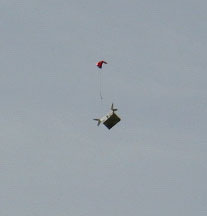
spilling air of the side and it as it oscillated front to back. Parachute
ejected right near apogee. Although it didn’t fully open, it prevented the
rocket from nosing over and it instead tumble recovered (without much tumbling)
onto the grass with no damage. Only problem was a scorched shock cord that will
need to be replaced for the next flight.
For those that are curious, I’d like to thank the fine bakers at the B.
Manischewitz Company, L.L.C. and remind you all that "This product is
lactose free and vegetarian," a good source of fiber, 98% fat free,
cholesterol free, sodium free, and contains no sugar or artificial sweeteners.
No wonder matzo tastes like cardboard! If you wish, the Astron Matzo-Fly can be
made with Unsalted, Egg, Thin Tea, Yolk Free or Whithe Grape flavored matzo
boxes.
 Editor’s Note:
I asked Art "If I build this do I have to fly it only with kosher motors?
I just checked my range box and, by golly, there's a little k on each
one!" Art replied "Heh! The reason for that
"k" is that although it is a secret in Penrose, Vern Estes is 1/8
Jewish. His Great grandfather was the Rebbe Mordechai ben Estes of Vilnius. He
insisted that all rocket products meet the strictest rabinnical standards, and
it is this way even today! If you check date codes carefully, no motors are
made on Saturdays."

