Pemberton Technologies Little Bucky Jones
Pemberton Technologies - Little Bucky Jones {Kit}
Contributed by John Lee
| Construction Rating: | starstarstarstarstar_border |
| Flight Rating: | starstarstarstarstar |
| Overall Rating: | starstarstarstarstar |
| Manufacturer: | Pemberton Technologies  |
Brief:
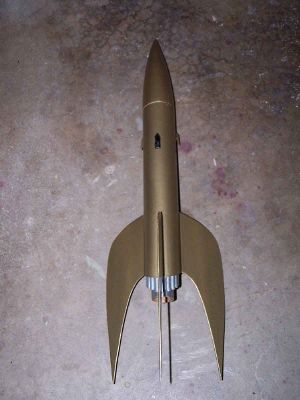
The Little Bucky Jones is a downscale of Pemberton Technologies' Bucky Jones. Layne makes some other stuff too but it
is the retro science fiction look that he practically owns. This rocket is not exception. It hearkens back to a day
when Flash Gordon and Buck Rodgers ruled the serials. I miss those days.
Construction:
I normally don't worry about the spirals in my tubes unless they are excessively hideous. The spirals on the body
tube for this kit were minuscule. Even so, I decided that I wanted to make this rocket a "best effort".
Accordingly, and guided by the "desctructions", I decided to start off by filling in the spirals. I brushed
some Elmer's Wood Filler over the lines and then scraped away the excess with a razor blade. This did not leave much to
dry so it dried quickly. About an hour later, I sanded the tube down with #330 sandpaper, also removing the sheen from
the BT. After that, I gave it a once over with the #400.
Printed on the last page of the instructions were templates for the fins, finlets, mitered tube cutting guide and alignment guide. I cut out the miter guide and the alignment guide. I lined the marks for the dorsal fin up with the point at which the spiral ended at the edge of the tube and decided that this would be my dorsal surface. The miter guide was then wrapped around the tube so that its farthest extension lined up with the dorsal line. The guides were taped into place and an angle was used to transfer all of the alignment marks to the BT. The contour of the mitered cut was also transferred.
A fresh blade was put in the X-Acto and the process of cutting the mitered end of the BT began. I drew the blade around the marked line not pressing very much. It took several circuits to complete. The resulting cut was pretty good with just one significant burr and a few minor ones. These were sanded away with #330.
The templates for the fins and the finlets were cut from the last page. They were then taped down to the plywood sheets and the outlines transferred with a mechanical pencil. Orientation really does not matter because of the plywood. There are 2 finlets and 3 fins.
The instructions give suggestions for several ways in which to cut the sheet material. Since I didn't have any of the nice power tools, most of the "good" options were out. I wasn't about to try it with a pair of shears. That left just the "multiple pass with X-Acto" method. It is fortunate that I had a new box of blades. I went through 5 of them cutting the first fin. After that I had to leave this project aside for a while.
It took a while. Lots of passes with the X-Acto and many blades, but I finally got all three fins cut out. I used #220 sandpaper to smooth out the rough edges and then used #330 to round all the edges except for the root. Then, breaking from my usual practice, I filled them with Elmer's, scraped off the surplus, and gave them a couple of hours to dry. I then sanded them down with #400 and have to admit they look much better than they would have if I had waited until after they are installed.
 Cutting out the little finlets
turned out to be harder than the big fins. There was not as much to cut but keeping the right shape was tougher, as was
handling and sealing them.
Cutting out the little finlets
turned out to be harder than the big fins. There was not as much to cut but keeping the right shape was tougher, as was
handling and sealing them.
Since I was in filling mode, I went ahead and sealed the nose cone. Unfortunately, the scraping with a razor blade does not work on this type of surface so it will take considerably more time to dry. The recommended method in the instructions is to seal and sand with thin CA but I found my bottle hardened past the possibility of use.
When the NC filler had stiffened up a bit but was still to soft to sand, I added the nose weight. I used a 3/8" drill bit to bore 3" in from the base and then poured in the little bag of lead droppings. I mixed a batch of 15min epoxy and poured it in on top. I used a bigger bit than the instructions said was needed and I found that my lead just barely fit.
Thinking I had more time left on the pot life of my epoxy than I really did, I went ahead and marked the motor tube at 1/8" and 1-5/8" for the centering rings. They both had to be sanded just a bit to fit around the tube. I slipped them on and found the epoxy had hardened. I placed them with yellow glue which was the recommended practice anyway.
After the epoxy had set, I stared to insert the screw eye into the middle of the NC base but that epoxy along with the lead droppings made for hard going. Instead, I screwed it in a bit off center, where it would penetrate the surface layer of epoxy and then go into balsa.
 When the fillets around the
centering rings had dried, I test fitted the motor mount in the BT and found that it was a bit tight. Some judicious
sanding solved this problem. The mount was then removed and a notch was carved into the forward end to accommodate the
Kevlar®.
The Kevlar®
was then tied into place and the ring was given another fillet to keep it from moving.
When the fillets around the
centering rings had dried, I test fitted the motor mount in the BT and found that it was a bit tight. Some judicious
sanding solved this problem. The mount was then removed and a notch was carved into the forward end to accommodate the
Kevlar®.
The Kevlar®
was then tied into place and the ring was given another fillet to keep it from moving.
As the Kevlar® fillet on the motor mount dried, I turned to sanding the nose cone. The first pass was with #330. The dust was brushed away and then I went back over it with #400.
With the structural part of the motor mount done, it was time to start on the "cool" part that gives this model a lot of its character. The parts package is full of 3/16" launch lugs (mistakenly called 3/8" in the instructions). The are to form a cluster of "exhaust tubes" around the motor. A single exhaust tube is affixed to the motor mount tube, parallel, and butted up against the rear centering ring. After that, pairs of lugs are cut down in 1/8" increments and butted on either side of the first one. The result is a series of exhaust ports of diminishing length going around 2/3 of the motor tube for a pleasing retro, supercharged look. The instructions give a good piece of advice here and say to butt the cut end against the centering ring. This gives a more finished appearance at the business end.
When the exhaust tubes are in place and the CA dried, I used masking tape to protect the edges of the centering rings from paint and began to paint the motor mount with a glossy, flaked metallic silver from Rustoleum. This is one of those that would be a nightmare to mask after installation.
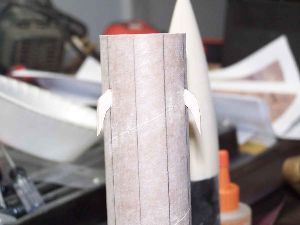
The finlets were glued 1" back from the front of the BT along the wing lines. They were applied with a double glue joint using yellow glue.
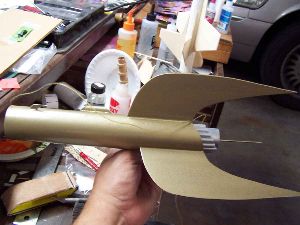
The fins were applied in the same manner using a double glue joint. Each fin is to be mounted flush with the back end of the BT. Since the BT is mitered, this give a bit of a funky look until all three are in place and the rocket is seen in the horizontal attitude. Then it really starts looking good.
The kit comes with a pair of 1/4" launch lugs meant to be cut for decorative effect but they are fully functional...and there is usually less of a wait for my club's 1/4" facilities. It also has a pair of 1/8" lugs in case you want to go for the slimmer look. I decided to use the 1/4" lugs in and mount a single 1/8" between them to give myself the most options. Each end of each lug was cut at a 45 degree angle and the larger ones were applied along the lug lines 3-1/4" back from the front. The 1/8" lug was centered between the two of them.
The canopy does not look much like a canopy. It starts out as a fairly irregular hunk of balsa. I used some #220 sandpaper to make it roughly rectangular. A pencil was then used to inscribe a diamond pattern on the top surface. A vertical line was run from the top and bottom points of the diamond to the edges of the balsa. An X-Acto was then used to whittle away material and give it a rough profile. Sandpaper was then used tho smooth things out and get rid of any sharp edges. I was fairly leery of this process at first but am quite pleased with the results.
I took my time building op the fillets on the fins. I used yellow glue but tried to be very careful about where it got smeared, building up the fillets one thin layer at a time. Doing this gave me the chance to turn my attentions elsewhere and I decided to go ahead and prime and paint the nosecone. There were several paints I was considering so I wanted to try one and see what it looked like. The NC was primed with Kilz and then sanded smooth again.
Waiting on fillets also let me finish up on the silver paint for the motor mount. I peeled back the tape and was please with what I saw.
I also started on sealing the cockpit canopy. I didn't used Elmer's for this one but used balsa fillercoat, figuring that would be easier to sand in this situation. I taped a piece of masking tape, sticky side up, to a scrap of cardboard and then stuck the canopy to it. It got two coats of filler and a light sanding then I brushed on some glossy black acrylic.
Still paying attention to the fillets, I went ahead and tried a paint option on the nosecone. I used a Rustoleum "hammered Brass". The manual calls for a gaudy shade of gold but I think I am going to save that for my full size Bucky. There I will use a very bright polished gold for the body and chrome for the exhaust work.
I eventually got the fillets built up in 4 layers and was satisfied with them. Then it was time to prime the rocket. I used Kilz and applied 2 coats over the space of 2 days. When they had dried, I sanded down with #400 sandpaper.
After the primed rocket was sanded down, I test fit the motor mount once again. I found one place on the forward ring that was a bit too tight for comfort and sanded it down. The Kevlar® was then fed through the body tube and a ring of glue was applied about an inch in. The motor mount was then inserted so that the forward centering ring was in but the aft one was not yet in. Another ring of glue was smeared around the BT at the high point of the mitered cut and the mount was shoved in with the longest exhaust tube aligned with the dorsal fin. A long handled swab was then used to apply a yellow glue fillet around the forward centering ring.
The instructions included advice on masking the motor tube, which I'd already painted silver, and protecting it from the final paint job. A sheet of notebook paper was simply rolled into a tube, inserting into the space between the exhaust tubes and the BT, and allowed to expand. That prepped the rocket for its final paint. I had decided to use the hammered brass I tried on the nosecone.
The rocket took 2 full coats of the brass paint and then a little extra around to front end on some spots I had missed. When done, it was obvious that there are some places where it went on a bit too heavy, but all in all, I am satisfied with the paint.
The hand whittled cockpit still had to be attached. I chose a spot along the dorsal line and used a razor to scrape away the paint and primer. The cockpit had been sanded to fit the BT by wrapping a piece of BT-60 in sandpaper and sanding in the correct profile. Some yellow glue was applied to the bottom of the cockpit and it was pressed in place over the base spot I had made.
All that was left was to finish the shock cord system. The kit came with a very generous length of Kevlar® which had been fixed to the motor mount. It did not come with any elastic. I like to have a bit of spring in the system so I tied on an 8" piece of sewing elastic to the Kevlar® and tied the other end to the nose cone. The rocket was ready for a chute and a flight.
Finishing:
The actual finishing was done during the course of construction and was described there.
Construction Rating: 4 out of 5
Flight:
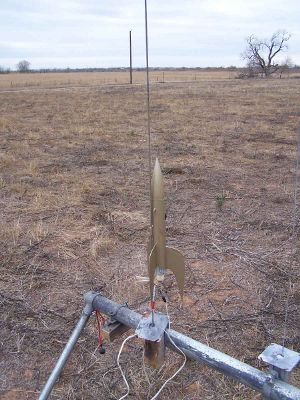
The day of the maiden flight was extremely windy. In fact, it was probably not too good an idea to try and fly.
Having missed the previous month's launch window for the same reason was enough to make me want to give it a try
anyway. With that in mind, I selected a C11-3 and loaded it in the rocket. As I watched it in the few moments prior to
launch, I realized that the dull brassy color scheme was also probably a poor choice for finding the rocket in the
winter colored field. Too late. 3, 2, 1, launch!
It took off well and weathercocked much less than I anticipated. It flew to a respectable height and deployed the chute just a bit before apogee. Then began the long drift with the wind. When it landed, there was no damage. This was a good one. A video of the first flight can be seen here.
The first flight went so well that I debated with myself about using a D for the second. I finally decided against doing so because of the wind and the distance the first one drifted. I decided to use a C11-5 instead of the 3 second delay reasoning that it would come down a little bit more and drift a little less. As it happens, the C11-5 seems to be the perfect C motor for this rocket and it ejected right at the perfect point of apogee. A video of the second flight can be seen here.
PROs: Good flier.
CONs: None.
Recovery:
I used a 15" nylon chute for recovery. It was installed with a short length of elastic and connected with a
swivel to the Kevlar®
provided. This brought the rocket down a little fast but it was solidly put together and suffered no damage.
Flight Rating: 5 out of 5
Overall Rating: 5 out of 5
Other Reviews
- Pemberton Technologies Little Bucky Jones By Jonah Dahncke (July 30, 2007)
Brief: This rocket is a downscale of the Bucky Jones by Pemberton Technologies and is a great kit through and through. The humorous "destructions" alone are reason to get this kit. It is also a great flier and is always impressive. Construction: The parts of this kit are packaged very well and this is a builder's rocket. 1 BT-60 sized tube is supplied and ...
 |
 |
Flights
|
|