| Construction Rating: | starstarstarstar_borderstar_border |
| Flight Rating: | starstarstarstarstar_border |
| Overall Rating: | starstarstarstar_borderstar_border |
| Diameter: | 1.33 inches |
| Length: | 19.00 inches |
| Manufacturer: | Shrox Industria  |
| Style: | Scale-Like |
 Brief:
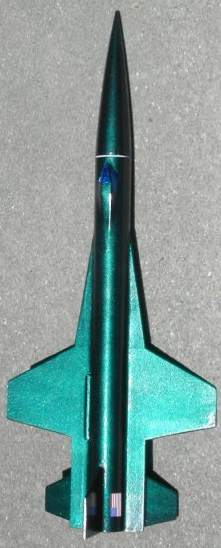
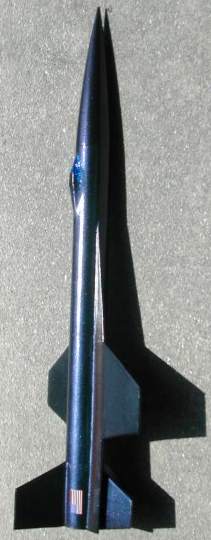
Any 'rocket scientist' will immediately recognize the similarity between the
SHX-15 and the actual X15 rocket plane. I assume the new name just absolved
Shrox from keeping to scale. This cool rocket flies on 24mm motors, and is made
from top-notch materials.
Modifications:
Recovery harness upgraded and Launch lug relocated, as described below.
Construction:
The kit came bagged in clear plastic, with all the small components in their
own zip-lock bag. The instructions are brief, with clear illustrations.
However, the instructions for the shock cord were unclear and deviated from the
parts list. More about this later. One thing did concern me - the decals were
missing. There was a note enclosed that said they were backordered and would be
provided later. It also gave a URL where the decal sheet can be downloaded. I
am hopefully optimistic that these will eventually show up, but you won't see
me holding my breath.
As I said, the components are of above average quality. The 13" BT-55 tube is thicker than the Estes tubing. The motor mount consists of a section of BT50, an engine block and two nice thick centering rings. The chute is 12" Nylon, and the recovery system includes 13" of Kevlar® twine and a 13" section of ¼" elastic. This is quickly becoming my favorite combination for small modrocs. The fin stock is good quality 3/32" basswood. The remaining components include the plastic nose cone, a standard launch lug, clay nose weight, an Estes-style shock cord mount, and a card stock cockpit cutout.
Following the instructions, I first built the motor mount. In case I wanted to use the new Estes E9, I replaced the 24mm tube with a slightly larger piece. I went ahead and used the motor block, and will need a spacer for a D12. I also drilled a hole in the front centering ring for attachment of the Kevlar® tether.
 The fins have to
be cut from the basswood stock. I was pleasantly surprised how easily the
basswood cut. It was nicer than the stock I have bought from hobby stores. The
instructions included two copies of the fin patterns, and there was more than
enough wood provided. I hate it when every bit is used up - I'm sure to screw
something up in that case. There was no fin marking guide, but it is easy to
make one and do your own marking. The large wings consist of 3 pieces and are
first glued together on a flat surface. A sheet of wax paper insured they did
not gunk up the kitchen counter. The side fins are attached at a -20 degree
angle from the wings, so I made a small paper triangle to make sure I got this
angle right.
The fins have to
be cut from the basswood stock. I was pleasantly surprised how easily the
basswood cut. It was nicer than the stock I have bought from hobby stores. The
instructions included two copies of the fin patterns, and there was more than
enough wood provided. I hate it when every bit is used up - I'm sure to screw
something up in that case. There was no fin marking guide, but it is easy to
make one and do your own marking. The large wings consist of 3 pieces and are
first glued together on a flat surface. A sheet of wax paper insured they did
not gunk up the kitchen counter. The side fins are attached at a -20 degree
angle from the wings, so I made a small paper triangle to make sure I got this
angle right.
As I said, the instructions for the shock cord assembly were unclear and did not match the parts list. Oh well, I did things differently anyway. First, I added a piece of 500 lb Kevlar® the length of the body tube. One end is fed through the hole I drilled in the centering ring, tied off, and glued. The other end is tied to the provided Kevlar® tether, which was in turn tied to the elastic cord. Thus, the elastic will be well removed from the hot ejection gasses. The nose cone came with the plastic hook removed. Evidently, Shrox felt that this would be too weak given the nose weight required for stability. Since it would be tough to feed the elastic through the small hole provided in the nose, I also added a few inches of Kevlar® twine as a leader. I installed one snap swivel where the lower Kevlar® tether is connected to the elastic cord, and the other is attached to the chute. Well, this was probably more than you ever wanted to know about a simple recovery harness.
I had problems with the last two steps. The card stock cockpit caved in' slightly at the ends as it dried - a minor issue, as it still looks fine. Next, the instructions say to glue the launch lug to the underside of the side wing at its root edge. However, the rear, angled fins will block the launch rod if the lug is in the prescribed location. I double-checked the fin installation and it is correct, so the options were to move the lug away from the body tube, or put it on the top side of the wing. I did the latter.
Finishing:
I went all-out on the paint, using purple/green Duplicolor Mirage. This stuff
goes on in three steps: a black undercoat, the color coat, and a clear topcoat.
The results look fantastic if I do say so myself! I will add the decals if they
ever show up.
Construction Rating: 3 out of 5
Flight:
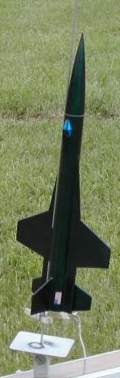
The instructions did not indicate a recommended motor, but the web site says a
D12-7. When I was going to check if this model was in the EMRR recommended
motors database, I noted that the recommended motors were the C6-5, and C6-7.
Well, there must have been a previous version that had an 18mm motor mount.
Anyway, this got me thinking, and despite the fact that I went insane and
planned for an E9, I decided to use an adapter and try a C6-5 for the first
flight. The model boosted well and weathercocked quite a bit (the wind was 5+
mph).
Recovery:
Recovery was nominal and there was no landing damage.
Flight Rating: 4 out of 5
Summary:
I have always loved the X15, and really like this kit. It is a little more
challenging than a 3/4FNC rocket. There were several minor problems with the
instructions and the decals were missing (and still haven't been delivered). In
the end, my advice is this: if you really love the looks of this rocket, go
ahead and buy it. The quality of the materials is good and you will end up with
a great addition to your fleet.
Overall Rating: 3 out of 5
 |
 |
Flights
|
|