Scratch Soviet SS-6 Sapwood Plastic Model Conversion
Scratch - Soviet SS-6 Sapwood
Contributed by Clive Davis
| Manufacturer: | Scratch |
Brief:
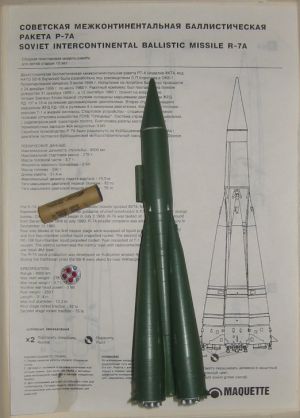
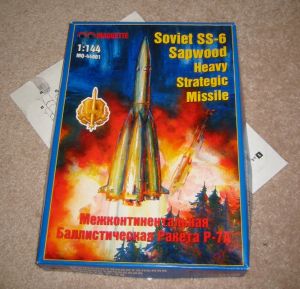
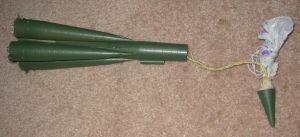
This is a plastic model conversion of the Soviet SS-6 Sapwood Heavy Strategic Missile manufactured by the Russian company, Maquette. The scale is 1:144. I picked this model up at War & Pieces in West Hartford, CT. This store carries a lot of Eastern European kits, and I really liked the looks of the rocket. I had no idea if I could convert it to fly until I got it home and was able to look inside the box.
Modifications:
Interestingly, the instructions for the model have some English on them, but most of the writing is in Russian. It doesn't take a rocket scientist to figure out how to put this paketa together though.
I began the modification by first gluing all the strap-on boosters together so that four pods were created. The fins are already a detailed part of the boosters, so this was an easy step. I simply glued two halves together and I was complete. All parts were in halves and were vertical pieces.
 The central body tube is almost wide enough to contain a central 13mm motor mount. I toyed with the idea of creating vent holes in the boosters and placing a 13mm motor mount in each booster and having them vent into the main chamber/body tube. I then decided that this was too much hassle and would create too many chances for failure. I decided after much thought that the way to achieve what I needed was to remove some of the body tube and replace it with a slightly larger internal diameter BT-5 body tube. I began by gluing the main body tube together. I measured what needed to be removed to house a standard 13mm motor and motor block. I then cut off 1 5/8" off the bottom of the plastic body tube. I replaced this with BT-5 tubing of the same length plus a small shoulder that I was able to epoxy into the plastic body tube. I tied some Kevlar around a motor block and glued the motor block into the rocket as well, feeding the Kevlar up through the body tube.
Next, I glued the four boosters onto the main body tube. I then added clay and BBs to the nose cone (filling both halves completely) before gluing them together. I did insert a screw eye in the nose cone so that I would be able to tie the Kevlarto the nose cone. I also glued a launch lug on the upper portion of the body tube.
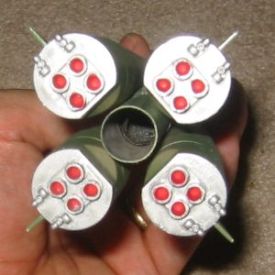
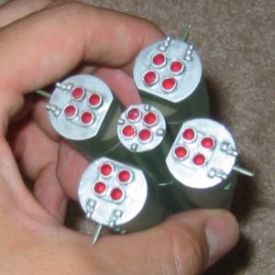
Last but not least, I glued each nozzle onto a plate (4 nozzles per plate) which then fit on the bottom of each strap-on booster. There was another nozzle plate for the central motor, but this is only for looks since it has to be removed for the 13mm motor. The nozzle plates were glued on to the model after the painting of the entire model was complete.
Construction:
The plastic model parts used in this conversion consist of the following:
- 2 nose cone pieces
- 2 body tube pieces
- 8 strap-on booster pieces
- many parts for the engine nozzle details (approximately 25 pieces)
What I needed to add to make the conversion:
- short length of 13mm tubing
- motor block
- Kevlar
- launch lug
- screw eye
- nose weight (clay, BB's, epoxy)
- streamer or small parachute
Finishing:
There were no decals included with the model. The suggested color for the model is "Soviet Green overall" with silver for the nozzles. I airbrushed the entire model with a kind of olive green that had darker shades of forest green and silver in it. I then airbrushed the 5 nozzle plates silver then dry brushed the inside of each nozzle with red. All paints I used were acrylics. This is actually a pretty easy paint scheme and was fun to put together.
Flight:
Motor prep is simple. The A10 is friction fit. I used wadding and then prepped the chute. The nose cone is also friction fit (see below for more detail).
The only motor I would recommend would be the A10-3T. I flew the Sapwood three times using this motor selection. In these initial flights, I used a small parachute. Given the size of the body tube, I would recommend using a streamer instead. The parachute remained clumped during every launch, probably due to it being crammed inside a small space.
There is one distinct CON with this model: the nose cone has a shoulder of about 2mm, so it does not sit very well on the top of the rocket. I solved this by taping some masking tape to the bottom of the nose cone around the shoulder. This gave the shoulder a little more length and allowed for a better friction fit.
The first and third flights were almost identical. The boost was surprisingly good considering the weight of the rocket. The altitude, while not astounding, was respectable. The three second delay worked fine, and the rocket landed fine. By the third launch, the body tube was showing signs of stress and was beginning to come apart at the seams. A little CA glue would cure this little problem.
The second flight was very strange. It did not boost as high as the first flight and the ejection was very late. Nonetheless, the rocket was unharmed. I wonder if I actually had a A10 in there or if the motor was mislabeled or malfunctioned.
Recovery:
As stated before, the rocket could probably use a good streamer rather than a parachute. Also, after a few landings, the rocket was beginning to come apart at the glue joints. With careful flying and maintenance, this rocket should last.
Summary:
As far as plastic model conversions (PMC) go, I thought this was a pretty easy project (this is only my fourth or fifth PMC). The rocket is unique. I have not heard of anyone else converting this model. It looks great and it flies remarkably well considering the size of the tiny fins on the four boosters. The price was pretty good, too. As I recall, I paid probably less than $10 for the model.
There is little room for a recovery device. The nose cone does not fit well and the flyer does not have much motor choice, but overall, I think it is a fun project.
Sponsored Ads


 |
 |