Scratch 2X Astron Sprite Original Design / Scratch Built
Scratch - 2X Astron Sprite {Scratch}
Contributed by Howard Smart
| Construction Rating: | starstarstarstarstar_border |
| Flight Rating: | starstarstarstarstar_border |
| Overall Rating: | starstarstarstarstar_border |
| Published: | 2010-05-16 |
| Manufacturer: | Scratch |
Brief:
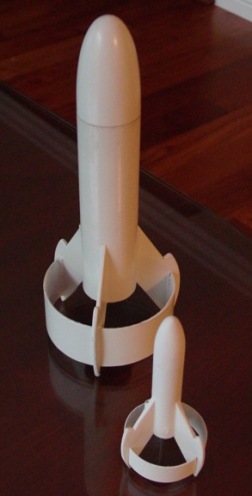
2X upscale of the original Estes Astron Sprite.
Construction:
- 1 Big Bertha nose cone
- 1 BT-60 body tube 5 7/8 inches
- 1 Ring fin - 4 inch LOC tube 1.45 inches longh
- 1 1/8 inch balsa sheet
- 1 BT-20 motor mount tube 2.75 inch
- 2 CR-20/60 centering rings
- 1 18mm thrust ring
- 1 Motor hook
- 1 1/8 inch launch lug 2 inches
- 1 Kevlar® string 24 inches - Pratt Hobbbies
As with most upscale projects, half the preparation is deciding what tubes to use to achieve the correct ratio of sizes. I this case, I had to compromise just a little. The ratio of the main body tube sizes is just about 2.1X, but there is no easily available tube for the ring fin that is just the right size to match that ratio. To be perfectly correct I would need a 4.75 inch diameter tube. I used a length of 4 inch LOC body tube, and I am very pleased with the result. It is quite heavy, but also very sturdy.
![]() The
other parts I had in my parts collection, probably from an Estes Designer Special box.
The
other parts I had in my parts collection, probably from an Estes Designer Special box.
I downloaded the original plans from Jimz. I had to scale the fins myself, since the distance from the main body tube to the inside of the ring fin was not going to be 2.1X. Measure twice, cut once. Cut too short, and have to add shims to make up the difference. That's my new motto.
I used a band saw to cut the curvy outside fins that cover the ring fin. After gluing them on, I filled the
joints with Elmer's Wood Filler. This really made the joints disappear.
![]()
I looped the Kevlar® around the motor mount to anchor it, then glued the motor mount in. There is not a lot of room for the wadding and parachute, which caused me a little worry. The original used tumble recovery, so this shortness was not a problem.
I painted all of the balsa surfaces with dilute Elmer's Wood Filler/water slurry and let it dry. Then one
sanding, and a coat of white Kilz. Another sanding to remove the fuzz from the primer coat and a couple of coats of
gloss white enamel.
Flight:
I put a 10 inch Estes parachute in it and stuffed the body tube with as much dog barf as I
could. I was worried about melting the chute.
The first flight was on a Quest B6-4. This was a good flight, and eject a little past apogee. No problem at all with the parachute. This was a good size chute, as well.
The second and third flights were on Quest C6-5's. Again, very good performance. I like the long burn time of the Quest C's. Five seconds was a bit long, though. This rocket really decelerates quickly after burnout. I am going to try it with a C6-3, but I suspect it will be a little early. Too bad there is no C6-4.
 Summary:
This rocket has a cool look. I was concerned about its performance, and the shortness of
the tube section for the recovery, but both turned out just fine. Did I mention that it looks cool? Several of the
Scouts at the launch asked me about it. It would be even cooler with the original paint job.
The LOC 4 inch tube is too heavy. It occurs to me now that I might have been able to strip out an inner layer of paper to make it lighter.
I think it may be time for a 4X.
Other:
Don't get too frustrated if things are not perfect. The ring fin was not the exact 2X size, but
it looks great. I really did sand the fins too short and then had to shim them out to fit the ring. If things do not go
perfectly, and you are frustrated, take a break. Come back to it, and think about different angles to come at the
problem.
Sponsored Ads


 - Ancient Prophecy - Unlimited Edition - Rare")


 - Number Hunters - 1st Edition - Super Rare")

, Launch Pad/ Controller, Glue, Four AA Batteries, and Two Engines")
 |
 |