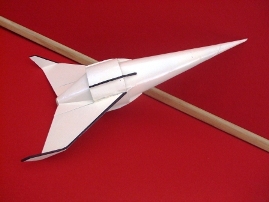
Scratch Spaceglider Original Design / Scratch Built
Scratch - Spaceglider {Scratch}
Contributed by Matt Gillard
| Manufacturer: | Scratch |
Brief:
A two-staged cone and fin rocket built for the 2009 design this spaceship competition.
Construction:
- 1x launch lug for 3 mm rod
- 1 x 12 inch Estes parachute.
- 2-foot streamer
- 3-foot length of elastic
- Snap swivels
- 18mm engine block
- Body tube BT20 8.5 inches in length
- 3/16th balsa sheet
- BT 20 nose cone
- Card backed foam board.
- A4 card
- Potato crisps tube
- Coupler
- Lead ball bearings
To build the rocket I used;
- Bostik glue
- White PVA glue
- Sanding sealer
- Model knife
- Aluminium oxide sand paper
- Primer
- Spray paint –porcelain
- black enamel paint
- CA gel glue
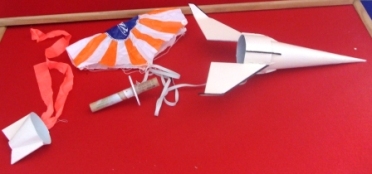
As this was one of the simpler rockets in the competition, decided to go for the 2-stage approach with the booster matching the sustainer to gain the extra points. After a spell of head scratching I decided to make the booster section as part of the original rocket.
The rocket is effectively two cones, so the lower cone would be the booster and fall away leaving the upper cone, outer ring and fins for the sustainer. The rocket should be quite stable, as cones themselves are stable and there are two largish fins, but only on one axis, so I’m going to add some mass into the nose for extra stability.
Sustainer assembly
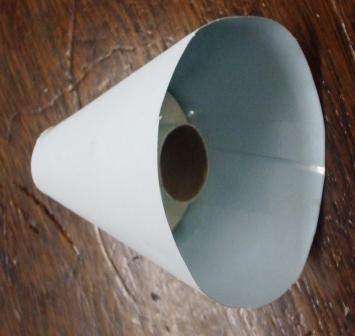
The outer ring was made out of a 2-inch section of a potato crisp tube. Measuring from the photo, the scale up factor was x5. The inner ring to which the cone was going to attach and where the parachute was going to be housed was made out of a coupler. A sheet of card was rolled into a cone until the length was 9 inches and the base fitted the coupler.
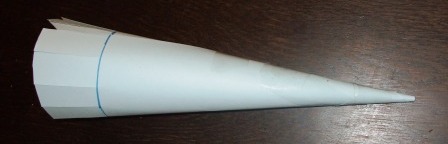
A centering ring was cut out of card backed foam board to accept a BT 20. The cone was sellotaped up and then attached to the coupler. This gave quite a sturdy cone. A layer of sticky backed plastic was then added to give a better finish.

Using balsa rods the outer ring was attached to the inner ring, a 3mm launch lug was glued between the two rings.
Using a nose cone that I left over from the 2008 box of part competition, I glued in the nosecone to a 7 inch length of BT 20. 10g of clay was then added to the BT20 just behind the nose cone. An 18mm engine block was glued into place so that the rear motor would just stick out behind the sustainer. The BT was then glued into the cone.
The fins were then cut from a 3/16th sheet of balsa. These were attached to the sustainer.
The recovery system was to be a rear ejection parachute deployment. The sustainer motor would kick itself out and have a ring attached around it. This ring would be keeping the parachute in place during flight. A length of elastic would be attached between the ring and the rocket with a 12 inch ‘chute attached.
Booster build
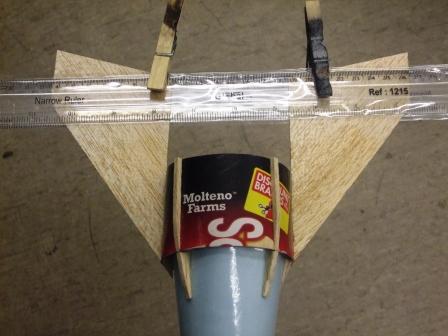
The booster section was made out of a sheet of card that was rolled to form a cone around a BT20 motor tube, and the coupler in the sustainer. The length of the cone was 3 inches. A centering ring BT20 – BT50 was then added for a bit of strength. An eye hook was then added so a streamer could be attached. The booster was then offered up the sustainer and the two fins were then cut to complete the fin structure.
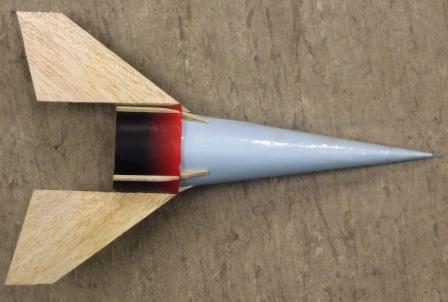
Finishing: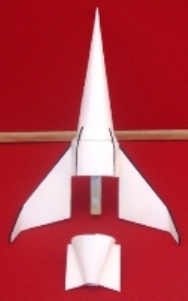
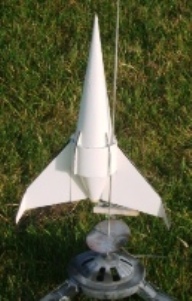
The rocket was spray with grey primer, which immediately reacted with the coating on the rocket. The rocket was covered in a mixture or wrinkles and blisters, and to make matter worse, this was 4 days before the deadline. After sanding as much of the damage away as possible I resprayed the rocket, to watch the same thing happen again, I repeated this sand and spray process until the blistering stopped, which was about 7 coats. The rocket was then sprayed with porcelain enamel paint. It does not look great, but at a distance it is passable. After masking with tape, black enamel highlights were added by brush.
I did not bother adding any clear coat or finish coat to the rocket.
Flight:
Flight one
Two Estes motors were used, a B6-0, and a A8-3
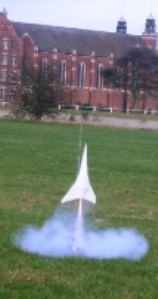
The rocket lifted well, and then went arched at about 80 foot. The booster fell away cleanly. The rocket down nearly horizontal shot off under the power of the A8-3. Ejection occurred not far from the ground.
Looking at the rocket on the ground I learnt a few things. Firstly, as the sustainer motor lit, the flames torched the streamer in the booster, the charred remains were found near the booster section. In hindsight this was obvious. Secondly, more mass is needed in the nose cone, for stability. Thirdly, the ejection charge from the sustainer is kicking out hot gases almost directly onto the parachute, which was badly charged.
Flight two
 Two Estes motors were used, a C6-0, and a B6-6
The rocket was reassembled with a new ‘chute but no streamer. No new mass was added, as I wanted to watch what was happening with the sustainer.
The rocket lifted as before and as before the rocket arched and appeared to be more unstable (greater mass on motor at the rear) as the sustainer motor lit, the booster fell away cleanly and the rocket shot off at and angle of about 20 degrees to the horizontal. During the 6 second coast phase the rocket flew almost perfectly as a glider. Where the ejection charge went off the motor and ring ejected and the rocket fell to earth.
The parachute was again charred, even though wadding was used. However, this was not going to be an issue for the next few flights. As I wanted to see the glide again I opted to go for the next flight with just the sustainer.
Flight three
C6-0 (wrong motor choice)
Rocket lifted quite fast and was stable. As I stupidly used a 0 delay, the motor popped at the end of the boost phase, and the rocket turned around and fell to earth nose first.
Flight four
C6-7 (correct choice)
Great flight, arched at top of boost and gave a nice flight/glide during the coast phase, even giving a few twists in its flight path. Again at ejection the motor popped and the rocket fell. This time the rocket damaged its rear fin.
I took the rocket back to be fixed with some 5 minutes epoxy. Giving thought to the flights, I really wanted to use a 18mm plugged motor. As the rocket seemed to have a good CG, CP placement for a glider after the motor had burned out (shouldn’t be stable for boost, but it is) It’s against safety codes to tamper with motors, so I couldn’t epoxy in a section of 13mm balsa rod into the top of a C6-0 to create a plugged motor.
Flight five.
C6-0 - must ahave been a bad motor, appeared to act like a plugged motor.
Unfortunately this motor seemed to have a dodgy ejection charge that failed to go off!
Great flight, got a good height with the arching under boost giving the rocket a nice glider style flight. Landed in a belly flop with no damage
Back to the two stage rocket. Lead ball bearings were added to the nosecone to lift the CG. Two days later I went to fly the rocket again. The recovery system was altered so that the booster would simply tumble, and the sustainer would recover via a steamer (heavily wrapped in wadding).
Flight six
Two Estes motors were used, a C6-0, and a C6-7.
Flight was straight and stable, the sustainer ignited with the rocket pointing about 10 degrees of the vertical. Booster recovered fine. The sustainer deployed its steamer just after apogee and it recovered very quickly but safely and with no damage.
Recovery:
The sustainer part of the rocket recovers fast on a streamer, but packing a parachute into such a small area is
problematic.
Summary:
I'm not too happy with the overall finish with this rocket, it was rushed in its final days and i would have liked to
have spent a good few weeks sorting out the paint issues and solving the recovery problems. Having said that, i have
really enjoyed that flights and the alterations that have been made due to watching and determining was was happening
during those flights.
 |
 |