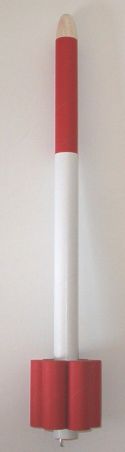
Aerospace Speciality Products That Tube Rocket! (18mm)
Aerospace Specialty Products - That Tube Rocket! (18mm) {Kit} (KTTR-18)
Contributed by Art Applewhite
| Construction Rating: | starstarstarstarstar |
| Flight Rating: | starstarstarstarstar |
| Overall Rating: | starstarstarstarstar |
| Diameter: | 0.98 inches |
| Length: | 18.75 inches |
| Manufacturer: | Aerospace Specialty Products  |
| Skill Level: | 1 |
| Style: | Ring/Tube/Cone Fin |
Brief:
That Tube Rocket is a tube finned rocket with many extras. It flies on a wide range of motors from A6-4 to C6-7. It is easy to assemble and more durable than conventional rockets with balsa fins and is made from high quality parts.
Construction:
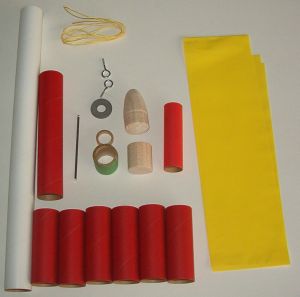
The kit contains:
- 1 12" White BT-50 body tube
- 1 5.25" Red BT-50 body tube
- 6 2.75" Red BT-50 body tubes (fins)
- 1 2.75" Red BT-20 motor mount
- 1 BT-50 Balsa nosecone
- 1 BT-50 Balsa bulkhead
- 1 1" BT-50 coupler
- 1 BT-20 motor block
- 2 5/8" screw eyes
- 1 2.75" stainless steel engine hook
- 48" Kevlarshock cord
- 1 flat washer (nose weight)
- 38" x 3" yellow vinyl streamer
The kit arrived 6 days after I ordered it, sealed in a plastic bag and double boxed. The small, easy-to-lose parts were packed in a heat-sealed poly bag inside the kit bag. All the parts were present and good quality. The 3 page instructions are given in a logical order and clear line drawings are provided where needed. Assembly requires only glue, tape, and finishing supplies. All the tubes are precisely cut to the required lengths.
 The engine mount is built first. It is a standard design with a BT-20 body tube, a BT-20 engine block, a 2.75 inch stainless steel engine hook, and a thick, 1 inch long BT-50 coupler used to adapt the BT-20 motor mount to the BT-50 body tube. The Kevlar shock cord is tied around the motor mount and through the BT-50 coupler for a very strong attachment. The loose end of the Kevlar shock cord is tied to one of the screw eyes for later attachment to the payload section. The BT-50 coupler also holds the engine hook firmly in place. Using an engine hook and engine block may seem like overkill but I think it is a great idea because I have seen many instances where the engine hook slid and tore the motor mount tube when it was not securely reinforced. The engine block also helps protect the end of the motor mount tube from heat of the ejection charge and abrasion by the Kevlar shock cord. This rocket is really built to last. Engine mount glued into main body tube, flush with the end of the rocket for a very neat appearance.
The "fins" are made from the six identical 2.75 inch long pieces of red BT-50. The color makes a nice contrast to the white of the main body tube. The instructions suggest gluing one of the tube fins to the main body tube 1/2" from the bottom end and then marking and gluing the remaining 5 tube fins in turn. I prefer to glue 3 separate pairs of tube fins, supported on a flat surface, and then glue the pairs to the main body tube, one pair at a time. This makes alignment of the tubes almost foolproof.
The remaining red BT-50 is used to make the payload section. The balsa bulkhead is glued in place on one end of the body tube. The only snag in construction came when fitting the nose cone to the top of the payload section. The shoulder of the nose cone required some trimming and sanding to fit inside the body tube. This was easily done and it better to be too big than too small. The flat washer is screwed and glued to the balsa nosecone with the other screw eye and the nosecone can be either friction fitted or glued to the body tube. I didn't expect to be carrying a payload so I glued the nosecone in place so I won't lose it in the field.
The streamer is attached to the Kevlarshock cord with Scotch tape. Simple but effective. The screw eye at the end of the shock cord is then threaded and glued into the balsa bulkhead of the payload section to complete construction of the rocket.
No launch lug is provided in this kit. The gaps between the main body tube and any 2 of the tube fins are used instead. The gaps are a good fit a 1/8" launch rod but too small for a 3/16" rod. This method positions the launch rod at the tail of the rocket and not at the center of gravity. However the 2.75" length of the channel and its robustness, should prove adequate support during liftoff. Rusty or oily launch rods will stain the body tube as it slides along it so some care should be taken to clean the launch rod before use to preserve the beauty of the rocket.
One obvious bash for this kit would be to build it for 24mm motors. This could be easily done by using the BT-50 coupler as an engine block and tie point for the Kevlar® shock cord. If built in this manner the rocket could be flown with Estes C, D, and E motors, Aerotech and Ellis Mountain 24mm single use motors, and Aerotech RMS 24/40 reloads. The extra weight of a 24mm motor may require an addition washer for nose weight to make the rocket stable.
Finishing:
The instructions suggest that several coats of primer first. I felt it would be a waste of time and add unnecessary weight to use primer on this rocket. Also the body tubes were a nice bright white and red already so 2 light coats of clear lacquer are all I used to finish it. The glossy lacquer I used soaked into the red tubing really well and caused it to turn a lovely shade of burgundy.
Construction Rating: 5 out of 5
Flight:
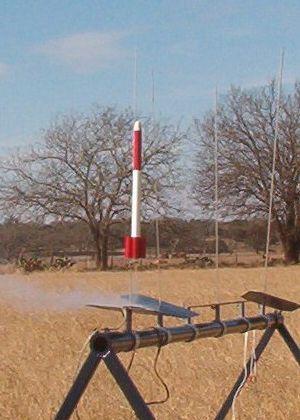
I flew this rocket at the Hill Country Rocketeers NAR #671 monthly launch at Center Point, TX on January 22, 2005. The temperature was a cool 60 degrees and it quite windy, with gusts up to 18 mph. Flight preparation was easy. An Estes B6-4 motor that I got from Wal-Mart for $4.97 for a 3 pack, snapped into the motor mount. I dropped a thumb-sized chuck of dog barf into the forward end of the main body tube, accordion folded the 3" vinyl streamer and slide it easily into the long, 1" diameter body tube. The all Kevlar shock cord virtually eliminates the possibility of a separation during recovery. The payload section slid into the main body tube perfectly with no tape needed. I installed the Estes Solar igniter and plug that came with the motor at the launch pad and slide the rocket onto the freshly cleaned launch rod. I let one of our very enthusiastic junior rocketeers make the countdown and press the launch button while I caught the lift off with my digital camera. From the photo you can see that after months of effort I've finally got the camera shutter timing just right. You will also notice the smoke trail being quickly carried away from the pad by the wind. It flew very straight without much weathercocking. The altitude reached was impressive considering the rocket's draggy fins, larger diameter, and low impulse motor.
Recovery:
Ejection came at apogee. It descended quickly on the 3 foot by 3" wide vinyl streamer, hitting the ground tail first 500 feet downwind from the pad. If it had weathercocked a bit more I might not have had so far to walk. Despite the quick descent there was no damage whatsoever, not even a dented fin (tube). If the rocket gods remain kind, I will be able to fly this one many more times.
Flight Rating: 5 out of 5
Summary:
PROs:
- Simple, strong design
- Easy prep and recovery
- Wide choice of cheap and easy to get motors
CONs:
- None
Overall Rating: 5 out of 5
 |
 |
Flights
|
|