Scratch Spool Bell Original Design / Scratch Built
Scratch - Spool Bell {Scratch}
Contributed by Art Applewhite
| Manufacturer: | Scratch |
 Brief:
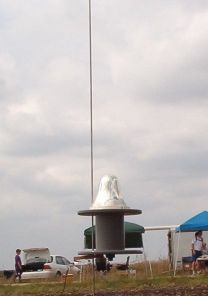
This rocket is named for its principle parts: a 22 pound wire spool and a bell
shaped Christmas ornament. I have seen other spool rockets reviewed on EMRR and
their simplicity and lack of fins really appealed to me. When a friend gave me
a one piece all plastic spool I knew I just had to give it a try.
Construction:
- 22 lb wire spool
- 5" gold plastic bell
- 8" LOC 29mm motor mount tube
- 15" Kevlar® 1/4" braided cord
- 22" nylon Parachute
- 4" 29mm spent single-use motor or 1 1/8" dowel
- 8" coat hanger wire
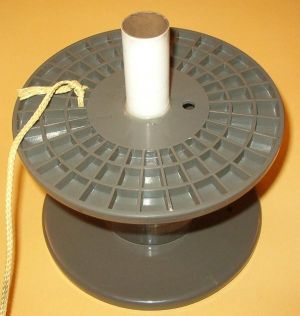 I started by enlarging
the existing 1.125" holes in the center of the spool until the 29mm motor
mount tubing fit snugly. A piece of 150 grit sandpaper wrapped around a spent
29mm motor made short work of this chore. I then drilled two 3/16" holes
1/2" apart and 2" from the center in the top of the spool for the
Kevlar®
shock cord. It was then that I noticed that the 2 pre-existing 3/8" holes
that I had planned to use for the launch rod did not line up with long axis of
the spool. Not a problem, so I drilled two 5/16" holes in the top and
bottom ends of the spool about 2.75" from the center. Putting the launch
rod holes further from the centerline of the rocket allows the bell to fit on
top without the need to put a hole through it. I was careful to line up the
holes so the centerline of the finished rocket would be vertical on the launch
rod.
I started by enlarging
the existing 1.125" holes in the center of the spool until the 29mm motor
mount tubing fit snugly. A piece of 150 grit sandpaper wrapped around a spent
29mm motor made short work of this chore. I then drilled two 3/16" holes
1/2" apart and 2" from the center in the top of the spool for the
Kevlar®
shock cord. It was then that I noticed that the 2 pre-existing 3/8" holes
that I had planned to use for the launch rod did not line up with long axis of
the spool. Not a problem, so I drilled two 5/16" holes in the top and
bottom ends of the spool about 2.75" from the center. Putting the launch
rod holes further from the centerline of the rocket allows the bell to fit on
top without the need to put a hole through it. I was careful to line up the
holes so the centerline of the finished rocket would be vertical on the launch
rod.
With the preparation of the spool completed, I epoxied the 29mm motor mount tube to it with 5-minute epoxy. The bottom end of the motor mount was flush with the bottom of the spool and the top of the motor mount sticks out about 2.75" above the top of the spool. I put an extra fillet of epoxy on the top motor mount joint for insurance. I did not install a motor block because I wanted to use a variety of 29mm motors, which come in many different lengths.
 Next came the
preparation of the "nosecone". The body of the nosecone is a gold
mirror-finish bell-shaped Christmas ornament now available at Hobby Lobby for
$1.99. It's the one with the 5" base. It's made from a thick high-impact
plastic and also comes in shiny silver color. With any luck they will be on
sale at 1/2 price in a few weeks.
Next came the
preparation of the "nosecone". The body of the nosecone is a gold
mirror-finish bell-shaped Christmas ornament now available at Hobby Lobby for
$1.99. It's the one with the 5" base. It's made from a thick high-impact
plastic and also comes in shiny silver color. With any luck they will be on
sale at 1/2 price in a few weeks.
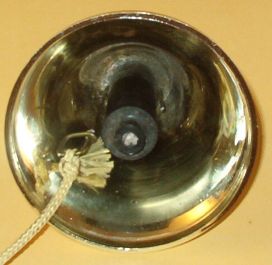
For the "shoulder" of the nosecone, I cleaned up a used Aerotech G35-4W single use motor. A 1-1/8" dowel, 4" long would have worked just as well but I like to recycle things whenever possible. I removed the label and the goo left on the casing and plugged the nozzle and ejection charge hole with a small piece of paper towel and CA to keep the black soot inside the casing. I then drilled a 1/16" hole on opposite sides of the casing about 1/2" from the forward end. These holes are for the shock cord hook. As you will see later the use of shock cord hook makes it easy to tie the shock cord to the bell. At one end of the coat hanger wire I made a 1/2" diameter closed loop. 2.5 inches down from the loop I made an 85-degree bend. I inserted the straight end of the wire into one of the 1/16" hole at the forward end of the spent motor and pushed it through the hole on the other side. I then bent the end of the wire down flat so that the wire was trapped in place but could still move a little. I was careful not to fracture the brittle phenolic of the casing.
 With the bell upside
down, I squirted about 1/4" of 5-minute epoxy into the inside of the top.
I mixed the epoxy in place with a craft stick and then pressed the top of the
spent motor into the epoxy making sure the casing was centered. The nozzle end
was just about even and centered with the bottom edge of the bell.
With the bell upside
down, I squirted about 1/4" of 5-minute epoxy into the inside of the top.
I mixed the epoxy in place with a craft stick and then pressed the top of the
spent motor into the epoxy making sure the casing was centered. The nozzle end
was just about even and centered with the bottom edge of the bell.
Finally I tied the Kevlar® shock cord to the hole in the spool and to the loop in the shock cord hook. I made a slip knot in the shock cord about 4 feet from the bell end for the parachute attachment.
I made the 22" parachute out of the nylon canopy of a small umbrella from the Dollar store. The shroud lines are four 44" pieces of #18 nylon twine with each end tied to adjacent corners of the canopy. A drop of CA was put on each knot.
Flight:
To prep for launch I friction fit a 29mm motor with a 1/4", masking tape
thrust ring on the nozzle end. I put a couple of pinches of dog barf
(flameproof insulation) down the top end of the motor mount. I put of the shock
cord inside the bell and then the parachute. The spent engine casing then fits
into the top of the motor mount until the bottom of the bell is flat against
the top of the spool.
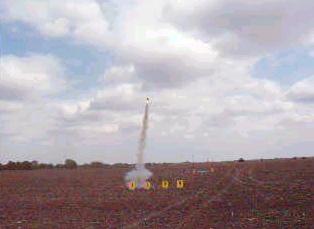
 My first flight
was with an Aerotech F23-4FJ. It flew slowly but straight with a very nice
smokey trail behind it to about 350 feet. At apogee the rocket stopped almost
immediately. On descent the parachute deployed about half way down and the
rocket landed safely about 25 feet from the pad. This design is absolutely
zipperproof because the parachute and shock cord are outside of the body tube
so ejection at apogee is not necessary.
My first flight
was with an Aerotech F23-4FJ. It flew slowly but straight with a very nice
smokey trail behind it to about 350 feet. At apogee the rocket stopped almost
immediately. On descent the parachute deployed about half way down and the
rocket landed safely about 25 feet from the pad. This design is absolutely
zipperproof because the parachute and shock cord are outside of the body tube
so ejection at apogee is not necessary.
For my second flight I used an Aerotech G35-4W. It boosted to about 500 feet and made another excellent recovery 50 feet from the pad. I can't wait to try this rocket with an Ellis Mountain G35, they have higher thrust and longer burning time than the Aerotech G35s and are perfect for high drag designs like this. There is also enough room in the motor mount for up to a G80 single use or RMS 29/40-120 reload. With its rugged construction, there should be no problems using as much power as will fit.
 Summary:
PROs
- Easy to build
- Very rugged
- Cheap
- Fun to fly
- Lands close to the pad
- The spools are hard to come by
Sponsored Ads


 |
 |