Scratch SynerJet Original Design / Scratch Built
Scratch - SynerJet {Scratch}
Contributed by Kathy Kippen
| Manufacturer: | Scratch |
Brief:
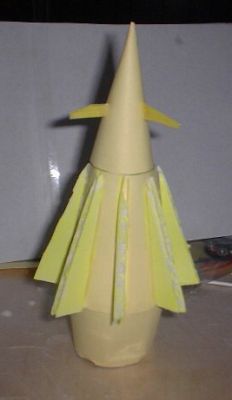
This a scratch built spaceship rocket designed for the 2009 Design-A-Spaceship contest. It is constructed of 110lb
cardstock and presentation board.
Construction:
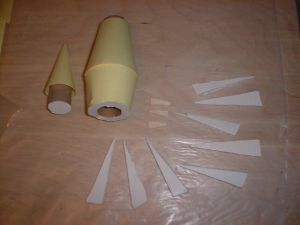
The parts include:
- BT-50 for the internal tube/motor mount
- screw eye
- presentation board for centering rings, fins, and bulkhead
- ¼" elastic shock cord
- 1" plastic streamer
- 1/8" launch lug
- 110lb cardstock
- clay for nose weight
- 1 BT-50 size centering ring
- motor block for BT-50 tube
- 1-½" long coupler to fit into BT-50 tube (can make from BT-50 tube)
I first cut the centering rings, bulkhead, and fins from the presentation board. Next I cut the BT-50 to 4-½". I used an online transition template to print out the templates for the nose cone, body, and tail cone. For the larger centering rings, I used the template printout from RockSim. For the bulkhead, I just used one of the 'holes' from a centering ring.
After printing out the templates on the cardstock, I then carefully shaped the nosecone and transition sections into cone shapes. After they dried, I dry fit the paper sections onto the centering rings sanding as necessary.
Next, I glued the motor block into the tube using a spent 24mm motor to push it into place leave ¼" to 3/8" of the motor sticking out. After that had set, I glued the centering rings onto the body tube: the smallest ring ¼" below the top of the tube, the two larger tubes at 2-½" and 2-¾" from the top of the tube and the medium ring flush with the bottom of the tube.
After the glue has dried, I carefully glued the middle transition section to the top end of the tube making sure it is perfectly straight on the top centering ring and top middle centering ring. Then I added the transition to the bottom again making sure the piece was perfectly straight on the lower middle ring and bottommost ring. I let it thoroughly dry.

To finish the nose cone, I glued the coupler onto the nose cone being careful to get it straight. When it was dry, I filled the cone with clay leaving a ¼" lip to the edge. Glued the bulkhead into the coupler. When all was dry, I added the screw eye for shock cord attachment.
As this is a tricky design, I glued the launch lug to a fin making sure it was straight.
The shock cord is mounted in the Estes fashion with the other end tied to the screw eye. The streamer is tied on about 1/3 from the nose cone.
Finishing:
Since I used color cardstock, I didn't really need to paint anything. I used a color highlighter marker to paint the
fins to match the cardstock.
Flight:
The Synerjet flew on C11-3s for all three flights. The first flight was unstable. For the second flight, I used a
spacer to extend the motor out the back ½". This caused the rocket to be even more unstable. The third
flight was a recreation of the first.
Recovery:
Recovery for all flights was after the rocket hit the ground. Each landing broke a forward fin off.
Summary:
I would say this is not a good rocket design as it is too stubby to be stable. Even trying to upscale it in RockSim
it was not stable. It was a fun and interesting build.
Sponsored Ads

 Model Rocket Accessory")


 |
 |