| Construction Rating: | starstarstarstarstar_border |
| Flight Rating: | starstarstarstarstar_border |
| Overall Rating: | starstarstarstarstar_border |
| Manufacturer: | FlisKits  |
Brief:
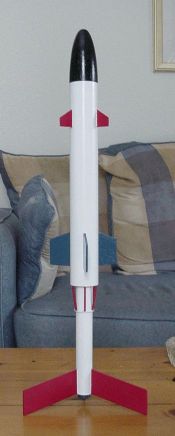
This is a new kit from FlisKits with cool missile styling including three sets
of fins and six struts at the bottom. It flies on 18mm B4-2, B6-4, and C6-5
motors and recovers with a parachute. The kit came from
BRS
Hobbies. My kit was also hand numbered serial #06. A nice touch.
Construction:
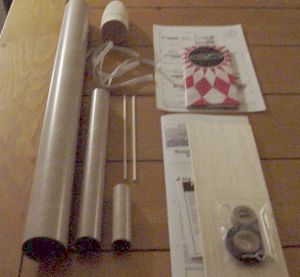
The kit includes:
- 1 sheet of assembly instructions
- 1 BT-60 main body tube
- 1 BT-50 lower body tube
- 1 balsa nose cone
- 1 motor mount tube
- 2 sheets of 3/32" balsa stock for fins
- 2 launch lugs
- 1 thrust ring
- 2 BT-50 centering rings
- 1 special centering ring
- 2 BT-60 centering rings
- 2 balsa sticks for struts
- 1 16" plastic unassembled parachute
- 1 screw eye
- 1 36" long shock cord, shroud line, and tape disks
The instructions for this kit were very easy to understand, had lots of illustrations and text, and were written in a very logical order. No templates were included in the instructions as they were included on a separate sheet. This rocket is rated as skill level 2 which means that the builder is assumed to have some previous building experience.
 The
construction begins with assembling the motor mount. I marked the locations for
the centering rings and glued them into place and then glued the thrust ring
into place. No motor hook is included with this kit so don't spend any time
looking for one.
The
construction begins with assembling the motor mount. I marked the locations for
the centering rings and glued them into place and then glued the thrust ring
into place. No motor hook is included with this kit so don't spend any time
looking for one.
I then cut out the BT-50 fin marking guide from the template. I recommend that you slightly scuff the surface of the body tubes with 320-400 grit sandpaper before marking them. That tends to give the glue some more bite when you attach the fins later. After the motor mount dried, I glued it into place in the BT-50 tube. I then marked the locations shown for the three centering rings that get mounted to it.
First I slid the special centering ring into place. To make it easier to get it positioned, I pushed it down the tube using one of the BT-60 centering rings. This made it easier to get it positioned properly and make sure it wasn't crooked. I then attached the other two rings at the locations as intended.
The next step calls for the BT-60 to be cut down to approximately 11 1/2 inches. It is recommended that the tube be marked at this location and that you wrap a single layer of masking tape around the tube as a guide for a nice, clean, even cut. I then scuffed up the surface and marked it.
After all the rings on the lower assembly was dry, I glued it into place in the shortened BT-60 tube. Care must be taken during this step to make sure that all the fin marking lines are lined up correctly.
You now cut out the main, mid, and upper fin templates from the template sheet, trace them onto the 3/32" balsa sheets provided and carefully cut out all the fins. There is a total of nine of them so be prepared to spend some time during this step. I then stack-sanded each set to flatten the edges. I then marked the tube at the locations shown for the upper fins and glued them onto the tube one at a time. You then do the same for the mid fins and the bottom main fins. After all of the fins were dry, I then glued the two launch lugs into place. After everything was dry, I applied generous glue fillets to all the fins especially the bottom ones and the launch lugs.
I then cut out the shock cord mount from the template sheet. I assembled it with a small length of Kevlar® and then tied the elastic shock cord to it to complete the assembly. It is then mounted into the body tube.
The screw eye is mounted into the base of the nose cone and then assemble the parachute. One thing I really like about FlisKits parachutes is that they are premarked and if desired, they can be cut down to two smaller sizes. I decided to leave it as is. That pretty much concluded the construction. It is recommended in the instructions that the struts be attached after the model is finished.
PROs: Easy assembly and logical assembly order.
CONs: None.
Finishing:
I started the finishing process by sanding everything smooth. It is recommended
that you use sanding sealer but I decided to pass. I sprayed the entire model
with grey primer and sanded between coats. I then sprayed the body of the model
gloss white and the nose cone gloss black. The next day, I masked off
everything and sprayed the mid fins a dark gloss blue. The day after that, I
masked the model once again and painted the main and upper fins gloss red. I
painted the struts gloss red also. I found it easier to gently poke sewing
needles into one end so that you can hold onto them.
After all the paint was dry, I then cut the struts as shown, test fitted them and then glued them into place. Be sure to take some time and line them up carefully as this step can be a bit tricky.
PROs: Easy to finish
CONs: Finishing can take a while if you choose the stock scheme. Took me 3 days.
Construction Rating: 4 out of 5
Flight:
The recommended motors for this kit are the B4-2, B6-4 and the C6-5. They are
friction fit into place and this kit does require recovery wadding to protect
the parachute.
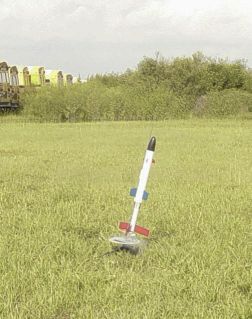
For the first flight, I went with a B6-4. The rocket took off faster than I expected. As a result, my launch photo was only smoke. It was a nice straight flight up to about 400 feet.
On the second flight, I wanted to see what this rocket could really do and decided to go with the C6-5. Great motor choice. The rocket took off fast and straight and went maybe 650-700 feet up.
PROs: Flies great, very stable.
CONs: None.
Recovery:
This rocket uses a 16" parachute for recovery. On the first flight, I left
the chute as is. It brought the model down slowly, a little too slow for my
liking. It could probably be cut down one size smaller or reefed.
For the second flight when I used the bigger motor, I decided to reef it, which was a good thing too as I still had a rather long walk to recover it.
PROs: Recovers well if a smaller of reefed chute is used.
CONs: Recovers just a little too slowly if a full size chute is used, would be prone to excessive drifting in windy conditions.
Flight Rating: 4 out of 5
Summary:
I really liked this rocket, it was easy to build, looks great and it flies
great too. This was the winner of FlisKits' Design of the Month May 2003
contest. The contest winner, Darren Humphries clearly has a winning design here
and FlisKits also did a great job on converting this into kit form, however, I
would only recommend it if you've built a few kits already as there are a few
steps in this kit that a beginner could find confusing.
I would also like to thank Brian Swanson of BRS Hobbies for providing this kit. He did a great job packing and shipping it.
Main PROs: Easy to assemble, great looks, and impressive flight performance.
Main CONs: Recovery just a bit on the slow side with the provided chute.
Overall Rating: 4 out of 5
 |
 |
Flights
|
|