
Brief:
FunnelVision 3.0 is a simple but robust high-power finless rocket constructed from a 3" x 36" postal mailing tube (they are actually 37" long), an 8" plastic automotive funnel and a 3" LOC nose cone. To be more accurate, it is a "skirt-fin" rocket. This is a 2x upscale of the original Funnel Vision design I have built. FunnelVision 3.0 is built exclusively for the 38mm 2-grain Cesaroni motors (H143 Smokey Sam or H153) and the AeroTech H123 and H148R motors. It excels as a Level 1 and fun fly rocket for "minimum" (1500 square ft) high power fields surrounded by obstructions, trees, or water hazards since it flies only about 600' high on these motors and meets the 1500g FAA waiver weight limit.
Construction:
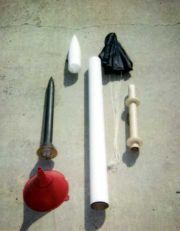
FunnelVision 3.0 is an exceptionally cheap and easy H-power airframe to scratch build. Component cost is $3.50 for the 3" heavy wall mailing tube, $1.75 for the 8" plastic funnel, and "typical retail rocket prices" for 2 centering rings (1/4" x 38mm x 3"), a 14" piece of 38mm motor tubing, and a 3" LOC (or Estes Big Daddy) plastic nosecone. With no fins, no glassing, no through-the-wall construction, it goes together in about an hour with 5-minute epoxy. Total cost is 20 bucks (and half this if you borrow the cone from another rocket). Recovery system is a 36" Top Flight nylon chute attached to 9ft of 1/2" nylon webbing (actually, I used a Petco dog leash with choke collar).
Construction sequence is as follows:
- Trace the outline of the mailing tube circumference onto the plastic funnel to give you an idea where to cut; perfect or slightly too small (tight) is good. Too big (loose) is bad.
- Cut off the excess with a fine hacksaw, razor saw or X-Acto knife.
- Sand the funnel opening so that it fits snuggly over the nose cone at its widest.
- Before gluing anything, make a 1/2" wide by 1" deep "C"-shaped cut in the edge of the 3" opening in the funnel. This is to accommodate the 3/8" launch wire. You will not be able to easily make this cut-out once you glue the funnel to the body tube!
- Slide the completed funnel "skirt-fin" over the mailing tube resting vertically on a flat surface with the nose cone in its place. Check to assure that the body tube is absolutely vertical (e.g., line up visually with a wall corner or window frame or a proper plumb bob if you're fussy). Tack glue the funnel in place with 5-min. epoxy.
- Now use lots of epoxy to really attach that funnel well--you can invert the assembly and just pour a little around the joint. Don't skimp as this joint undergoes a lot of aerodynamic stress, as you can imagine.
- Add four 1/2" thick scrap balsa gussets to the inside of the funnel. My pieces measured exactly 2" x 2 5/8" around the right angle. (That's all you need to know if you remember geometry!)
- Epoxy the two 1/4" thick centering rings to the 14" motor tube, 1" from each end. Now would be the time to anchor the recovery system to a screw-eye or U-bolt through the upper ring as well, however I use a different system.
- With a generous amount of epoxy inside the body tube, insert the motor tube assembly into the body tube until it is flush with the aft end of the body tube.
- A knotted loop of shock cord is passed through the hull 1" below the bottom reach of the nose cone. The recovery system is attached with a quicklink and the exposed knot is epoxied to a fairing cut from a plastic Garcia-Vega cigar tube.
- Epoxy a 3" piece from that same cigar tube so the lug top is exactly 16" from the top edge of the 37" long body tube. Top edge lug tube is the CG balance point for the 48" rocket fully loaded with a Pro38 H143SS motor (21" from the bottom of the rocket/skirt-fin and 27" from the tip of the 11" LOC cone. Reinforce lug attachment with pieces of balsa triangle sticks at each side.
- Critical step: using the above balance point, add sand and gravel through an enlarged hole in the bottom of the nose cone. A LOC 3" cone properly weighted should ~600 grams total to balance an H143SS. Seal the ballast hole securely with masking tape. When ballasting the loaded rocket, be sure to tilt it vertically, before knife-edge balancing at the balance point to make sure the ballast has settled to the bottom of the nose cone.
- Finishing was done simply by spraying with Testor's flat light aircraft gray primer. I left the cone "natural" white. I never bother to seal the spiral groove as I like to show off that the rocket was made from a mailing tube.
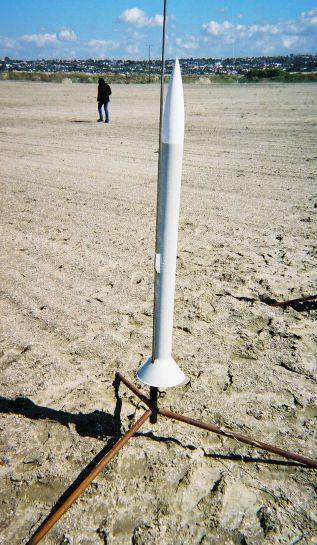
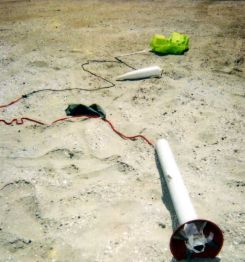
Flight:
FunnelVision 3.0 is designed to fly on the 2-grain Pro38 motors only (or comparable Aerotech motors--H123 and H148 Redline, which are lighter so less ballast is needed. It will not fly safely on the single grain G69 or G79 Pro38 motors, due to weight of the rocket. The heavy ballasting needed is a characteristic of finless rockets. Sims say FunnelVision 3.0 will fly adequately on a G80-4 with a 29mm adapter, giving performance for the 1175g rocket (unloaded weight) like that of an Estes Big Daddy on a D12-5 but I have not tried it. I have flown the rocket mainly on Pro38 H143SS with 5 second delay, which has been perfect with apogee each time at about the 630' sims predicted. Ejection of the 36" chute occurs just after apogee with the rocket pointed slightly nose down. Furious turbulence was visible in the smoky exhaust, as one might expect. This would be a great Level 1 rocket for a hazard surrounded field like our Fiesta Island site, where landing outside the 1500' site is usually means it goes in the water. I have also flown FunnelVision 3.0 on a Pro38 I287SS out in the desert. Flight was safe but it oscillated violently and flew a spiral path under power, straightening out after burnout. Ejection, descent and recovery were still acceptable. I believe this very high drag airframe does not much like the intense wake turbulence generated by the 310 mph flight on the I287SS, and was recoiling against it, causing the tail to oscillate. For this reason, I don't recommend flying FunnelVision 3.0 at more than 200 mph, although the 3-grain Cesaroni I motors (I212SS and I205) might be a possibility since sims predict about 830' at 255 mph for these.
Summary:
PROs:
- This design has unique potential as a L1 and sport rocket for minimum sized high power fields with trees, water or other rocket-eating hazards.
- Cheap, quick to build, and very robust design for 38mm H power.
- Looks unusual, gets attention at launches with lots of noise, flame, and smoke but without need to chase very far after it.
- No fins to break. Immune to hangar rash. Sturdy.
CONs:
- Heavy ballasting is a fact of life with finless designs.
- Limited choice of motors. Need to keep speed down to assure stability.

