Scratch Star Fury Original Design / Scratch Built
Scratch - Star Fury {Scratch}
Contributed by William Carney
| Manufacturer: | Scratch |
(Contributed - by William Carney )
 Recently I just finished a
rocket I call Star Fury. As to credits to "Babylon 5", I did not
think of the series in anyway when I named this rocket and in no way is it
meant to associate in anyway anything on that fine sci-fi series. It's sort of
like a futuristic space fighter with "Star Trek" style nacelles.
Recently I just finished a
rocket I call Star Fury. As to credits to "Babylon 5", I did not
think of the series in anyway when I named this rocket and in no way is it
meant to associate in anyway anything on that fine sci-fi series. It's sort of
like a futuristic space fighter with "Star Trek" style nacelles.
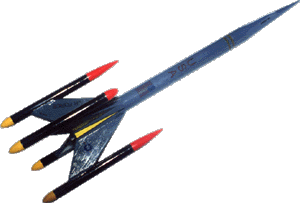
Basically start with a Estes Venom. But add a 18 inch chute instead of the 12. Also you will need six BT-5 nose cones (short like Mosquito), two long BT-5 nose cones (like Sparrow), four BT-5 tubes (five inches long), one or two blocks of clay weights or something similar.
Cut eight additional fins the size of the four original but without the thru the wall tab. Then cut about 1/8 inch from the tip of each of the four original fins. After you glue the motor mount and the original fins in place on the body glue an extra fin on each side of the original fin. So you end up with a laminated three layered fin but with a slight depression in the center of the tip.
You can then sand the tip to a curve to fit a BT-5 body tube in. Mark from one end of the BT-5 tubes in one inch. This is where the tube will be placed on the tip of the fin in the curved spot so that the BT-5 tube is hanging over the back side (motor end) one inch. Glue four short BT-5 nose cones on the rear end and two on the front on opposite sides facing toward nose cone. Glue the two long BT-5 nose cones on opposite sides facing forward toward the nose cone, this forms the "wing". The BT-5 tubes are wing tanks or Nacelles at the fin tip.
 Paint four of the short BT-5
nose cones yellow (the ones on the rear) and two red (the forward ones). Paint
the two long BT-5 nose cones (also forward ones) red. Paint the rocket
medium/dark grey. Paint the four BT-5 tubes black. I added some decals but you
could skip this if you do not have them. On each side of the fighter nose cone
I placed one black decal 1/4 inch wide 1/8 tall but with slanting (45 degrees)
angle in the front to simulate a window. Also just behind it along the nose
cone another window decal about 1/2 inch long 1/8 tall rectangle shape. At the
tube end where the nose cone is I placed two bands of yellow decals. Between
this and the fins I placed two decals each "UNITED STATES",
"USA" and US flag. Each on opposite sides.
Paint four of the short BT-5
nose cones yellow (the ones on the rear) and two red (the forward ones). Paint
the two long BT-5 nose cones (also forward ones) red. Paint the rocket
medium/dark grey. Paint the four BT-5 tubes black. I added some decals but you
could skip this if you do not have them. On each side of the fighter nose cone
I placed one black decal 1/4 inch wide 1/8 tall but with slanting (45 degrees)
angle in the front to simulate a window. Also just behind it along the nose
cone another window decal about 1/2 inch long 1/8 tall rectangle shape. At the
tube end where the nose cone is I placed two bands of yellow decals. Between
this and the fins I placed two decals each "UNITED STATES",
"USA" and US flag. Each on opposite sides.
Now this is where it gets tricky. The two long BT-5 nose cones and BT-5 tube nacelles on opposite sides form the "wing". With the nose cones pointing away from you the left wing has "US AIR FORCE" decals on top and bottom with the right wing having the Air Force emblem. The top "rudder" has a US flag and the name "STAR FURY" using yellow/red letters. In the area between the two wing fins and the "rudder" I placed the decal from Venom that is a long pointed yellow triangle. About 1/8 inch from the tip of this I placed a decal saying "Warning High Pressure Gases". The bottom "rudder" has "USA" on each side. Between the bottom "rudder" and the "wing" on one side is the Yellow triangle decal from the Venom but on the other I placed the Launch lug. Pointing toward the launch lug is a yellow arrow decal saying "danger" and on the launch lug is a black one saying "danger". The decals come from various kits and press type lettering. You will have to check the center of gravity and add weight to the nose cone to bring CG ahead of the fins. You also might have to then fly it and trim is as necessary since at this time I do not know exactly how much you will need. It may also depend on how heavy the glue is that you use.
Sorry I don't have the CP calculated but I am terrible at math and have had trouble doing the math for the nacelles and rearward mounting nature of it. The CG for my rocket came to about 6 3/4 inches measured from the front end of the body tube. The nose cone with the added weights and paint comes out to about an ounce with the rocket weighing about four ounces all together.
 After I posted a similar
article on the Rec.Models.Rockets Usenet I had some further thoughts. Before
you glue each nose cone on the nacelles paint each one and the nacelles then
let them dry for a better finish. Also make sure you sand, seal, prime and
paint the outer sides of the fins very well. On my model I did not do this and
the decals on the fins don't look as nice as they should. Also the color of the
body is a little too dark to show off the decals well. If I do another one
(up-scale) I would paint it a lighter grey. I also since added some "No
Step" decals, one on each "wing". If anyone knows of a supplier
that could up-scale the special nose cone style of the Estes "Venom"
I would like to know. You almost have to hand carve a scale up nose cone.
After I posted a similar
article on the Rec.Models.Rockets Usenet I had some further thoughts. Before
you glue each nose cone on the nacelles paint each one and the nacelles then
let them dry for a better finish. Also make sure you sand, seal, prime and
paint the outer sides of the fins very well. On my model I did not do this and
the decals on the fins don't look as nice as they should. Also the color of the
body is a little too dark to show off the decals well. If I do another one
(up-scale) I would paint it a lighter grey. I also since added some "No
Step" decals, one on each "wing". If anyone knows of a supplier
that could up-scale the special nose cone style of the Estes "Venom"
I would like to know. You almost have to hand carve a scale up nose cone.
After a few flight tests I realized that the 1/8 inch shock cord is not good enough for C size motors and intend to replace it with 1/4. Also the rear "trailing edge" of the fins had some scoring on each flight. I would add some epoxy on just this edge to protect them from scoring. I did notice a little of tendency to "weathercock" a little into the wind so I would recommend that you fly this rocket in winds under about 10 or 12 miles per hour. Adding a little weight to the nose cone could help, but the take off weight is pushing it as is. With a C5-3 or C6-3 it barely gets up a high enough and you do not want any longer delay. Also be careful how you wrap the chute.
For the first flight I wrapped it a little tight to fit the larger chute in the body tube and it took a few seconds to come out. I had a few anxious seconds while I said "come out", "come out", "come out" as I waited for the chute to deploy and bring the rocket back across some power lines. I had not anticipated it weathercocking up wind. Most rockets I have flown weathercock down wind. For as heavy and as strange as it is, it does fly pretty good and is a neat one to build.
 |
 |