 Brief:
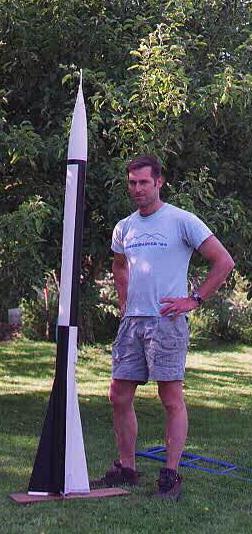
A scale high power model (@ 67% scale) of the ASP (Atmospheric Sounding Projectile) rocket. This rocket was used in operation Redwing in the pacific ocean during atomic bomb tests at Bikini Atoll. First flights were at White sands test range in 1955. Was launched through the atomic mushroom cloud to send back radiation data.
Construction:
Two sections of Loc type 3.9" diameter airframe, 4 plywood fins, plywood centering rings, bulkhead, 4' chute, 1" wide bungy cord and plastic nose cone. Also includes aluminum spin tabs as the original used and a 3/8" dowel for antenna.
Instructions are easy to follow using standard high power construction techniques. Fin fit in the pre-cut fin slots required some additional trimming of the slots as the fin tab was longer than the slot. Through-the-wall fin construction epoxied to the motor tubes and centering ring make a very sturdy lower airframe.
I built it for standard motor ejection so no removable avionics bay was installed. The long fins require long fillets which means you will use a lot of epoxy on this kit. I sanded the plywood fins and gave them two coats of finish epoxy to make them smooth. I also wanted to use the aluminum spin tabs to keep with the scale appearance. These require some filing as they are kind of crudely made and careful alignment on the bottom of the fins. I also opted for the nose cone antenna. I drilled a hole in the end of the cone and set the dowel in strait extending the appropriate length. Then I poured epoxy into the nosecone to cover the 2" I left on the inside of the cone. I also added 10oz of nose weight at this time so the thing would be stable with the heaviest motor I could use. I was a little worried the antenna would break off easy but it turned out to be very solid using this technique.
Finishing:
Standard fill the grooves of the tubes and sand, sand sand. I left the aluminum tabs off, primed and painted the original black and white alternate quarters paint scheme. Decals were included and are "mac-tac" type decals produced off a computer. They were kind of poor quality so I opted to make my own the same way. The finished rocket to me is an awesome bird with the four long fins and overall sleek appearance. The fin tabs in natural aluminum look cool also.
Construction Rating: 4 out of 5
Flight:
With a 54mm motor mount you have lots of options, I started out with a 38mm adapter and put a Aerotech I161-6 White lightning motor in for the first flight. Rocksim put this at 1,300' at apogee. The rocket really spins and looks awesome in flight with a good paint scheme. The launch went nice but the ejection could have been longer as it ejected when it was still on the way up. The lower airframe drove into the upper airframe creasing the upper airframe. Otherwise the recovery was fine. I fixed the upper airframe with a coupler tube and some fill and finish and re-painted it.
My second flight was with the same motor (I161) with the medium delay this time. Disaster struck right off the rod when a faulty delay insulator resulted in a CATO burning the upper section of the lower airframe. I have cut out the 10" of the airframe that was burned and re-built the Asp using a coupler and another section of tube. I expect to put a J350 in it for its third flight. A J350 should send it 3,500'.
Recovery:
The shock cord attaches to a wire harness connected to the upper motor mount centering ring. A quick link connects it to an ~8' bungy cord. After my first launch I replaced this with a 25' piece of 1/2" nylon webbing as I think the bungy is partially to blame for the damage on the first flight.
Flight Rating: 2 out of 5
Summary:
I really like the Asp and although I have had tow problem flights I still like this rocket and just keep fixing and flying it. I think its a great kit and is reasonably priced for a 7' tall 4" diam. rocket (@ $75 when I bought it).
Overall Rating: 4 out of 5

