Scratch Big Red Original Design / Scratch Built
Scratch - Big Red {Scratch}
Contributed by Kevin McLaughlin
| Manufacturer: | Scratch |
 Brief
Description:
Brief
Description:
This rocket came to being after deciding not to buy the Aerotech G Force kit.
After studying the plans for the G Force, I decided that I could make a scratch
build that met my basic criteria for liking G Force. I wanted a tall rocket
with a 4" airframe that would perform well on G64 and higher 29mm RMS
hardware. Since I got back into model rocketry with my son who is now eight, I
strove to make rockets that where at least as tall, if not taller than his
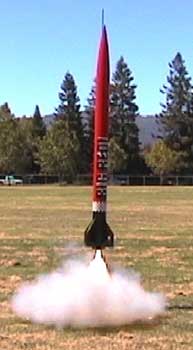
height. This rocket is 64" tall and weighs in at 44 ounces with altimeter,
but without motor and 'chute. "Big Red" seemed to be an appropriate
name after completing the paint job. Component Description: The construction of
this rocket follows closely the plans for the G Force.
- 30 x 3.9" body tube
- 10" section of 3.9" body tube for the altimeter bay
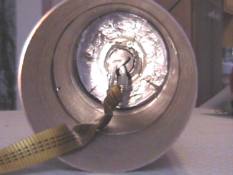
- plywood centering rings and a bulkhead
- 29 mm motor mount tube
- Public Missile 3.9" nose cone
- 1/8" PVC fin stock
 This was my first large airframe
rocket, so I wanted to try and imitate the Aerotech wad-less recovery design.
Through a stroke of luck, I came across the Aerotech baffle shock chord
attachment used in the G Force and used that on top of the 29 mm motor mount
with a three-ply centering ring. Similar to the G Force, I also created a
payload bay using a 10" section of 3.9" body tube. The payload bay
was adapted to hold my home-made RCC2 Missile Works altimeter.
This was my first large airframe
rocket, so I wanted to try and imitate the Aerotech wad-less recovery design.
Through a stroke of luck, I came across the Aerotech baffle shock chord
attachment used in the G Force and used that on top of the 29 mm motor mount
with a three-ply centering ring. Similar to the G Force, I also created a
payload bay using a 10" section of 3.9" body tube. The payload bay
was adapted to hold my home-made RCC2 Missile Works altimeter.
Construction/Finishing Techniques:
Using the G Force plans as a guide, I somewhat followed the fin tube/motor mount construction. The main exception being the use of mounted #8 brass screws with a retainer plate for motor retention. This provides
the flexibility to handle various 29 mm motors.
motor retention. This provides
the flexibility to handle various 29 mm motors.Instead of using the sort of fin locking mechanism that comes with the G Force kit, I used 1/8" PVC plastic sheet cut to templates created from the VCP fin tool. These were cut with fin tabs for through-the-wall mounting between the centering rings and motor tube.
I also added a 2.5" section of 3.9" tube coupler at the tail pipe to reinforce the body tube for landings.
Flight/Recovery:
First flight was on a G64-4W with a 45" 'chute. Flight was very straight with chute recovery at apogee. Landing was about 100 yards down wind with an estimated altitude of about 900'. I actually forgot to arm the altimeter on the first flight. The 45" 'chute appears to be perfect for the weight of this rocket. Wad-less recovery worked perfectly with no heat damage to recovery components detected. Shock chord is a 12' length of 9/16" tubular nylon with quick links for body tube and nose cone attachment.Summary:
This rocket is a real crowd pleaser. It flies straight and has a nice take off. I have flown it with and without the altimeter bay. Due to the size of the rocket, it tends to get banged up if it lands on any sort of hard surface like the street. Since my finish paint is very decorative with the decal, I tend to be very selective about launch sites and wind conditions.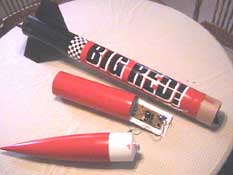 I used too small of a 'chute at one launch
due to windy conditions, and a piece of the fin was broken off. I used a
Dremmel tool to cut off the PVC fin at the body tube joint, then used a router
bit to remove the PVC material down to the motor mount through the body tube
fin slit. This way, I was able to entirely remove the old fin down to the motor
mount without cutting the body tube. I cut a new fin out of PVC and epoxied
into place through the body tube fin slit and to the motor mount tube. After
applying a filet of epoxy around the fin joint, I masked and sprayed the fin
can with black enamel. The result is as good as new, with no evidence of the
fin replacement. This is one of the advantages of using PVC fin material. It is
very easy to work with and replace. Since the PVC is soft, it is easy to cut
and in the case of fin replacement, remove through cutting and routing.
I used too small of a 'chute at one launch
due to windy conditions, and a piece of the fin was broken off. I used a
Dremmel tool to cut off the PVC fin at the body tube joint, then used a router
bit to remove the PVC material down to the motor mount through the body tube
fin slit. This way, I was able to entirely remove the old fin down to the motor
mount without cutting the body tube. I cut a new fin out of PVC and epoxied
into place through the body tube fin slit and to the motor mount tube. After
applying a filet of epoxy around the fin joint, I masked and sprayed the fin
can with black enamel. The result is as good as new, with no evidence of the
fin replacement. This is one of the advantages of using PVC fin material. It is
very easy to work with and replace. Since the PVC is soft, it is easy to cut
and in the case of fin replacement, remove through cutting and routing.After applying decals, I applied a light clear coat finish. I have had much trouble with clear coat either dripping or wrinkling, so I have been very stingy in applying it to my projects. I have also started painting most of my rockets black in the fin can area to facilitate quick repair and finish. Black covers best and doesn't show burns and other wear and tear.
I estimate that the total cost breakdown looked something like this for Big Red:
- Nose cone: $15 purchased on eBay plus $5 shipping
- Body tubes, motor tube, centering rings, bulkhead and 9/16" nylon tubing: $22 with shipping
- Paints, epoxy and laminated paper for lightening bolts and checkerboard tube wrap: $15
- Decals: $15 with shipping purchased from The Decal Zone
- Scrap 1/8" styrene for fins: $2
 |
 |