![[Picture]](/images/archive/images/ratings/rating_ignitorman.gif) (06/15/99) I saw the
IgniterMan Igniter kit on a post at RMR and replied for more information. Liked
what I read and ordered the kit directly from Unique Rocketry. (Note now you
can ordered directly from The Hobby
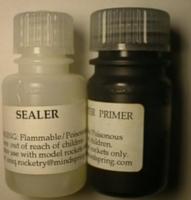
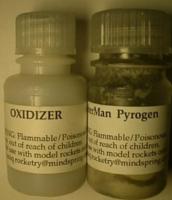
Connection where I purchase my RMS reloads). The kit includes 4 small
bottles. One IgniterMan Conductive Primer, one IgniterMan Pyrogen, one Sealer
and one Oxidizer. The Oxidizer is combined with the Pyrogen in order to make
the igniters.
(06/15/99) I saw the
IgniterMan Igniter kit on a post at RMR and replied for more information. Liked
what I read and ordered the kit directly from Unique Rocketry. (Note now you
can ordered directly from The Hobby
Connection where I purchase my RMS reloads). The kit includes 4 small
bottles. One IgniterMan Conductive Primer, one IgniterMan Pyrogen, one Sealer
and one Oxidizer. The Oxidizer is combined with the Pyrogen in order to make
the igniters.
CONSTRUCTION:
 The
instructions are clear and easy to follow. After a series of warnings about the
flammability and the need for adequate ventilation the steps necessary to make
igniters follow. The steps outline making igniters for Black Powder motors like
Apogee, Estes and Quest. Then addition steps to make igniters for Composite
motors. There are some suggested wire sizes to use for various sizes of
motors.
The
instructions are clear and easy to follow. After a series of warnings about the
flammability and the need for adequate ventilation the steps necessary to make
igniters follow. The steps outline making igniters for Black Powder motors like
Apogee, Estes and Quest. Then addition steps to make igniters for Composite
motors. There are some suggested wire sizes to use for various sizes of
motors.
Unique Rocketry suppled some AWG 22 solid zip wire to get me started. I made 11 igniters from this wire, all about the same length as North Coast's igniters.
The process is easy. Strip the wire and line up the bare ends with a even gap of ~0.008 and 0.015". The instructions suggest using a spark plug gapper or feeler gauge. I used a feeler gauge on a few and then used my eye.
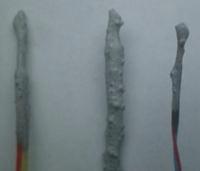
 Once
stripped, the wires are dipped into the Conductive Primer until they are
covered completely with the black primer. After this you should measure the
resistance. The instructions say that between 1.5 and 10 ohms is normal for a
properly dipped wire. Most of the eleven I dipped came in at 4 - 5 ohms. The
others measured at 8 - 9 ohms and two were > 25 ohms. I re-dipped those and
they came down to 4 - 5 ohms.
Once
stripped, the wires are dipped into the Conductive Primer until they are
covered completely with the black primer. After this you should measure the
resistance. The instructions say that between 1.5 and 10 ohms is normal for a
properly dipped wire. Most of the eleven I dipped came in at 4 - 5 ohms. The
others measured at 8 - 9 ohms and two were > 25 ohms. I re-dipped those and
they came down to 4 - 5 ohms.
After the ohm check you are supposed to dip them in the sealer. I did this and let them dry over-night (only need 20 minutes). When I got up, I re-measured the resistance and all the ones that came in between 4 - 5 ohms were now between 2 - 3 ohms and the rest were also lower. I don't know if this is expected, but it happened.
 The next step is mixing
the Oxidizer with the Pyrogen. This makes a very grainy and heavy mixture. I
mixed it with a small flat screwdriver. The instructions are very clear in
saying that shaking is not enough. This is especially true after the mix has
set for a while. I would suggest making 10+ igniters at a time since you loose
some of the mixture on your stirring device.
The next step is mixing
the Oxidizer with the Pyrogen. This makes a very grainy and heavy mixture. I
mixed it with a small flat screwdriver. The instructions are very clear in
saying that shaking is not enough. This is especially true after the mix has
set for a while. I would suggest making 10+ igniters at a time since you loose
some of the mixture on your stirring device.
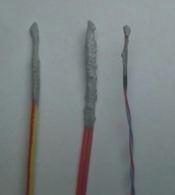
Once mixed, I began dipping my igniters. I stirred this mixture every few dips. Re-measured the resistance per the instructions. None seemed to change. After letting the Pyrogen dip dry for 1 hour, I dipped them in the sealer. Voila' . . . igniters ala Nick.
The finished igniter tips were wider and longer than NCR's and that concerned me. The smallest nozzle throat I could pass any of my new dipped igniters through was a F39. This was a concern to me.
 I purchased
some 24 gauge 4-strand telephone wire and used it to make my next 10 igniters.
Similar results all around. I also purchased some 30 gauge insulated wire wrap
wire from Radio Shack. I twisted the pairs together using a drill as described
in the instructions. I made 8 of this size igniter and now had successfully
dipped some that would easily slid into a D9 nozzle throat.
I purchased
some 24 gauge 4-strand telephone wire and used it to make my next 10 igniters.
Similar results all around. I also purchased some 30 gauge insulated wire wrap
wire from Radio Shack. I twisted the pairs together using a drill as described
in the instructions. I made 8 of this size igniter and now had successfully
dipped some that would easily slid into a D9 nozzle throat.
Overall, for CONSTRUCTION I would rate this kit 4.5 points. Although I have nothing to compare it to, I found the Pyrogen mix to be the most challenging part. To obtain a perfect 5 rating, I don't want to have to stir it. However, don't let this deter you. Just recognize that this is a required step and take your time.
When using twisted pairs of wire, make sure of two things; 1) they are is at least 5 turns per inch and 2) that you strip both ends before dipping. If you try to strip the launcher end after dipping the igniter it may be disturbed enough to loss good contact. I had this happen after the primer dip.
FLIGHT/RECOVERY:
 The
instructions indicate that a 12V system is required. I use the Estes Command
Controller with two 7.2V batteries for a 14.4V system. I tested one of the
igniters on a garage floor. Upon ignition there was a large flame ball and
flash. Then a visible and audible crackling of the remaining igniter head that
lasted for less than 2 seconds.
The
instructions indicate that a 12V system is required. I use the Estes Command
Controller with two 7.2V batteries for a 14.4V system. I tested one of the
igniters on a garage floor. Upon ignition there was a large flame ball and
flash. Then a visible and audible crackling of the remaining igniter head that
lasted for less than 2 seconds.
I have used 10 of these igniters on various 29mm and 24mm reloads. They have all fired the motor on first pop. I never had a puff, puff, puff, whoosh ignition either. All were, 3...2...1...whoosh! The best display of the igniters happen when using the 30 gauge in my three 24-mm cluster THOY Snipe rocket. I successfully ignited all three E18's!
For recovery . . . yes, there is a recovery mode. For recovery, the wires can be reused. Simply snip the end, strip the end and dip the end where the previous igniter tip was. This was not possible on the 30 gauge igniters as they crumbled and curled from the motor exhaust.
For FLIGHT/RECOVERY, I would rate this kit 5 points. Haven't had a single failure. Can't be better than that.
I asked Unique Rocketry about thinning the mixtures and here is the response: "Yes, the pyrogen can be thinned with acetone to suit the motor application. It can also be thickened by allowing some of the acetone to evaporate. The solvent used in all three bottles is acetone. The same is true of the Conductive Primer. After several igniter dipping sessions, users will have to add a bit of acetone to the IgniterMan Pyrogen and Conductive Primer to maintain the consistency. I have a couple of users who make igniters for their Apogee motors. They say they have to thin the Primer and Pyrogen in order for the igniters to easily fit into the slots of the Apogee motor grains."
Overall, the IgniterMan kit is a win with me. For the $30 I have made about 30 igniters. That has already brought the price down lower than most purchasable igniters. However, the important fact is that I barely started using the mixtures. Unique Rocketry says I can get 500 igniters out of this mix. I probably can't with my dipping technique, but I'm sure I can get 200. Doing so would drive the cost per igniter down to $0.15 note including the wire. This is outstanding! I give the kit an OVERALL rating of 5 points.
UPDATE 4/00 - A couple of tips for sucessful clustering.
1) Make certain the date of motor manufacture is identical for all four
motors. At the very least, make certain the two opposing motors have the
same date of manufacture. Doing this eliminates the motor aging
variable. Also it's highly doubtful the formulation changed at any time
during that day.
2) Match the physical size of the heating element formed by the
Conductive Primer Dip. Also, match the DC resistance of the finished
igniter to with in 0.5 ohms. This will minimize any igniter ignition
skew.
3) Make certain to use a battery which can supply ALOT of current
WITHOUT having its output voltage collapse. A sealed lead-acid gel cell,
motorcycle battery, or car battery works great. You want to be able to
dump lots of power into that little thermal head so it heats up VERY
fast.
Following these three steps will help insure all motors fire and come up
to pressure at the same time. Steps 1 and 3 should be followed
regardless of the brand of igniter used.
- Robert Briody (Unique Rocketry)
 |
 |