| Construction Rating: | starstarstarstarstar_border |
| Flight Rating: | starstarstarstarstar_border |
| Overall Rating: | starstarstarstarstar_border |
| Manufacturer: | Rocket Pad |

Brief:
This is a scale model of an old 1950's Army ground-to-ground missile used for
troop support. It was in service for a short time. The rocket kit flies with
24mm motors and uses a bright mylar parachute for recovery, is rated a skill
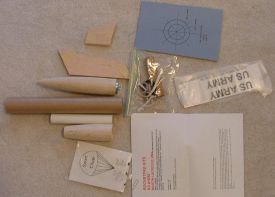
level 3 kit, and is a single stage rocket with 8 balsa fins. The kit come in a
plastic bag pretty much like a lot of other kits. I won the kit on eBay.
Rocketpad does not have a website yet though Stan who sells them told me that
one is in the works. I got it for $19.95 and it arrived here packed up good in
bubble wrap in the box.
Construction:
The kit has one main body tube (a standard 1.6" Estes type BT-60) and also
comes with a balsa boat tail--not one you have to make out of card stock like
some other kits have you do! The nose cone also is balsa. The fins are cut to
size, leaving you to just sand them together to ensure they match. It uses a
black fiber board centering rings and a Kevlar®
shock cord mounting system. There are 8 fins on this kit: 4 large, 4 small. The
nose cone came with the nose weight (metal washers) and eye hook attached. The
balsa used for the fins looks to be of good quality. The shock cord is
1/4" and the Kevlar®
cord is rather thick--I'd guess to be about 50-80lb. It also includes a fin
marking guide that is the type you place the BT over it and make marks where
the fins lines are.
The assembly instructions call for assembly of the motor tube to the boat tail first and hook up of the Kevlar® cord to a "V" cut into the top motor block. It seems to work out nicely. I have another one of their kits with over 4 problem-free flights and they used the same system on it. You must be careful when you use the included blank motor casing to push in the motor block, as the instructions warn not to stop when pushing in to the mark and quickly pulling it out. I once did this in a similar Estes kit, stopped for a second and it jammed up! This one went fine though (since I did not stop!) After assembling the boat tail motor assembly, you move on to the fins. You first mark where the fins go from the fin guide. The 4 top fins are offset to the 4 lower small fins. After you mark the body tube & the motor-boattail assembly is dry, you install the motor assembly into the main body tube. Then you move on to the fins. This part takes some time as you wait for the fins to dry so you can move the tube around to the next line. I used a heavy rod I had in the tube to keep it from moving as I glued on the fins. This helped keep the tube in the correct position. After the fins are all glued on, you are told to add fillets to the fin/body tube, a standard item. The parachute is a standalone kit that you assemble. The last step is attaching the shock cord to the Kevlar® cord and nose cone along with hooking the parachute to the nose cone. The instructions were in a typical order and there are pictures to show how the assembly should look. Though not all that hard to assemble (aligning the fins is the most difficult part), it is a skill level 3 kit!
Finishing:
I used sanding sealer on the fins, boat tail, and nose cone. I put 3 coats on
the fins and nose cone, but the boat tail took 4 coats to seal up. I used
Rustoleum paints and it came out looking just like the kit in the picture on
the kit card. The decals are nice and thick, making them hard to mess up. All
around standard finishing. The only thing I would want different on the kit is
a tighter grain on the balsa boat-tail.
Construction Rating: 4 out of 5
Flight:
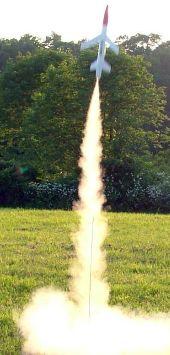
I used a C11-5 for the first flight. I put in some wadding and loaded the motor
with a little masking tape for a friction fit. It did not go up all that high
but it was still a good flight. It did arch a little to the left because of a
little drag I guess from the 8 fins. Some of my friends thought the big fins up
near the top of the rocket make it unstable but it seems to work thanks to the
heavy noseweight. It went up better with a D12-5. The flight with the D12-5 and
C11-3 were better and straighter than the C11-5.
Recovery:
The 12" parachute brought it down fine and none of the fins got messed up.
The descent was a little faster than normal but I think it should not be a
problem at grassy launch sites, so you may want swap the included chute for an
18" one when launching near hard surfaces. The shock cord system with the
Kevlar®
was fine. I had no problems and the parachute came out fine on each flight. It
would be a good idea though to fly this with a C11 type motor in a small field
if you want it back. The D12-5 got it way up!
Flight Rating: 4 out of 5
Summary:
This is a fun and unique looking rocket kit. The rocket gets attention when
there are people around, as it does not look like your everyday rocket! The
main PROs here are its unique looks and pre-cut fins, the instructions were
much better than the first Rocketpad kit I got, and the balsa fins were top
notch. CONs: not much here, the only real thing was the grain in the boat-tail
but with sanding sealer, it has not had any damage in all its flights. Also
consider a larger chute for hard surfaces though don't use the larger parachute
on a windy day if you want it back!
Overall Rating: 4 out of 5
 |
 |