| Construction Rating: | starstarstarstarstar_border |
| Flight Rating: | starstarstarstarstar_border |
| Overall Rating: | starstarstarstarstar_border |
| Manufacturer: | Rocket Pad |
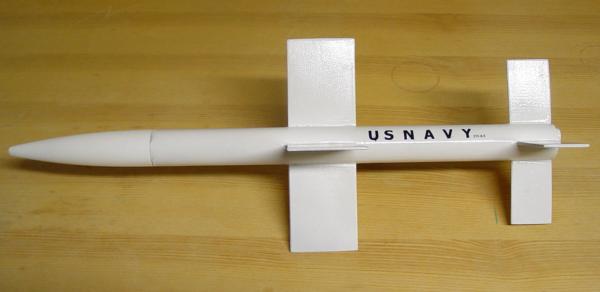
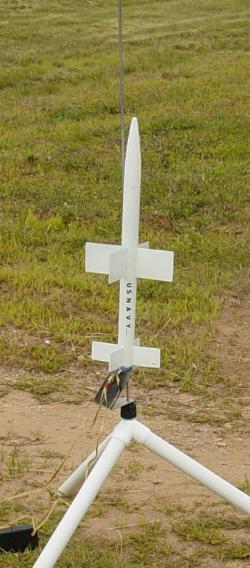
I ran across the LARK on eBay a while back and was intrigued by the awkward looking fin design. This surface to air missile was designed in the mid 1940's to be a point defense weapon for the U.S. Navy against Kamikaze pilots. The designation was CTV-N-8. I'm personally a typical 3FNC flier and the concept of 8FNC kind of tickled me. The kit was advertised as a 2 x 18mm cluster scale kit. So I happily placed my bid and went on my way. I think I lost a couple of auctions and ended up taking one in the $20 range. I did post a couple of notes to the seller asking for details about the kit and the replies were rather vague. Figuring it's just $20, I went ahead and bought the kit. I did post a few inquiries on RMR, RF, and ROL about Rocket Pad Kits however everyone seemed determined to confuse them with The Launch Pad.
When it arrived it was packaged as any other small kit manufacturer does, in a poly bag with a nice picture and a hang tag. What was interesting is there is no indication of whom or what Rocket Pad is. There is not even so much as a zip code or state to indicate where these kits come from. I found then, and still consider this a little weird.
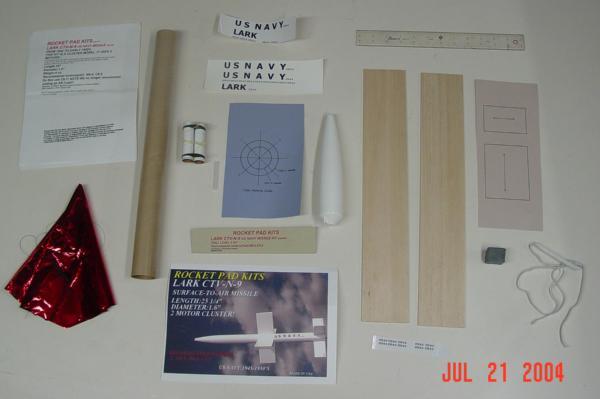
Ok, let's look at what I got:
- (1) BT60 body tube
- (1) Plastic nose cone - looks like an Estes (or equivalent) PNC60AH
- (1) Pre-assembled 2x18mm motor mount (more on this later)
- (2) Sheets of some nice quality 1/8" balsa
- (1) 18" Mylar parachute kit - I'm pretty sure this one was an Arizona
- Earth Space Research kit
- (1) 3/16" Launch lug
- (1) Elastic shock cord - 32" of ¼" sewing elastic.
- (1) Lump of modeling clay
- (1) Cardboard fin pattern
- (1) Cardboard fin guide
- (2) Sheets of waterslide decals - the packing list indicated one
- (1) Set of b/w photos to aid in assembly
- (1) Set of directions
- (1) Document on the history of the Lark
Let me get the nits out of the way early on so the rest of the way we have a rather positive review.
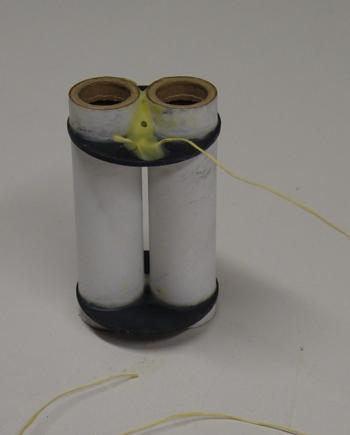
1) I like to build my kits - I did not like getting a preassembled motor mount and found it odd that step would be done for me in a kit where I had to cut out my own fins. I also did not like the assembly technique used by the manufacturer. The here was only a dab or so of glue. I did approve of the Kevlar cord mounted to the forward CR to act as a shock cord. The MMT provides no retention.
2) The documentation was thorough; however it was rife with grammatical and spelling errors. While this does not interfere with the building, I am fussy about documentation and consider it a mark of a pro to take pride in your writing
Those two points were the only major peeves, besides the mystery of who the heck Rocket Pad Kits is.
The Build
Except where noted, I have been true to the directions in assembly.
The actual build was fairly easy. I initially tried yellow glue, but the fins were a bit awkward so I fell back to CA/Accelerator and then 30 min epoxy.. The only major deviation was in the MMT. I felt a little extra glue was called for and I also lengthened the Kevlar by about 12". My reason for the latter was I could easily envision the nose cone snapping back and either zippering the BT, or tearing off one of the front fins.
1) I mounted my modified MMT in typical smear in some glue and set it in place fashion.
2) I cut out the fins using the supplied template, however in this case you really just need a ruler as the fins are rectangles. The larger one is the with of the stock and the smaller one could be done by trimming the stock to width and just lopping pieces off.. One nice thing is the template has a clearly marked grain indicator. The directions call for sanding both long edges and one side to a rounded profile. The directions also call for sealing the fins and I did at this point with a coat of thin CA and did an initial sanding.
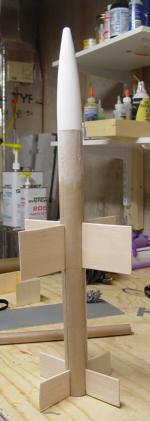
3) Instead of the fin placement template, I used my trusty Estes fin marking guide. I marked four lines. And the position of the front fins, which is indicated as 9" from the base of the rocket.
4) I mounted the rear fins first using the marking guide and then mounted the front fins.
5) The directions call for the lug to be mounted against one of the smaller fins and about 1" from the bottom. So be it. I used a 1/4" lug instead of the supplied 3/16" one provided as I prefer to do most of my flying from the MPR pads. If need be, I can fly from a 3/16" rod as well.
6) I tore the clay in to small chunks and packed it into the NC as instructed, using a launch rod to pack it in. A quick layer of epoxy made it for keeps.
7) The parachute is a typical Mylar assembly job and I won't bother with the detail.
8) I the attached the elastic to the extended shock cord and affixed it to the NC. The directions call for securing the knots with a drop of glue. They also call for attaching the parachute directly to the NC, although I prefer to mount the parachute back from the nose cone a bit.
9) Finishing is about as simple as you can get. Paint it white and apply the decals. There is a note that some Larks had a black tip. I was less than impressed with the waterslide decals. They seemed to be unfixed and the ink began to run as soon as they were wet enough to apply. Now where is that bottle of Future…?
I give the Lark 4 out of 5. The kit is fairly easy to build and my only peeves are indicated above.
Construction Rating: 4 out of 5
 Launch and Recovery
On Saturday August 7th we went to my secret launch site, the RV area next to the Tournament Players Club (where they hold the Buick Invitational - formerly the Greater Hartford Open golf tournament).
Rocket Pad is specific about motor selection: They recommend only the B6-4 and C6-5 the specifically advise against the C6-7 and A8-3. I pulled a couple of B4-4's (notice how well I pay attention to the manufacturer) taped them for a friction fit, dropped in about one caliber of dog barf wadding and dropped it on the rod. At this point I looked at where the lug was, how much torsional loading there was, and immediately glued a piece of soda straw at the root of the upper fin. I then hooked up my clip whip and handed the control to my wife.
I stood by as my wife launched her first rocket. There was a bit of a breeze and the Lark weather cocked a bit, probably due to those massive front fins. The flight arced to about the 300' altitude that Rocksim predicted and after a few heart stopping moments, the chute popped and down she came .
I do want to note here that I did replace the supplied parachute with a 12" Spherachute. The stiff breeze gave me concern as to drift and I always get a straight drop with these parachutes. I also hate assembling Mylar chutes.

Flight Rating: 4 out of 5
Summary
- I do think two launch lugs are called for
- The pre-manufactured MMT is a bit disappointing.
- I think in retrospect I am going to modify the Lark for a positive retention. I'll probably epoxy a screw to the rear centering ring and just use a nut to hold the motors in.
- I may scratch build another and use a 24mm mount.
- Still, as ungainly looking as the thing is, it makes a nice addition to the fleet.
I next plan to build the Rocket Pad Lacrosse. I must have a thing for great big wings.
Overall Rating: 4 out of 5
 |
 |