| Construction Rating: | starstarstarstarstar |
| Flight Rating: | starstarstarstarstar |
| Overall Rating: | starstarstarstarstar |
| Manufacturer: | Rocket Pad |
Brief:
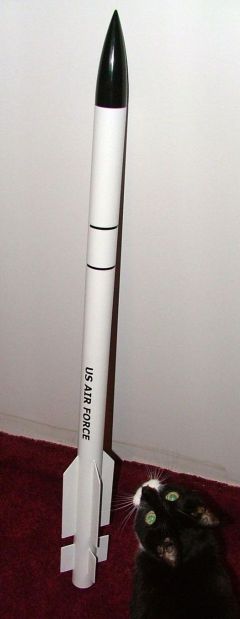
This is a scale model of the new US anti-missile missile, essentially it's an
update of the older Patriot missile used in desert storm in the 1990s. The new
missile has 108 small rocket motors to push it into an incoming missile when it
is close--COOL! This kit is a single-stage kit that uses one long BT-60 body
tube and flies on 24mm D and E size motors. It uses an 18" mylar parachute
and a metal motor hook for retention. It also includes a spacer for using the
shorter D motors in the motor mount. This is my fourth Rocket Pad kit and I got
it on eBay. It comes packed in the standard plastic bag like most kits these
days along with a big color picture of the completed kit on the kit bag card.
Construction:
The kit uses one 34" long main body tube. The spirals are almost not
there, making for an easy finish! The motor tube is an 11" long piece of
BT-50. There is a metal motor hook for retention, a lower centering ring of
laser-cut fiber, and an upper ring of plywood. There are 8 pre-cut basswood
fins (4 large and 4 small) that require just a little sanding before use. For
recovery, it uses a Kevlar®
cord mounted to the top centering ring and a 1/4" white shock cord tied to
the Kevlar®
cord and the black plastic nose cone, along with an 18" mylar parachute
from ASP. The kit also includes waterslide decals.
The instructions on this kit were fine, however, I had seen on other reviews that the instructions had some problems, which was the case with the first 2 RP kits I built, and that they were in the process of fixing them up. This appears to be one of the post-revision kits! The instructions included big pictures to help in assembly. This is a skill level 3 kit, so you should have built a few kits before but it was not all that hard. I used Elmer's wood glue for the entire construction. Assembly was like most kits, you work on the motor mount first, starting with the Kevlar® cord being tied to two holes in the upper plywood centering ring and you put some glue on both sides of the ring where the cord is. Then mark the body tube with the enclosed fin marking guide, glue in the motor mount in the tube, match sand the fins so they are all the same, attach them, mount the 3/16" launch lug, put some glue fillets on the joints, assembly the parachute, and connect up the shock cord to the nose cone. The body tube on a lot of large LPR kits have you coupling smaller tubes together to make a large one, but the single 34" tube in the PAC-3 eliminates that! Also, the nice basswood and body tube made the kit really stand out from others I've built. The soft clay used for the nose weight was pushed in per the instructions and has held up for 5 flights with no problems.
Finishing:
I used Aero-Gloss brand sanding sealer to seal up the basswood fins with a
couple of coats. The spirals on the body tube were so slight, I did not bother
with filling them and the paint took care of them! I painted the rocket with
white spray paint, except for the nose cone, which I painted black. The decals
were a nice weight material, not that thin decals you some time see that rip!
They took about 60 seconds to start to slide off & went on fine. There were
no problems in the finishing, all straight forward.
Construction Rating: 5 out of 5
Flight:
The first flight was with a C11-5 on a windy day. I did not want to use a
larger motor till I knew what it would do, but the flight was dead straight,
like it was on a string to guide it! I used some dog barf for wadding by the
way. The wind came up bad so I waited for a better day for the next flight.
Once the weather was more cooperative, I used a D12-5 for another great flight!
My brother thought that it would not be stable since the fins are only 1"
wide, but it flies unbelievably straight! The last flight was with an E9-8 and
it went impressively high! I like the sound of Es and this is one stable
rocket!
Recovery:
The recovery was great. The 18" chute brought it down at a nice rate
without damage. Our field is hard with very short grass but the rocket was
fine. Some people like the Kevlar®
past the top of the tube and others prefer it inside the tube, but here it's
past the top of the tube and I've had no problem with it. The recovery system
works as it should. The end of the motor is just past the end of the body tube
so there is no burning of fins or tube.
Flight Rating: 5 out of 5
Summary:
This kit from Rocket Pad is a vast improvement over the my first two that I got
back in January 2004. This one was great and I look forward to building and
flying more of their kits in the future. They are offering some unique kits
with some very original designs that you don't see with most vendors.
Overall Rating: 5 out of 5
 |
 |