| Construction Rating: | starstarstarstarstar_border |
| Flight Rating: | starstarstarstarstar |
| Overall Rating: | starstarstarstarstar_border |
| Manufacturer: | Rocket Pad |
Brief:
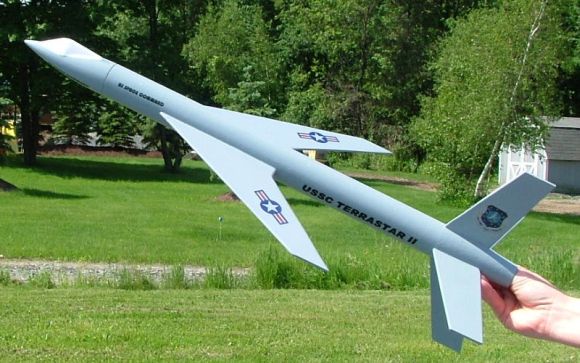
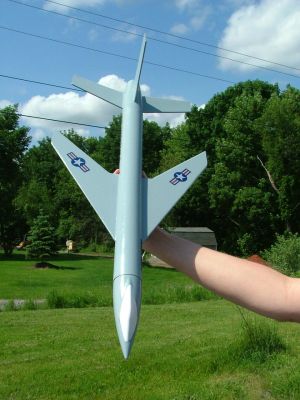
This is a Skill level 3 single stage 24mm motor model rocket kit. It has a main
wingspan of 12" wingtip to wing tip on my kit. Rocketpad calls it a
"futuristic attack-troop transport of the U.S. Space Command". It is
a sleek looking kit and uses an 18" mylar parachute for recovery. There
are two large wings and four smaller fins. Their kits are different than the
run of the mill 3 fin types and I like something different!
Construction:
The kit features high quality 1/8" balsa wood. The sheets were straight
and not warped. The fins and wings are cut from the included balsa sheets with
card stock templates. The kit also uses a balsa boat tail, not a roll your own
paper type! The nose cone is a plastic type with a molded canopy top that adds
to the kit's look. The kit uses a Kevlar®
cord that is connected to the motor tube assembly and ties to a brass swivel
that you tie to the 1/4" shock cord. The main 1.6" diameter body tube
is 17" long. The centering rings are laser cut black fiber and the kit
also included full color waterslide decals. The motor retention is friction
fit. All the parts were of a high quality and fit together with no problems.
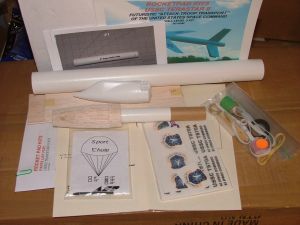
The instructions are on a few sheets that are printed on one side of each sheet. The included pictures were clear and in B&W. The instructions were easy to follow and I had no problem following the assembly of the kit although I would not recommend this kit to a beginner. The only hard part was gluing on the two large wings. It took me some time to do as the fins would not stay in place because of their size. I ended up cleaning off the Elmer's wood glue and used some heavy CA. When the wing was dry, I the placed fillets of Elmer's wood glue to finish them. There was no problem using Elmer's on the four small fins or balsa boat tail. I like Rocketpad's way of hooking the Kevlar® cord to a big brass swivel where you then hook it up the shock cord that fits to the nose cone. The parachute was packed in its own bag with assembly instructions. The kit was a mylar type from ASP. It was an 18" and bright silver in color. To ensure proper stability, you have to put in some clay weight in the nose cone. It was a fun kit to build and the results were great.
Finishing:
The instructions have you prep the plastic nose cone separate from the rest of
the kit since the "canopy top" is left white in color. They show you
a picture of the nose cone taped up so you can paint the cone the gray color
and protect the canopy from the gray paint. The kit comes packed in a plastic
bag with full color picture of the finished kit showing the color and decal
placement. I used my old stand by Aero Gloss brand sanding sealer for the balsa
parts. It took 3 coats to get a smooth finish on the balsa. There were no cons
in the finishing of the kit. The included waterslide decals are not the thin
type and went on fine. I used Rustoleum Gloss Gray spray paint that I got at
Home Depot. I did the painting and finishing to match the picture on the header
card and it looks sharp!
Construction Rating: 4 out of 5
Flight:
The recommended motors are C11-3,C11-5,D12-5,E9-6, and E9-8. You prep the
rocket like most others. I used some dog barf for wadding and a C11-3 for the
first flight. The motor is held in place by friction fit by using a small piece
of masking tape on the motor. I launched it With some friends at a local
farmer's field. The farmer's son is also into rockets so we had access to a big
field! The first flight went great. It was straight and the parachute came out
as the rocket was turning down at about the 9 o'clock position. There was no
wind and the kit came down close to the launch pad. The next flight was with a
D12-5 motor and this one was real nice and much higher than the C motor. Again
the rocket came down with no damage near the launcher. Then I got brave and
used an E9-6. Man, did it take off! It went very high and was hard to see when
the chute came out but we did see the puff of smoke from the ejection charge
and the bright chute. It took a bit of time till it came down over a small hill
on the farm and I had a walk to get it, but I did get it back! Lesson, don't
fly this kit on an E9 without a large field! The C motors would be fine in a
small high school field with nice flights! I was impressed the way it flies
with those large wings up front. I did us an E9-8 for the last flight and the
chute clearly popped out on the way down. Since the kit is not that heavy and
it flies high, the 8 second delay is OK. Good flights all around.
Recovery:
After 4 flights, the kit was in great shape and had no damage from recovery.
The shock cord mounting system is still in great condition as well.
Flight Rating: 5 out of 5
Summary:
There are just about no cons in this kit. The only thing that you have to be
careful about is the gluing the two large fins on. I contacted Rocketpad and
told them about the problems I had attaching the fins. They emailed me back in
less than a day and said they would add the info about using the heavy CA glue
for the wings to future kits. I am just giving the kit a 4 1/2 for the wing
thing but am happy they responded so fast to me. Also, I received an updated
copy of the instructions from them with the fix included. Cool!
Overall Rating: 4 out of 5
 |
 |