| Construction Rating: | starstarstarstarstar_border |
| Flight Rating: | starstarstarstarstar_border |
| Overall Rating: | starstarstarstarstar_border |
| Manufacturer: | Rocket Vision |
Brief:
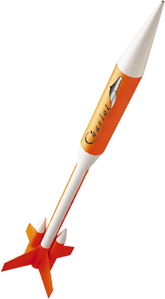
The Chariot is a single stage, payload rocket. It is one of Rocket Vision's line of Rugged Rockets and is specifically designed for mid-range power (E-G). The body tube and payload tubes are of heavy duty phenolic. The nose cones (there are faux strap-on boosters) and transition are poly-vinyl. The BP section 8 inches long and has an interior dia. of 1.86", plenty of room for eggs, altimeters, cameras . . . whatever.
Construction:
The component specs are as follows:
Finished length... 31.125"
| Body Tube (BT) L=15" dia. ex. 1.12", int. .990" material= phenolic Payload Bay (PB) L=8" Dia. ext. 2.05", int. 1.86" Material= phenolic Fins (4) Material= G10 Thickness= .054" Root= 3.25" Span= 3" Tip= 1.5" Sweep Length= 3.350 |
 Faux Boosters Faux BoostersMaterial= phenolic L= 6.75" (incld. NCs) Dia= ext. .945", int. .8" (20.5mm) Motor Mount (MMT) Material= rough cardboard L= 8" Dia= ext. .992", int. .945" (24mm) Shock Cord Material= 1/8" braided Kevlar L=40" 'Chute Material= DayGlo Orange ripstop plasticized paper Dia.= 18" at grommet points Shroud Lines= 6, 200lb. Kevlar [all connections to the 'chute are double thickness and have brass grommets] 'Chute Protector= 9.5"X4" black Nomex with a grommet connection to the shock cord |
The three nose cones (one main and two for the boosters) are made of white polyvinyl material and are very thick. The rocket divides at the base of the transition forming a section consisting of the fins and Body Tube (BT) and another section consisting of the Nose Cone (NC), Transition and Payload Bay (PB).
The construction is very simple. The instructions are clear and concise. If greater detail is needed, the online instructions are ideal. Here you can get the step by step color photos that are lacking from the packaged instructions. This rocket requires the use of epoxy exclusively. No other glue will work. The reader is advised to use a long cure epoxy for the best joints. I used SIG's two part epoxy that is mixed 2/1. It sets in about an hour and cures in 24 hrs. The only exception to the SIG epoxy was in the area of the Motor Mount (MMT). Here, I used 5min epoxy. The stress here is longitudinal and I see no reason for super strength here. Other than that, I think I'd make one change. I would build a bulk head about three inches into the base of the PB. Then I would NOT glue the PB to the transition. Instead I would glue the transition to the BT and use the transition and the three inch chamber in the bottom of the BP for packing the recovery system. This would allow easier 'chute packing, more certain deployment and a larger 'chute for heavy payloads.
Finishing:
I left this rocket in the raw. However, based on my experience with other Rocket Vision kits, sanding would be minimal and the finish should go on quite well. I can see only one area of concern. At the base, where the false boosters join the BT, it is going to be tough to get paint in there using a rattle can. Even worse, on the booster that has the bottom rod guide attached, there is even less space between the booster and the BT. Here, you are either going to have to use a brush or a airbrush.
Construction Rating: 4 out of 5
Flight:
It uses several motors. The first flight was with the recommended E15-4. Lift-off was smooth and the rocket reached 1200' as measured by two theodolites on 1,000' baselines. Recovery was without a hitch about 400 yards from the pad in light wind. I think a larger 'chute will be necessary if any payload is included.
The second flight was trickier. For this one, I took two Estes C-0 boosters and filled the tops with epoxy. Then I wrapped them in masking tape until they fit tightly in the booster tubes. For the sustainer, I used another E15-4. Ignition was facilitated using a Vaughn Brothers QuadCon controller. I wired the E15 to one switch and the C-0's to another. I opened the switch to the E-15 and pushed the fire button. As it lit, I opened the second switch to the two C's and they lit too. The rocket moved off the pad quickly and flew to just over 1500'. The C's burned out just after the E motor. Recovery was as before. (Please note that this technique is not indorsed by Rocket Vision and would not be allowed at an NAR event.) Modifying the C6-0's alone would cause most RSOs to DQ you. In the end, the altitude gain was minimal and hardly worth the risk and trouble. My advice is to forget it.
The largest motor I have used to date is an F72-10. This produced an altitude of 2800'. I'd like to try a G55 but I doubt that I would be able to see it at the projected altitude of 4,300' so I'll hold off on that one.
Recovery:
The 'chute is a very stiff material that gets stiffer in cold weather. Do not prep this rocket until moments before flight. Also, I wouldn't leave the 'chute stored in the packed position. It most definitely will take a set. The Nomex chute protector is an iffy thing. On the surface it seems ideal. However, in practice it takes up a lot of space, sometimes hangs up causing ballistic recoveries and it doesn't always stop the 'chute from getting pin holes. I recommend using cellulose insulation. It is lighter, packs easier and will not hang up. Repeated launchings (20 to date) reveal very little wear and tear on the components. I've had to re-tie the knots in the Kevlar a few times but that is because I refuse to set them with glue.
Flight Rating: 4 out of 5
Summary:
This is another excellent product from Rocket Vision. The parts are sturdy, well made and correctly dimensioned. The design is very good. It is practical, esthetically pleasing and flexible. The generous payload section coupled with a powerful selection of motors should make this an excellent egg lofter or experimental platform. My one big criticism is in the area of the launch lugs. They included two sets in my kit; 1/8 inch and 3/16 inch. The 1/8 are too small. This rocket is heavy and long and needs more stability that can be achieved using a 1/8 inch rod. The 3/16" lugs are to large in diameter. For some reason, RV uses and especially thick polyvinyl tubing for its lugs. In the small diameter it is ok. But in the larger 3/16 diameter, it is so large that it looks obviously out of scale on the Chariot. I recommend not using the lugs and either using Estes lugs or better yet, using rail buttons and a rail.
Overall Rating: 4 out of 5
 |
 |