| Manufacturer: | Rocket Vision |
![[Picture]](/images/archive/images/ratings/rating_rv_six-pack.gif) (06/02/01) I purchased another Rugged-Rocket, the Rocket Vision Six-Pack, to
have built and fly on a vacation in Arizona . . . right after which it was
announced that Rocket Vision was going out of business. Oh, well, I'll go ahead
and give it a quick review and add it to my newest comparison page on
Tube-Fin
rockets.
(06/02/01) I purchased another Rugged-Rocket, the Rocket Vision Six-Pack, to
have built and fly on a vacation in Arizona . . . right after which it was
announced that Rocket Vision was going out of business. Oh, well, I'll go ahead
and give it a quick review and add it to my newest comparison page on
Tube-Fin
rockets.
See my Tube-Fin Rocket Comparison Page
I never had a Tube-Finned rocket in my youth but gave it a try a few years ago with a Rogue Hex Courier and really liked it. But it was the Custom Serval that I really enjoyed. I bought the Six-Pack with the hopes of having the same fun and gaining a heavier model that could take some flying abuse.
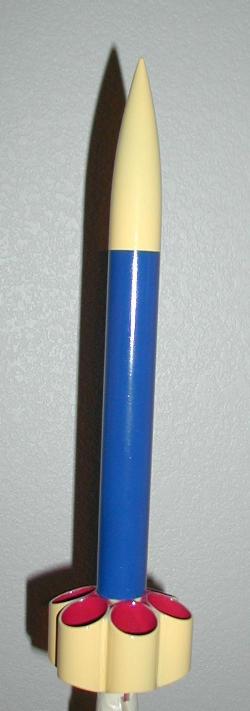 The Six-Pack follows the
same pattern of all the Rugged-Rockets including a single thick, phenolic body
tube, with a motor tube insert, a plastic nose cone, a Kevlar® shockcord,
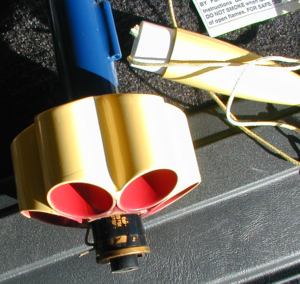
parachute protector and parachute. For fins the Six-Pack has six thick,
phenolic tubes pre-cut at a slight angle. Nice looking. What this rocket had
over my first Rocket Vision rocket, the
Solar
Venture, was a motor retention system which consisted of a motor hook that
was sandwiched between the body tube and the motor insert.
The Six-Pack follows the
same pattern of all the Rugged-Rockets including a single thick, phenolic body
tube, with a motor tube insert, a plastic nose cone, a Kevlar® shockcord,
parachute protector and parachute. For fins the Six-Pack has six thick,
phenolic tubes pre-cut at a slight angle. Nice looking. What this rocket had
over my first Rocket Vision rocket, the
Solar
Venture, was a motor retention system which consisted of a motor hook that
was sandwiched between the body tube and the motor insert.
CONSTRUCTION:
Assembly of the Six-Pack was straight-forward and very easy. The instructions were on a single 8.5" x 11" page. They were in logical order, but no illustrations. The only illustration for assembly purposes was on an extra piece of paper that showed how the motor retention was added.
Shockcord installation, is really the only part of this rocket kit that I don't like. Rocket Vision provided a small piece of cardboard that the Kevlar® shock cord is mounted to the inside of the body tube with. You tie a knot in the Kevlar®, slot the cardboard, and glue the cardboard into the rocket body tube with the Kevlar® sandwiched between the cardboard and the body tube. It positions the shock cord like an Estes' 3-fold paper mount does with one exception: the Kevlar® knot sticks out. Is this a big deal, yes! With the small diameter body tube and having to pack in the parachute protector and parachute, this knot gets in the way. I would suggest two things: 1) don't use the knot, and/or 2) use enough epoxy to bury it and make it a large smoothed out bump in the body tube. I cut my knot off after 3 flights.
Finishing is a dream. No spirals! All you really have to worry about it how smooth your epoxy junctures are. The kit comes with water-transfer decals but I did not use them.
Overall, for CONSTRUCTION I would rate this kit 4 points. Just don't like that shockcord mount and the instructions could use illustrations to reach a larger group of modelers . . . kind of a moot point now.
FLIGHT/RECOVERY:
Rocket Vision provided the following Motor Selection guide in the instructions:
- D12-7 - 765 feet
- E28-8 - 2,770 feet
- F72-10 - 2,638 feet
- G55-10 - 3,450
 I was pleased to get the
rocket in the air during our vacation to Arizona. I had to buy the motors at
the launch and it being an AHPRA launch there were not many choices for smaller, 24mm
motors. But I did purchase some E28-7's.
I was pleased to get the
rocket in the air during our vacation to Arizona. I had to buy the motors at
the launch and it being an AHPRA launch there were not many choices for smaller, 24mm
motors. But I did purchase some E28-7's.
The first launch was nice on the E28. It punched off the pad and I was able to follow it for the full flight. I could tell it was still travelling upward when the ejection charge fired. Descent was fine and I recovered the rocket within 100 yards of the pad. I was fortunate not to lose my RMS Casing, it appeared that the ejection charge pushed it past the motor retention clip. A nice reminder for me to always use tape or a tie-wrap to make that motor hook stay on the casing. I lost one this way when I was first getting into RMS.
My next opportunity to fly was back home so I made a decision to convert this rocket into an 18mm motor. After all, flying a foot-long rocket to 1/2 mile high does increase your chances of losing it and since it couldn't be replaced I wanted to keep it around. I glued an 18mm motor mount into the existing 24mm and bent the motor retention pin to hold the 18mm motor.
Oh, for you folks that love altitude, it's not so bad. Here's what 18mm motors can do:

The next two flights were on C6-3's and were quite enjoyable. The second flight on the C6-3 didn't have a full parachute deployment. It was pushed out of the body, but the parachute never unfurled and the rocket dropped into some taller grass without damage, holding up to its trademark of being a "Rugged Rocket".
For FLIGHT/RECOVERY, I would rate this kit 5 points. Easily converted to an 18mm flier (just use an adaptor if you don't want to make it permanent) for enjoyment in the smaller fields. Solid and stable flights.
Overall, the Six-Pack is good rocket for someone looking for a Tube-Fin. Altitudes of over 3,000 feet or as low as 200 feet allow for the variation that many look for. Too bad we can't get them any more! I give the kit an OVERALL rating of 4 ½ points.
Other Reviews
- Rocket Vision Six-Pack By R. J. Talley
I just finished building the Six-Pack by Rocket Vision. For those who aren't familiar with it, it uses the same body tube/nose cone/recovery system as their Mach Buster . The difference is in the six tubular fins that provide guidance. I ordered one of these for two reasons: One, because like all of the other rockets in their fleet, it is really hard-core rugged. I expect to be able ...
 |
 |
Flights
|
|