| Manufacturer: | Rocket Vision |
This rocket was another "wow" in my hobby experience because I didn't expect what I found. One formulates an idea about what makes a "rugged rocket", but in my case I missed the boat. Rocket Vision's own words, "Unlike kits from other manufacturers, Rugged-Rockets can give you hundreds of flights for years enjoyment. The quality phenolic and fiberglass construction is water resistant and extremely tough." Notice the word "hundreds". Some kits may start showing wear after only a few flights. However, I think limiting factor to having "hundreds" of flights on a Rocket Vision's kit is to not loose it.
CONSTRUCTION:
The Solar Venture was a newly released kit for 1999. It is made up of a 9 3/8" long, 1/16" thick phenolic body tube. This is a very sturdy tube with this thickness for such a short tube and with only a 1 1/8" diameter body. The body tube is pre-slotted for the fins. Also this body tube does not have spirals!
It also comes with a motor mount tube which simply slides into the main body tube to allow 24mm motors to fit correctly. There are no centering rings, thrust rings, or other motor mount hardware. There is a plastic, (no spirals) 1/8" launch lug included in the kit, too.
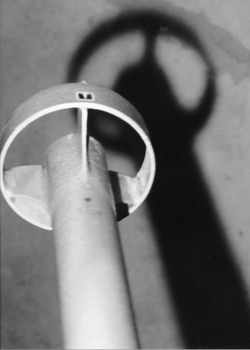
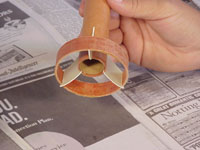 The fins are 1/16" fiberglass all pre-cut and ready to go. The fins simply fit into the pre-slotted body tube and glue up against the motor mount. Also the 3" diameter fin-ring is phenolic and assembles nicely to the fins that have a tab to hold it in position. I have included a picture from Rocket Vision's online assembly guide. Don't worry, they send hardcopy instructions with the kit.
Completing the body is a very hard plastic nose cone that requires a cross-bar to be assembled to it before it is complete. The cross-bar is used to tie the recovery system to.
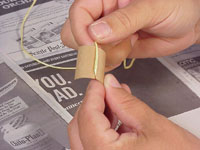 The recovery system is unique in hoe its components are assembled. It has over a 50" piece of Kevlar shock cord after all the mounting is complete. The cord is attached to the nose cone's cross-bar on the one end and the other to the inside of the body tube. This is done by using a supplied cut from a piece of tubing that gets a small slit cut in it to secure the knotted end of the shock cord. It is then glued to the inside of the body tube. Here is another picture from Rocket Vision.
What is also unique to the recovery system is that six inches down from the nose cone attachment a small ring is tied to the Kevlar and then six inches down from that another one is tied to it. Then after attaching the 3 shroud lines to the rings on the 10" white rip-stop nylon parachute, a ring is tied to each of the three shroud line centers. There is a 6th ring that is tied to another small length of Kevlar which is attached to a 3 1/2" x 4" piece of Nomex® permanent wadding. Then the three rings from the parachute are attached to the upper ring on the shock cord and the ring from the permanent wadding is attached to the lower shock cord ring. This makes for a very orderly recovery system and easily removable components.
 The included instructions were complete, orderly and had plenty of illustrations to ensure a successful build. They recommend 5-minute and 20-minute epoxy to ensure the "rugged rocket" components hold together for the many, many flights ahead.
It was great not working with spirals! I simply hit this rocket with a couple light coats of Plasti-Kote primer. I then used a special "hammered look" paint from Rustoleum. This gave the rocket a unique look.
The kit comes with a single sheet of water transfer decals. They include the pilot's windows, fuel openings, a big USA and various other decals that one might find on a futuristic, "advanced, thrust-augmented space transport vehicle".
Overall, for CONSTRUCTION I would rate this kit 5 points. Excellent, quality materials, and good instructions. No spirals is also a major bonus.
FLIGHT/RECOVERY:
Rocket Vision recommends the following motors which should provide the estimated altitudes:
| Estes D12-7 (BP) | 830 feet |
| Aerotech D15-8 (RMS) | 1,080 feet |
| Aerotech E5-8 (WL) | 2,090 feet |
| Aerotech E18-8 (RMS) | 2,050 feet |
Preparation is easy because the Solar Venture has the permanent wadding. Simply push it into the body tube and follow it with the remaining shock cord and folded parachute. Even though it is easy, there is actually quite a bit to get into that tube.
The second half to preparation is the friction (tape) fitting of the motor mount. I have to admit, that I was not terribly excited to use my 24mm RMS system without positive motor retention. But I did. After taping an ensuring it was snug, I made 4 flights on this rugged bird.
 First flight was on a D9-7. Now based on the table above, the altitude shouldn't have been more than 1,000 feet. The launch was fast coming off the 1/8" rod. It seemed a bit shaky by doing a small vertical adjustment (for lack of better term) and then roared off into the sun. I lost track of it due to the sun, however, finally caught a glimpse of the parachute and was able to recover it. This rocket drops very quickly!
For the second flight, I decided to replace the parachute with a 3-foot streamer to help with tracking. I also up'd the motor to an E18-10. Most other launchers indicated that I would loose this one for sure. I set up the pad with a small angle for the slight breeze and launched. It simply vanished from the pad and into the sky. Should have gotten at least 2,000 feet from this motor, but I promise I never saw the thing until about 30 seconds had elapsed. I then saw the streamer coming down still at 1,000 plus feet. This time when it hit the ground the ring-fin popped off. A clean break of the epoxy and easily repaired.
The third flight demonstrated the "rugged-ness" that the second flight put into question. With another D9, the rocket was set up. At launch, this thing bounced off the pad and ground twice, never going up. It did demonstrate a "rugged rocket" ability as nothing broke. It appears the red cap stuck on the motor and made its thrust angle change.
The fourth and last flight, was again on a D9-7. Similar trait as the first flight coming off the pad and this time it shot back over my head. I was able to track it and just about as the D9's thrust ended the ejection charge went off. The rocket survived the full speed deployment of the recovery system, however, with its fast descent rate and the concrete driveway it hit . . . well, you get the picture. The ring-fin blew off, taking a fin, and a section of tubing between two fins cracked and broke off. I probably will not repair this one, however, I see a it being recycled into a different rocket in the future.
The altitude with the small size of this little rocket makes me nervous, especially when using a $35 RMS casing. I would recommend single-use motors. The descent rate is very fast, however, if landing on any kind of ground cover it should be fine with the sturdiness of the kit. It has a nice recovery system and the permanent wadding is a bonus. For FLIGHT/RECOVERY, I would rate this kit 4 points.
Overall, a very easy kit to build. Super materials and precision cutting combined with easy to follow instructions. Make sure there are plenty of trackers, because if using E's and F's, this bird will be out of site! I give the kit an OVERALL rating of 4.5 points.
 |
 |
Flights
|
|