| Construction Rating: | starstarstarstar_borderstar_border |
| Flight Rating: | starstarstarstarstar_border |
| Overall Rating: | starstarstarstarstar_border |
| Manufacturer: | RocketHead Rockets |
| Style: | Odd-Roc |
Brief:
An unusual upside-down looking rocket that's a great flyer, and fairly easy to build. Rockethead's offerings are definitely not your run of the mill 3FNC designs.
Construction:
My kit took a couple of weeks to arrive, as the kits are essentially made in small batches as orders come in. When it did arrive, everything was in good shape. Parts were good quality and included 3 body tubes (BT-55-5, BT50-6, and BT20-6), a hard balsa nose cone, balsa fin stock, pre-assembled mylar chute, and assorted templates and hardware.
The instructions were fairly easy to follow and color pictures were helpful. There were several typos and misspellings but these did not detract from the basic construction.
I was pleased to see that step one of the instructions is to sand all tubes. This is a fairly basic step that helps improve bonds and also preps the surface for filling spirals. Most kit manufacturers overlook this basic technique but these instructions were clearly written by someone who's built rockets.
After sanding, all tubes are marked for fins lines and launch lugs. Next, a 13-18 centering ring is inserted into the BT20 to serve as a motor block. The BT20 construction is wrapped up by gluing a couple of centering rings near the top.
Next comes the BT50, which gets a couple of centering rings towards its top.
After the rings have been filleted and all bonds dried, the tubes are then glued together, with the BT20 feeding into the BT50, feeding into the BT55. The result is a tapered look with the fat part of the rocket at the top. This is dead opposite most conventional transition designs. This was also where I noticed a significant "gotcha" in the instructions. After going to all the trouble to mark fin lines on the tubes, it would be a good idea to make sure the lines are in alignment when connecting body tubes. There was no mention of this in the instructions and, while obvious, my guess is that a few folks might not think about this.
I found the somewhat loose fit and spacing on the centering rings made the assembly of the tubes a bit tricky. I was especially worried about a slightly off-center thrust. To make sure I didn't have a problem, I made a couple of centering rings from cardstock with OD's matching the OD of the body tubes (not the ID like most centering rings), and temporarily attached them to the exposed ends of the tubes. This allowed me to roll the tubes on a flat surface for proper alignment.
Fins are then cut from stock using templates, the good old-fashioned way. The attachment is fairly straightforward, though the larger fins go on the forward end (attached to the BT50), and the smaller trim fins go towards the aft end (on the BT20). The instructions pointed out the proper technique for bonding fins of this type--bond an upper and lower at the same time, then use a flat surface to make sure they are aligned. After that set is bonded, repeat for the other two sets. Follow everything up with fillets.
Launch lugs are mounted using standoffs of different sizes, since one goes on the BT20 and the other goes on the BT50, and both need to clear the BT55. I found it a little tricky keeping them aligned, but that's probably because I was using yellow glue instead of CA to bond, and they wanted to move around whenever I tried using a rod for alignment.
I was a little uncomfortable with the shock cord attachment method--tie knots in the ends of a small length of Kevlar, put a drop of glue inside the BT55, then put the Kevlaron a piece of masking tape with the knots just below the edge. The tape/Kevlarloop is the placed inside the BT55 on the drop of glue. I'm sure this will work OK for a while, but I would much rather have seen another foot of Kevlar, attached to the motor block.
The Kevlarattaches to a nylon/elastic shock cord, which is anchored to the hard balsa nose cone. My cone center was too hard for the screw eye to go in without drilling (there was a hardwood dowel in the center of my cone). I wound up screwing it in to the nosecone slightly off center, outside the wood dowel.
Finishing:
Finishing this rocket is pretty easy. I went with a single color finish (glossy white), which I thought looked better than the basic gray on the header card.
I have to say though, that the water slide decals were a mess, which was disappointing because they have some cute Rockethead logos (a helmeted knight, much like the Martian from Bugs Bunny cartoons). The decals were the flimsiest I've ever worked with and also tended to roll up on themselves. This kind of spoiled what was otherwise a very nice construction job. I dinged the rating a full point for this.
Construction Rating: 3 out of 5
Flight:
I was surprised to learn that there are no recommendations regarding motor selection in this kit. Based on my experience, I would figure the basic combo of A8-3, B6-4 and C6-5 would be the choices. For its first flight, I went all the way up to a C6-3, using the shorter delay in steady 8-10 MPH winds in anticipation of a significant weathercock.
The rocket went straight up off the pad, with a minor spin on the way up--I guess I didn't get those fins and tubes aligned perfectly after all. The 3 second delay was about right for the conditions, and it actually held a reasonably straight path with only a minor weathercock.
The 15" mylar chute deployed right on cue and I prepared for my long walk, as this bird very likely topped 900-1000 feet on that C. With nearly a square mile of open field, my rocket managed to drift to a soccer field at the opposite end of the park and landed on one of the flag posts marking the corners of the field. The kids playing soccer thought this was a very cool rocket.
Recovery:
This is a very good flyer, and the pre-assembled Mylar chute worked great. If anything, the 15" chute is a bit larger than needed.
Flight Rating: 4 out of 5
Summary:
Overall, I'd have to say the design itself is a big pro, as is the quality of the materials. The biggest con would be the flimsy decals. I thought is was a neat design and it drew the most attention of the assortment of rockets I took to the pad today.
Overall Rating: 4 out of 5
Other Reviews
- RocketHead Rockets RHR 2003 By Bob Cox
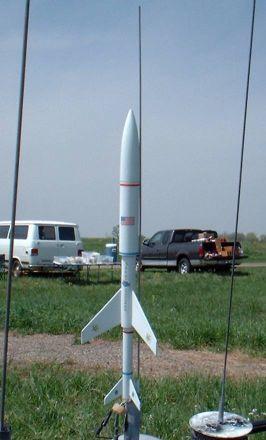
Overview A single-stage rocket with attractive styling. The body features three different diameter tubes that get progressively smaller toward the rear. The most eye-catching features are the fins, with a large set in the middle and a small set at the rear. Kit Specifications (from the cover art) "The RHR 2003 is a great rocket for those who would like to add a couple new ...
 |
 |
Flights
|
|