| Manufacturer: | Schoolyard Rockets |

(Contributed - by Bob Ellis - 01/14/03)
 Brief:
I won this kit in the DesconX contest and decided to try something that I
hadn't done since '67, building a kit per the instructions, exactly per the
instructions, no changes or improvements at all. I normally wouldn't consider a
rash act like this, but while trial fitting the parts, I was very surprised to
find that all the parts fit on the first try, no sanding or other modifications
were going to be needed. It was also obvious that this was not a thin Estes
tube that needed reinforcing or extra support for 18 mm D engines. The
"Tuff Tube" trademark is serious. The BT 50 equivalent had a wall
thickness of .031, almost twice the thickness of an Estes tube and .006 thicker
than a LOC 24mm Motor Tube. I was very impressed to find a tube that thick with
a spiral that I couldn't feel with a fingernail. I thought briefly about
building it for a 24 mm mount to try out some of the new C11's, but the ID of
the tube is just a bit too tight for Estes and Aerotech 24 mm motors, so it was
back to building it absolutely stock.
Construction:
The kit comes with a heavy duty BT-50 and a standard BT-20 motor mount. The
motor mount is centered by two wound cardboard rings. It has another wound
cardboard ring for an engine block, but no clip for motor retention, instead it
goes back to the old way of friction fitting the motor with tape. It uses a 24
inch long piece of 1/8 inch sewing elastic for a shock cord, mounted using a
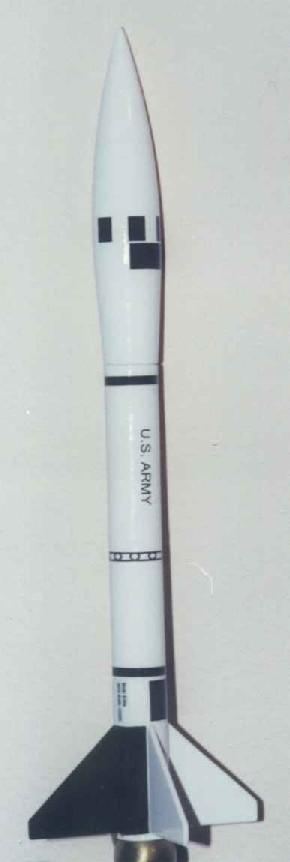
tri-fold piece of card stock. The nose cone is a beautiful piece of 7-inch long
balsa. You cut the fins and the launch lug stand offs out of a piece of
pre-marked balsa, the launch lugs are standard 1/8 inch mylar. For recovery,
there is a very nice little pre-assembled 10-inch nylon parasheet with a snap
swivel.
This was a really nice kit to build, the instructions were great, pretty much following the normal small model building sequence. Build the motor mount, add the fins, then the launch lugs. Glue up the shock cord and mount, place it as far down the BT as you can reach. Add a card stock engine nozzle and some optional card stock spin motors. Attach the parachute using a screw eye (haven't used one of those since '67 either) and swivel clip and go paint it. Actual building time was a bit less than two hours, using strictly DAP Carpenters Glue (Yellow Glue), no epoxy or power tools were needed and I didn't have to go out to the hardware store looking for any extra parts. The only required tool was an Exacto Knife, I chose to use a Razor Saw since all the cuts for the fins are straight lines. The most difficult step in the assembly is getting the two launch lugs and their stand offs straight. I was very tempted to use a couple of drops of CA, but resisted.
The only part that I wasn't completely satisfied with was the motor mount. It looks like the same blue/green tube that Estes uses, and I feel that it should be a much stronger tube to live up to the potential of the "Tuff Tube" used for the BT.
I also did not add the optional spin motors, I just didn't have the time to get them right and I liked the shape of the nose cone without them.
Finishing:
I used Elmers Fill and Finish (FNF) thinned down to milky consistency and
painted two coats of that on all the balsa surfaces. After sanding it down, I
remembered why I was so happy when the first plastic nose cones came out. That
beautiful 7-inch balsa nose cone needed three more coats before it showed a
smooth surface. I then put on a single coat of Kilz Spray Primer. I was right
about the lack of spiral lines, one coat of Kilz completely covered what little
line there was on the BT.
I painted mine completely with two coats of White Krylon, choosing not to mask off for a Black fin. I then added the water slide decals and a cover coat of Clear Krylon. The decals went on easily and look great.
 Construction Rating:
5
out of 5
Construction Rating:
5
out of 5
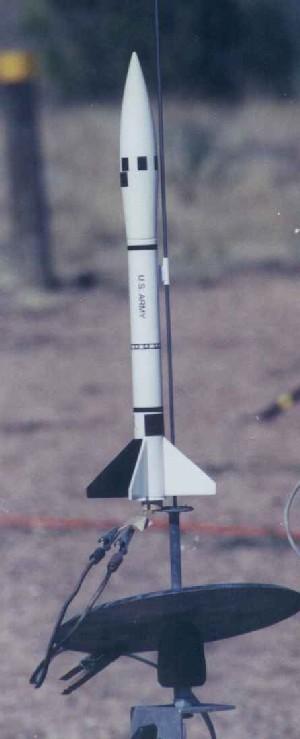
Flight:
The first flight had to wait almost four months, because of the open fire ban
in Colorado, no rockets anywhere in the state all summer.
With a finished weight of only 1 3/4 ounces (50 grams) it should be a good flyer on any engine from an A8-3 for a schoolyard safe 180 feet, to a C6-5 for 840 feet. For those that really want to see it move, the D13, D21 and D24 with 7 second delays all check in at about 1400 feet, and the D3-5 looks good for about 1900 feet after a 6 second motor burn.
I tried it first on an Estes A8-3 and had my first ever CATO of an A8-3. The motor burn was great, the rocket went almost straight up, just a very slight rotation to keep it straight, good tracking smoke, then instead of a nice POP at ejection, there was just a HISS that lasted about two seconds. The ejection charge had just fizzled, toasting the wadding and melting the nylon chute and shock cord. The only good part was that the nose cone was pushed off just enough to prevent a lawn dart. When I went to pick up the model, I expected to see burns and blisters thru the body tube, since I had seen smoke pouring out both ends on the way down. I was very surprised to find that other than one snapped fin, the only damage was the melted chute and the shock cord had been burned thru in several places. The Tuff Tube had come thru with no damage at all, fantastic considering the chute and wadding had blocked the tube, containing all the ejection heat and pressure inside.
The model was easily repaired, the fin went right back on with Yellow Glue and a bit of FNF to fill the crack, then touched up with a brush dipped in some White Krylon. The shock cord was a bit harder, I had to soak the paper tri-fold shock cord mount with water until the glue softened enough to peel out the old mount, and then replace it with a new mount and shock cord. The chute was a complete loss, but easily replaced with one of my own 10 inch nylon chutes.
The model has flown since on A8-3, B6-4 and C6-5 with great results, always straight up, no weather cocking at all, just a slow rotation on the way up and ejection right at apogee.
Recovery:
The 10 inch nylon chute is perfect, it packs easily, brings the model down
quickly, but with no damage even on our hard field. The only damage since the
first flite CATO was when the model came back down right on our club's aluminum
beam launch rack, the sharp edges of the aluminum rack dinged up the nose cone
and two fins, requiring more FNF and White Krylon.
Flight Rating: 5 out of 5
Summary:
Excellent, a well designed kit with above average parts, it gets many comments
from fliers asking where I found a vintage Estes kit. All are surprised when I
tell them that it's not the Estes original, but that it's much better. It
should be a great choice for a second or third kit for a new flyer. It is built
of much heavier materials than most kits of this size and should be able to
stand up very well to rough handling. You could add an engine hook, but then it
won't look right and it won't stand up by itself.
Overall Rating: 5 out of 5
Other Reviews
- Schoolyard Rockets Honest John By Mike Goss
The Honest John was a short range ballistic missile that was used for many years in a peace keeping role armed with a nuclear warhead. It’s distinctive bulbous nose cone and delta fins make this a very distinctive rocket. School Yard Rocketry is a new rocket company that I found through a web search. They have two rockets at this time, the Honest John and the Patriot Missile, and ...
 |
 |