Scratch 13mm Deuces Wild Original Design / Scratch Built
Scratch - 13mm Deuces Wild {Scratch}
Contributed by Joe Policy
| Manufacturer: | Scratch |
Brief:
When you get bored with your 18mm Deuce from FlisKits, step down to the 13mm
version. With downscale (and upscale) parts available from FlisKits, it is
quite easy to shrink (or enlarge) your Deuce!
Construction:
The parts list:
- 1 NCB-55DW, Balsa Nose Cone for BT-55
- 1 BT-55-18, 18" BT-55 Body Tube
- 1 EMK2-13-55c, 13mm Canted 2 Engine Motor Mount
- 2 Sheets, FSB-3-3-9 3/32" Balsa Fin Stock
- 1 LL-1-2 Standard Launch Lug
- 1 SC-1-36 Elastic Shock Cord
- 1 14" Kevlar® for shock tether
- 1 PCP-16 Plastic Parachute
- 1 SE-S Screw Eye, Small
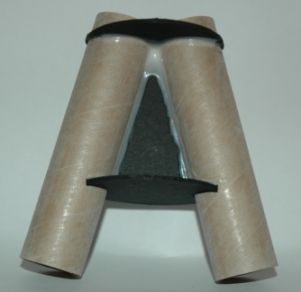
Construction of a downscale Deuce mirrors that of its big brother. The hardest part of the entire process is cutting out the oval slots in the body tube to take the unique motor mount.
 The
FlisKits motor mount kits includes two 13mm motor tubes, 2 engine blocks, 1
custom fiber centering ring, and a fin marking guide that also includes the
cutout templates for the canted engines. Just follow the detailed instructions
that come with the kit and you will have no problems. I added a length of
Kevlar®
to the motor mount by drilling a small hole in the upper centering and passing
the Kevlar®
through. I tied the Kevlar®
around the motor mount to give it added strength.
The
FlisKits motor mount kits includes two 13mm motor tubes, 2 engine blocks, 1
custom fiber centering ring, and a fin marking guide that also includes the
cutout templates for the canted engines. Just follow the detailed instructions
that come with the kit and you will have no problems. I added a length of
Kevlar®
to the motor mount by drilling a small hole in the upper centering and passing
the Kevlar®
through. I tied the Kevlar®
around the motor mount to give it added strength.
I took the 18" body tube and cut it down to 13.75". I then took a fin pattern from a normal Deuce and reduced it on my computer by 19%. A copy machine would do the same trick. I transferred the pattern to my balsa sheets and cut out the fins. I opted not to round the edges of the fins.
My motor cutouts on my 13mm version were better then my full size Deuce. Once the motor mount was glued in place, I had very little finishing to do around the seams where the body tubes meets the motor tubes. A 2" long launch lug was cut in half and aligned on the body tube. The fins were mounted using white glue and fillets were added for strength and appearance.
I added 18" of elastic shock cord to the Kevlar® tether and then added the parachute which I cut down to a 12" size from the original 16". A screw eye was mounted to the nose cone for shock cord attachment. That completed the construction which took about 2.5 hours including drying time.
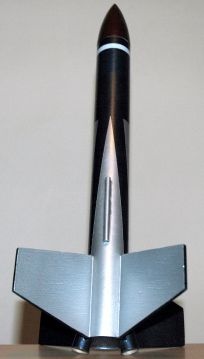
Finishing:
I used a little bit of wood putty to smooth the seam where the BT met the
engine tubes. Three coats of sanding sealer helped finish of the fins and the
nose cone. The entire rocket received two coats of primer and I used a dark
blue automotive paint for the base coat. I masked off the rocket and then added
some silver paint for effect. The nose cone was painted a dark red.
Flight:
Obviously, there are no motor recommendations and I was only limited by what I
hand on hand. I prepped the rocket with 3 sheets of wadding. First flight was
on 2 Estes A3-4Ts. It was very fast off the pad and left behind the telltale
Deuce twin smoke trails, albeit somewhat smaller. It got respectable height and
had a perfect landing about 150 feet from the pad.
For the second flight, I used two Estes A10-3Ts. The rocket really screamed off the pad this time and landed well downrange due to the windy conditions of the day.
Fearing that I would lose the rocket, the third and final flight was back on the A3-4Ts for an almost perfect launch. The parachute got singed and did not fully deploy, I must not have had the wadding in correctly. Fortunately, the landing was all soft grass so there was no damage. It will fly again!
Recovery:
The 12" parachute seems like a good fit for this rocket. The Kevlar®
is a big help in keeping the shock cord from getting damaged. Even with the
last flight where the parachute was singed, the elastic is still in great shape
and does not need to be replaced.
Summary:
With all the hard work putting the motor mount kit together already completed
by FlisKits, the Deuce is one rocket that can easily be scaled down to 13mm or
even up to 24mm. Take your time with the engine tube cutouts as they are the
most difficult part of the entire construction process.
 |
 |