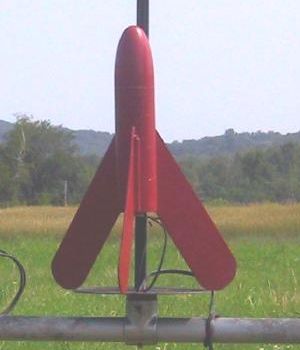
Scratch 24mm Fruit Fly Original Design / Scratch Built
Scratch - 24mm Fruit Fly {Scratch}
Contributed by Scott Turnbull
| Manufacturer: | Scratch |
Brief:
This is a scratch build Mosquito-esque rocket using a Fat Boy body and nose
cone and plywood fins. It has a 24mm motor mount. It basically was a practice
run in using high power rocket building techniques on a smaller scale.
Construction:
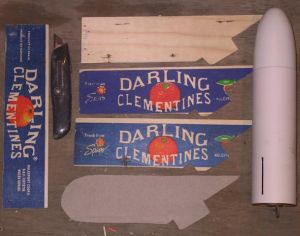
The body tube and nose cone are stock Fat Boy items. The three fins and two
centering rings were cut from thin plywood taken from a Clementine fruit crate.
A steel fishing leader attaches to the motor mount with 9 feet of 1/4"
elastic attached to that as the shock cord.
The Clementine crate wood was chosen because I have several sheets of it on hand. The crate sides are stapled to heavier corner pieces and are easily removed with a pry bar and pliers. I used the Fat Boy centering rings as templates to mark rings on the plywood. An X-Acto razor knife was used to score through the thin wood. I took several traces around the rings to get through the three layers of wood. The 24mm central hole was traced using a standard paper motor mount and also was cut with the razor knife.
 I made a
custom motor hook using steel wire previously used to hold insulation up
between floor joists. Two pair of pliers were used to twist the wire to the
right shape and snip the extra. Once the hook was made, the lower centering
ring was notched to allow the hook to bend back away from the motor mount. The
upper ring was epoxied to the motor mount tube. The lower ring was initially
press fit only.
I made a
custom motor hook using steel wire previously used to hold insulation up
between floor joists. Two pair of pliers were used to twist the wire to the
right shape and snip the extra. Once the hook was made, the lower centering
ring was notched to allow the hook to bend back away from the motor mount. The
upper ring was epoxied to the motor mount tube. The lower ring was initially
press fit only.
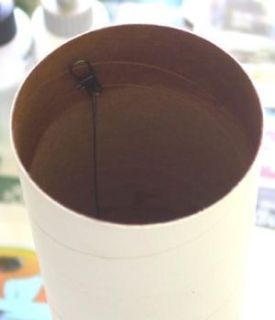
A steel fishing leader was looped around the motor mount tube just below the upper centering ring and fed through a small hole in the ring. This will provide an ejection charge resistant wire that extends to just below the upper end of the body tube.

The length and width of the Clementine crate sides constrained the size of the fins. I made paperboard templates from a cereal box to refine the design of the fins and their through the wall tabs. Once an acceptable template was created, I used it to mark the plywood for three fins. The razor knife scoring technique was used to cut out the fins. There were some staple holes and rough spots in the fin surfaces. Wood putty was used to fill in the holes and ridges. A thorough sanding gave the fins a respectable finish.
After the fins were cut out, the motor mount's upper centering ring was epoxied into the main body. The fins were then epoxied through the wall to the motor mount tube. At this point I was growing weary of learning the wonders of epoxy work and switched over to Elmer's Carpenter's Glue for the remaining fin fillets and the gluing of the rear centering ring. Everything I've read states that a good yellow glue joint will exceed the strength of paper and wood bonded together. The materials will fail before the yellow glue (or epoxy) will.
A length of 1/4" cardboard tubing from a high power igniter packaging was glued at the root of one of the fins to serve as a launch lug.
Three yards of 1/4" elastic from a local sewing store were attached to the upper end of the fishing leader. The other end of the elastic was tied to the nose cone lug. A loop tied in the elastic a couple of feet below the nose cone serves as the parachute attachment point.
The final assembly task was to attach an alternate launch guidance device: rail buttons. I like to have options for launch pad selections. It helps at busy regional launches to be flexible in what sort of pad you can launch from. Sometimes the rails are busy. Sometimes the rods are. I epoxied and machine screwed the rail buttons in the vicinity of the centering rings. The machine bolts used are larger diameter than the thickness of the centering rings, so not much button strength was going to come from the rings.
Finishing:
The finish was done using low cost rattle can spray paint. Several light layers
of gray primer were applied first with some sanding to remove fuzzies. Several
light coats of red spray paint were then applied.
Flight:
For a parachute, I used a small yellow "Frankenchute" borrowed from
my Cycline 3 kit. This is a relatively light rocket with lots of fin area to
help it flutter down. There is very little space in the tube between the motor
mount tube and the nosecone for packing the chute. I have used a Nomex®
square threaded over the fishing leader to protect the chute and used no other
wadding.
The first five flights for this Mosquito-inspired Fruit Fly took place at the Northeast Regional Rocket Festival. It first flew on a D12-3 and flew ramrod straight to a respectable altitude.
Recovery:
After ejection, the body tube descended parallel to the ground as the nose end
was held up by the chute and the motor end was held up by the pinwheeling
oversized fins. All subsequent launches on D12, E9, and E15 engines have
exhibited the same enjoyable spinning fins horizontal descent after the chute
is deployed.
There was one unfortunate failure to eject the chute at a subsequent launch event. I had pushed the Nomex® sheet too far down the leader, and it hung up in the body while the ejection gasses passed by the sheet and chute. The nose cone separated, but the chuteless descent was a bit too rapid. The fact that I watched it come straight at me and bounce off the chair at my side added to the drama. I proved that the glue was stronger than the body tube as a chair induced gash in the body tube near the rear centering ring failed to dislodge any load bearing joints. It flew again later that day with a masking tape bandage over the gash and awaits more permanent repairs before flying again.
Summary:
This was an extremely gratifying rocket to build and fly. It was large enough
in diameter and used materials allowing experimenting with high power rocketry
build techniques. It flys wonderfully, is very forgiving of many engine delays,
and recovers in an amusing, spinning way.
The only CON is that the chute packing space is very tight. I plan on modifying the nose cone to allow packing of the shock cord up inside the cone. This can be done by cutting some of the base off the cone and attaching the shock cord up inside the cone.
 |
 |