Scratch A Glider Original Design / Scratch Built
Scratch - A Glider {Scratch}
Contributed by Geof Givens
| Manufacturer: | Scratch |
 Brief:
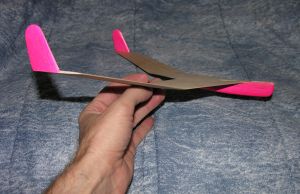
This glider is a scratch semi-reproduction of the Holverson Designs Silver Hawk v1.0. The glider has a wingspan of 13in and the boost pod is 20.5in. The boost pod has a 18mm motor mount and weighs 1 1/8oz. The featherweight glider is 0.5oz.
Construction:
The plans for this rocket (both version 1 and 2) can be found at http://plans.rocketshoppe.com/hdi/hdi2002/hdi2002.htm.
I also used the plans for the glider hook mount, but beyond that I built a different boost pod. I gave the project the highly original name of "A Glider".
The materials I used were:
- parts for a 18mm motor mount, including engine hook
- centering rings
- 20in BT50 body tube
- 4.5in ogive nose cone for BT50
- plastic chute and Kevlar thread
- 3/32in balsa for wings
- small sheet of 1/4in balsa for glider hook mount and jigs
- launch lug
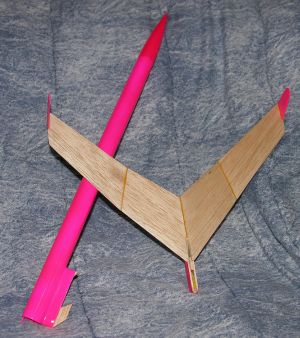
 Construction began with tracing templates, cutting balsa, and assembling the jigs which were used later to ensure the correct angles between wing parts. The boost pod was assembled just like any other model rocket. There are no fins.
Next I began the glider. The swept wing consists of six portions. First I sanded each portion into a perfect airfoil shape using 220-grit sandpaper. The entire cross-section of the wing was sanded so none of the original flat surface remained. This reduced all the wing parts from 3/32in to 1/16in thick.
With the help of the jigs, I glued the wing parts together. Because I was aiming for ultra-lightweight precision, there would be no wood filler or paint to hide imperfect glue joints. Therefore, I made very careful minimalistic joints using wood glue, with tiny fillets. Gluing the fin tips was a bit tricky because their airfoil shape didn't rest flat against the wing edge. After attaching them I used a smidge of wood filler to touch up any gaps.
The best thing about this design is the glider mount. The hook is on the pod, and there is a hole in the glider mount ("fuselage") to receive the hook. The hook portion is made by laminating three balsa parts together, with the middle one having an extruding hook shape. When ejection occurs, the glider should move forward to release itself from the hook. With many gliders, one problem that can occur is that the forces tend to bind the glider to the hook mount due to friction, causing the glider to release awkwardly only after the rocket has passed apogee and the glider twists off. What is so nifty about this hook mount is that it has a little triangular wedge at the forward edge of the mount which nudges the glider away from the mount surface as the glider initially slides up and off the hook. The result is a much more reliable release. See the plans for a picture.
The glider fuselage is also clever. The fuselage fits seamlessly into a notch in the wing, with a slot for the hook. However, the fuselage also extends forward beyond the wing with another small slot. The purpose of this slot is to insert trimming clay without ruining the smooth shape or aerodynamics. The fuselage is built from several pieces of balsa laminated together, then sanded down to an airfoil shape.
Finishing gliders presents a choice between smoothness and weight. At one extreme, you can leave it unfinished. At the other end, you can sand, fill, and paint it to a glassy finish. The latter choice looks better but adds weight. I avoided weight. I began by sanding lightly with 220 sandpaper, then more thoroughly with 400, then with 600. Then I painted two *very light* coats of clear paint, following each with thorough sanding. On the fin tips and fuselage I added a dusting of flourescent pink paint with another light clear coat over the pink. I painted the boost pod pink, too.
Flight:
Preparing the glider for lauch includes several steps. I rubbed the hook and slot heavily with candle wax, then soap, then rubbed it down with a clean cloth. Next, the glider was balanced left/right with a small clay strip near one wingtip (an amount less than a pencil eraser). A slight counter-clockwise tilt was allowed for circling. Then, on a dead calm day, I took it up to a small hill nearby and trimmed the glider by adding clay to the nose slot. It was difficult to add sufficiently tiny amounts of clay. After about 40 tosses, I got the best possible glide with clay about the size of the tip of a ballpoint pen.
The best possible glide is not, in my opinion, the trim that produces the longest flight in dead calm conditions. In real flights there is usually some breeze so you want to trim the glider slightly nose-heavy for a more assertive attack into the breeze.
The first flights were on a cold day on the prairie, with weak breezes of 2-5 mph. On a A8-3 motor, boost was gentle to a modest height of a few hundred feet with no sign of fluttering or spin. Glider release was excellent. The glider flight was satisfactory, but buffetted too much by the wind. Landing was fine and the pod recovery was fine, too.
For the second flight, I added some nose weight. Unfortunately, I forgot to bring clay, so I scotch-tapped a tiny pebble (more like large sand grain) to the nose. Boost on a A8-3 was the same as last time, but the delay was a little longer and the glider released easily but awkwardly just past apogee (slightly before apogee is better). My grain of sand was too much, so the glider corkscrewed down. It wasn't very graceful, but everything was recovered undamaged.
For the third flight, I swapped out for a smaller grain of sand. Glider release was excellent but something was not right with the trimming and the flight was a hard corkscrew into the ground. The leading edge of the wing and the fuselage had a few nicks which I have since patched up with lightweight interior spackling.
Summary:
Overall, my experience with this small version of the HD Silvery Hawk and my 4-foot large version (The Albatross) has been that the design is not very reliable. These gliders are difficult to trim and prone to excessive roll. They are also far too sensitive to modest crosswinds, which can turn out to be catastrophic. There are a lot of other really great old-school glider plans available and also some great modern kits. Notwithstanding the challenges, this project helped me hone my ultralight skills and the glider likely has quite a few more flights in her.
 |
 |