Scratch AquaBottleBat Original Design / Scratch Built
Scratch - AquaBottleBat {Scratch}
Contributed by Dick Stafford
| Manufacturer: | Scratch |
Brief:
This is a basic "el cheapo" tube fin rocket inspired by
BottleBat
3.0 by EMRR's latest featured reviewer, Larry Brand. Like the original,
this one is made from a mailing tube and uses a bottle for the nose cone (an
Aquapod, what else?) Mine has a 29mm mount but I plan to fly it on a 24mm F39
for its maiden flight.
Construction:
The parts list:
- 3" mailing tube (~17.625) with liner (~26")
- one Aquapod bottle
- plywood centering rings (2) and bulkhead (1)
- Kevlar® twine and ¼" elastic
- 29mm motor tube
- buttons from railbuttons.com
- small nylon rivets (2) -- Giant Leap
- lead shot
- chute and protector to be selected on the field
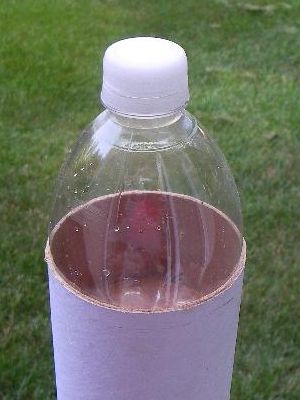
I started with the cannibalization of the tube from a scrapped (i.e. dead) rocket, which had a plywood bulkhead attached a few inches from its top. Prior to thinking about a BottleBat, I had found that the bulkhead was positioned perfectly such that when an Aquapod bottle was inserted, that the widest point of the bottle was right at the top of the tube. I decided that I'd form a short payload section from this tube. This method will only work if separation below the nose is desired. It does however, work out nicely due to the unique 'orbastic' shape of the Aquapod bottle.
 The next
thing was that I found I didn't have enough new 3" mailing tube to cut the
six fins and still have a body left. I could buy another...or...I decided that
I'd build the fins from the inner telescoping tube. The tubes I like from the
Container Store have full-length inner telescoping tubes. I never use all of
the latter, so I always have a bunch around. Because of the smaller diameter,
six rings of inner tube would not fit perfectly around the section of the outer
tube, however, the solution was simple: mount them around a piece of the same
sized tubing then slide this assembly into the main body. Instead of gluing
this fin can into the main body tube, I used the screw from the lower rail
button and two small nylon rivets to hold it together.
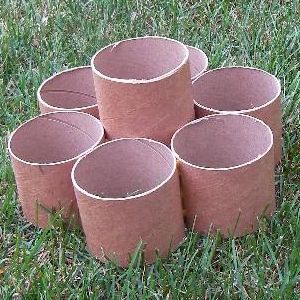
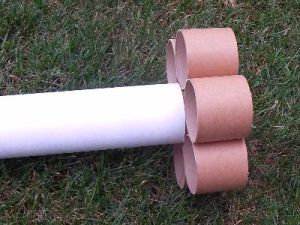
The next
thing was that I found I didn't have enough new 3" mailing tube to cut the
six fins and still have a body left. I could buy another...or...I decided that
I'd build the fins from the inner telescoping tube. The tubes I like from the
Container Store have full-length inner telescoping tubes. I never use all of
the latter, so I always have a bunch around. Because of the smaller diameter,
six rings of inner tube would not fit perfectly around the section of the outer
tube, however, the solution was simple: mount them around a piece of the same
sized tubing then slide this assembly into the main body. Instead of gluing
this fin can into the main body tube, I used the screw from the lower rail
button and two small nylon rivets to hold it together.
In keeping with the original BottleBat, the Kevlar® cord is mounted through the wall of the body tube and this is covered by half of a plastic Christmas ornament that I requisitioned for rocket purposes.
I started running some sims, but as long as I had the bottle modeled using the cap as the nose cone and the exposed body as an ogive transition, I was getting results that I didn't believe. The CP was coming up very close the top of the rocket and appeared to be a bug in RockSim. After all, I keep hearing about how stable tube fin designs are. Later, when I modeled the cone as a simple ogive, the results were more in line with what I expected. Since I always believe in picking the answer that I like, I stuck with the latter. The sim showed I'd need some nose weight to fly on a G reload and the more I thought about he Aquapod sitting on the end of a weighted section, I envisioned some crunching going on. Long story short and two Aquapods later, I decided I'd screw the bottle to the bulkhead and fill it with 2 part foam. After this was complete, I weighed the rocket and found I still needed a little weight. So, I drilled the foam at the tip of the bottle and imbedded about 0.75oz of lead shot in epoxy.
Finishing:
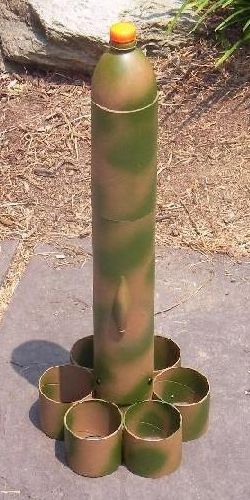
I finished mine in a camo style using Model Master dark tan and medium green. I
wasn't sure how this mix would look, but I am extremely satisfied with the
results. I painted the cap fluorescent red--I guess this round is
"live".
Flight and Recovery:
I used a chute protector and a 36" chute for recovery duties. I tossed in
a little dog barf just for good measures. A small F39-4 powered the first
flight. This required an adapter that I made form some tubing, pieces of a 29mm
SU motor, and a clamp-on aluminum thrust ring.
The boost was quick enough although the altitude was fairly low. Recovery was perfect.
I have a G77 with the AquaBottleBat's name on it for the next launch.
Summary:
I liked the BottleBat concept from the first time I saw it, and I love my
version. I don't know the actual cost of materials, but the airframe, fins, and
cone were all leftovers/scrap. I liked my approach to the fins, as it gives me
a away to use up tubing that might otherwise gather dust--I see more tube fins
in my future. If I were to do it over again, I'd eliminate the payload section
in favor of a longer main body. If the bottle were conventionally shaped, I'd
go with the approach used on the original BottleBat. With an Aquapod, I'd
fashion a shoulder using a short section of tubing and a inside tube/coupler as
the shoulder.
 |
 |