Scratch Aurora Original Design / Scratch Built
Scratch - Aurora {Scratch}
Contributed by Gary Sinclair
| Manufacturer: | Scratch |
 Brief:
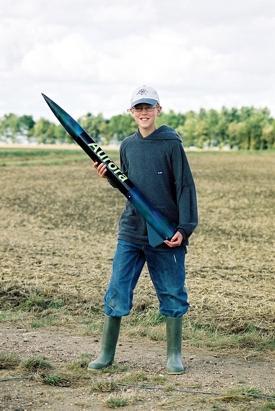
My son Guy’s (age 11) level 1 rocket. A scratch built 3FNC rocket using
G10, PML Phenolic and Carbon Fibre tape.
Construction:
- PML 32" long (3.125OD) Phenolic body tube
- PML 38mm x 12" long motor mount
- PML Ogive nosecone
- Birch centering rings 1/4" thick
- PML Phenolic coupler (3"OD)
- coupler bulk plate with hardware (eyebolt and nuts)
- airframe bulk plate with hardware (eyebolt and nuts)
- aeropak style threaded motor retaining hardware
- 15 foot section of 1/4" tubular nylon
- 2 foot long bridle strap with brass eyelets
- Topflite Xform style parachute (20")
- quicklinks
- barrel swivel for parachute attachment
- G10 fins with tabs
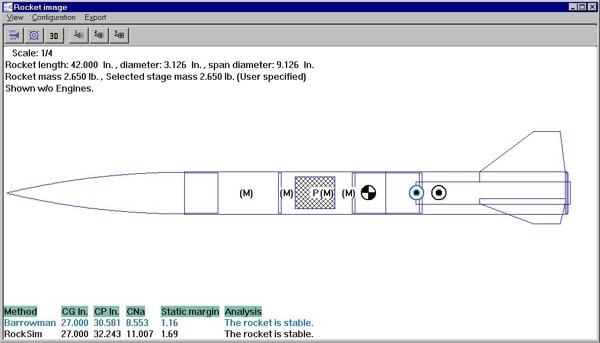
As this rocket was to be used in a television program for schools (a 5 minute segment was dedicated to Guy showing how to build and fly a model rocket) it was necessary to keep it simple but robust. After sitting down with Guy and Rocksim we came up with a nice 3FNC design that he could build using a minimum of parts. G10 was chosen as well as phenolic tubing for their strength with high power motors (this wasn’t going to be an Estes kit). Pete Davy of Pete’s Rockets supplied all of the materials including the motors.
 Guy was able to build it with
ease and made use of most of my tools (dremel, palm sander, drill).
Guy was able to build it with
ease and made use of most of my tools (dremel, palm sander, drill).
As I had ordered the body tube pre-slotted for the fins it was only a matter of widening the slots a bit (they were a bit thinly cut) with the dremel. I performed this task as it can be a bit tricky without a proper jig and router.
Additionally as the design called for a zipperless fin can section it was necessary to cut the body tube using a saw. This was achieved in the usual way of creating a masking tape built edge for the saw blade to rest against round the tube. The result was a nice cut.
The fins were reinforced using cut strips of Carbon Fibre and applied using West Systems Epoxy. Guy is an old hand at this so he first used some 1-hour hobby epoxy to fix the fins in place. Once all fins were tacked down to the motor mount and cured overnight the Carbon Fibre strips (3 strips which span the width between fins and go up about 1-inch onto each fin) were applied.
Once finished the fin-motor section (to which Guy had already applied the centering rings and motor retainer) was inserted into the slotted airframe and glued in place. Clamps were used to ensure the slotted ends were firmly held in place against the aft centering ring while they cured.
External fillets were applied by Guy using West Systems Epoxy and micro balloons and applied using a ‘tongue depressor’ which gave a very nice curve to the fillet.
The fin-motor section was covered with UV Smooth Prime to fill in the spirals and give a foundation for the primer paint. After drying it was sanded smooth with a palm sander and readied for painting.
The zipperless coupler was built as a separate component then glued in place AFTER the fin-motor section was painted. The only modification to the coupler was the creation of a 38mm hole in the coupler bulkhead using a drill with a hole cutting disk. The new hole would allow for the ejection gasses to pass and for potentially larger motors to be fitted.
The airframe section required very little work with the exception of a ‘mid point’ bulkhead being installed to provide an upper and lower recovery) section to the rocket. The bulkhead was first prepared by installing a hardpoint (eyebolt, washer and nuts). The finished bulkhead was then inserted into the airframe and aligned using a coupler tube to push the bulkhead into place and ensure it was perpendicular to the airframe.
The aft section of the airframe would be the recovery bay with the forward section left free for a tracker and altimeter or other payload.
Finishing:
The rocket was to be finished to show an Aurora Borealis effect on the nosecone
and fin/motor section. This was achieved using fluorescent paints as highlights
over a black base coat. The result was stunning and Guy was able to demonstrate
the paint effects for the camera. The airframe body is gloss black with a
‘AURORA’ decal in a lime green.
 Flight:
Guy wanted to certify UKRA Level 1 (so he could start using High Power motors
in his other rockets) so a Pro*38 H110 and I170 motors were chosen. On the day
I was only able to acquire a 3 grain casing (which is used for the I170 motor).
Hence the flights where going to be on the I170(s)(I had two).
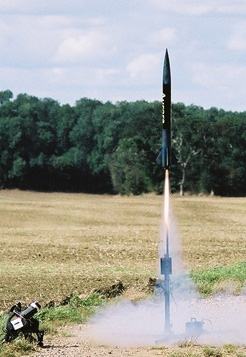
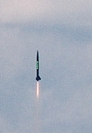
5.4.3.2.1 - whoosh. Well at 2.65-pounds dry weight it really left the pad quickly. Straight up to 3000-feet (simulated) on a sunny day with the parachute deploying before apogee. Guy had just become the youngest Level 1 in UK Rocketry History.
As the parachute was small the rocket landed fairly close and was recovered without damage. A second launch achieved the same result and the cameras (1 close and 1 a short distance away) caught it all.
Needless to say Guy was very pleased with this and can’t wait until the next launch.
Summary:
CON: The only CON was that I didn’t order a wide enough fin slot in the
tube (it is a real pain widening slots).
PROS: 3FNC is just soo simple that you really can’t go wrong. The zipperless design makes those quick deployments no problem.
 |
 |