Scratch Baby Jones Cadet Wannabe Original Design / Scratch Built
Scratch - Baby Jones Cadet Wannabe {Scratch}
Contributed by Jon Chrisman
| Manufacturer: | Scratch |

Brief:
While I was cleaning up my work table after building a Pemberton Technologies Bucky Jones Jr Space Cadet, I happened
to notice that the scrap balsa had the shape of fins...and the idea just popped into my mind to make a downscale of the
Bucky Jones Jr--which in itself is a down scale of Pemberton's Bucky Jones rocket. A downscale of a downscale!
Construction and Finishing:
Parts list:
- 1 BT-50 5.5" in length
- 1 BNC50K nose cone
- 1 BT50 18mm engine mount kit
- 3 Balsa fins
- 1 Launch lug 3/16"x2"
- 1 Small eye bolt
- 1 Length of threaded nylon cord 18" in length
- 1 8" Parachute
- 3 Lollipop sticks cut to approx 3/4" lengths
- 1/2oz nose weight
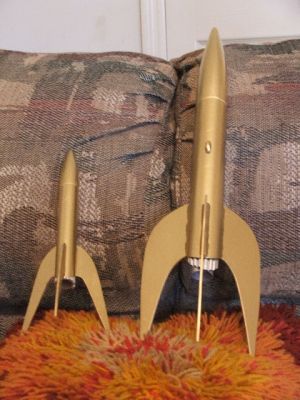
This was a fairly easy scratch build. After taking measurements off the built Bucky Jones Jr (BJJ) and comparing them to the fins I made from the scrap, I came up with a difference of 0.6, making this a 60% downscale. Using the 'Template Widget' application found here on EMRR, I deduced the angled cut at the aft end of the BT to be 55 degrees to closely match the bigger BJJ. The motor mount is assembled in the usual way with the exception that the aft centering ring to be 1" from the aft end of the motor tube. I then cut the BT-50 using the template at the 55 degree angle and glued the motor mount into the body tube so it was flush with the furthest aft point of the angled tube. I then marked the tube for the 3 fins making sure one of them was centered on that part of the tube making it the 'top' fin (this was again accomplished by using the Template Widget). I glued the fins in the appropriate places. I then cut the launch lug in half and gave them about a 45 degree angle cut with the long side being glued to the body tube. One flush with the 'bottom' of the tube and the other about 2" up. The shock cord is mounted using the Estes tri-fold method. Then a 1/2oz washer was glued to the nose cone and the screw eye installed. The lollipop sticks were then cut to approx 3/4" lengths and squeezed in the gap between the motor tube and the body tube. These were used to simulate the tubes on the BBJ that are made with the launch lugs. Then the usual fill and seal the balsa and copious sanding, prime, sand, prime, sand and paint. The rocket was painted using Colorplace Gloss Gold and the engine tubes painted silver using Testor's brush on paint.
Flight:
I had to wait a while after building for its first flights, but it was well worth the wait. Flight simulations show
that the A8-3 as being about the ideal motor as far as deployment velocity. On it's maiden flight I prepped it with a
B4-4 and it flew great! Perfectly straight with deployment just a heartbeat before apogee. I have flown it 4 times all
on the B4-4, and I haven't gotten the nerve to put the big C in it yet!
Summary:
PROs: A successful downscale scratch build!
CONs: Limited space for wadding and chute. It all fits but is a tight fit.
 |
 |