Scratch Birdhouse, Version 2 Original Design / Scratch Built
Scratch - Birdhouse, Version 2 {Scratch}
Contributed by Dick Stafford
| Manufacturer: | Scratch |
Brief:
This is my second type of birdhouse rocket. The fins are attached the end of a thick dowel and six 24mm motor tubes are mounted in the body around the dowel. The original rocket had canted mounts. However, the original rocket had a recovery failure and turned itself into toothpicks. When I rebuilt it, I had trouble drilling the canted mounts so I settled for parallel ones. This review covers both the original and re-built rockets so I hope I don't confuse you too much.
Construction:
The parts list:
- One cylindrical wooden birdhouse (Michael's crafts)
- One 24mm LOC motor mount tube (21" required)
- 1"x 34" dowel
- Four light ply rectangles (Michael's)
- Small section of 4" mailing tube with telescoping inside tube
- Kevlartwine
- 36" nylon chute
- 1st unit only: 3/4" pine strip and two rail buttons (railbuttons.com)
- 2nd unit only: 3/8" brass lug
Construction began by removing the top of the birdhouse. The conical top mounted to a flat circular plate that was in turn attached to the cylindrical body. While I was trying to remove the plate from the body, the cone spontaneously popped off. I eventually removed the plate and decided to leave it off, since I wanted the cone to be open for parachute storage anyway.
I first found the center of the base plate and drilled the hole for the dowel using a drill press and suitable wood bit. I marked lines to position the motor mounts, but how was I to drill the slanted holes for the motor mounts? The base of the Harbor Freight drill press will tilt to perform angled drilling, but it didn't have the clearance to do this with the birdhouse. I found a spacer that when placed under the edge of the plate, tilted it to an angle of about 15 degrees. So, I proceeded to drill the holes with my makeshift spacer. On the first item, drilling went fairly well. The inside of the base chipped as the drill went though but it retained its integrity. After the first two holes, I started drilling on one side, then flipped the birdhouse over and finished the drilling from the inside. On the re-build though, the wooden plate completely fell apart. The quality of the wood was not good nor was it uniform. Maybe a newer bit or a different drill speed would have helped. Luckily, the plate I removed from the top was the same size as the bottom that I just destroyed. I didn't risk the slant drilling on this one and drilled it straight through, providing parallel mounts.
While the body of the birdhouse was supported on the dowel by a nylon rafter angle square (which was taped to the dowel), I glued it in place with 5-minute epoxy. I cut the motor tube into 3.5" sections and also mounted them with epoxy.
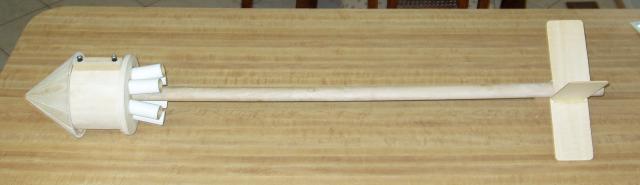
 I couldn't find any suitable scrap fin material, so I resorted to spending a couple of bucks on some prefab ply rectangles from Michael's. Michael's used to have a huge assortment of pre-cut shapes and I was hoping to get birds, or birdhouses, or some other theme shape. However, their stock was low so I settled for the rectangles. To facilitate their attachment to the round dowel, I mounted them across the dowel and butted up against one another.
I installed a piece of 4" mailing tube in the body to provide a smooth internal surface and to mate with the coupler tube that formed the nosecone shoulder. The Kevlarshock cord was affixed to the tip of the roof with epoxy and was run through the bottom plate and attached to the dowel.
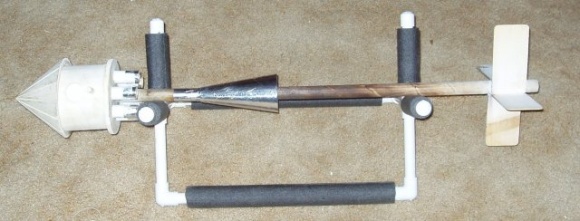
On the first version, rail buttons were mounted on a pine spacer so the rail would clear the roof. On the second version, I mounted a launch lug directly on the body and notched the roof to allow the rod to clear.
The final step was to wrap some scrap wire from the base of the body to the bottom fins. This allows me to hook the clips below the fins. Having clips above moving fins is not a good thing. Been there, done that!
I made a RockSim model and it appeared that it was highly stable. Of course, being a cluster there is plenty of opportunity for this design to get ignorant. So, it was off to the 'C' rack of high power pads for this baby! (Hence the buttons and rather large lug.)
Finishing:
This rocket was, is, and forever will be nekkid. You can find out why in my caption to the Nekkid Photo Contest.
Flight:
For the maiden flight, I loaded her up with a chute protector, a 36" nylon chute, and six D12s. The motors were ignited via quickmatch and ejection was to be performed by a single D12-7. I should have computed the volume involved or just used more D12-7 motors to handle ejection. The upshot was the laundry didn't come out and the flight ended in a spectacular lawn dart on the gravel access road. Anyone need some toothpicks? You can see a video of the flight on MDRA's photo page. In the video by Bob Utley, you can see the ejection charge go off just before apogee. The lawn dart also came too close for comfort to one Jerry O. who was arriving late. We were careful with the orientation of the rail, made sure nobody was walking down range, and checked the sky...we just didn't check for moving vehicles. Lesson learned.
On the rebuild, the prep was the same. However, this time I "enhanced" the ejection charge. The boost was cool and it recovered fine. The one problem is the dowel that holds the fins was barbecued.


Summary:
This unique odd-roc gets everyone's attention. There are not many rockets with their motors mounted so far forward...and there aren't that many flying birdhouses! As noted in the flight report, parallel mounts take their toll on the dowel, and in general don't look so cool. If you try one, I strongly recommend trying the angled version. I was going to scrap Version 2.1 and rebuild it using a piece of ply for the bottom plate. Instead, I decided to try something else. I sanded off the layer of charcoal and mounted a thick cardboard cone, covered with 2 layers of metal tape, to deflect the exhaust gasses. I hope that this cone protects the dowel downstream. If not, I'll revert back to my original plan.
 |
 |