Scratch carded-Eclipse Original Design / Scratch Built
Scratch - carded-Eclipse {Scratch}
Contributed by Eric Truax
| Manufacturer: | Scratch |
Brief:
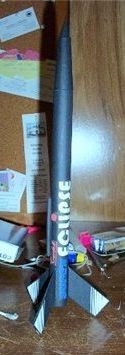
This is a semi-clone of the OOP Estes Eclipse made from cardstock, an elastic
shock cord, and a flag tape streamer. Creating a model rocket made from paper
isn't too much different from what you're used to with standard materials. You
still have fins, a body, engine mount, and nosecone, along with a recovery
system. What does differ though, is that you have to create these parts from a
two dimensional sheet of cardstock. Hence the name, "carded" rocket.
Construction:
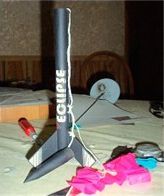
The whole kit is fashioned from three 8.5" x 11" sheets of 67lb
cardstock. There are 3 fins, made from cardstock laminated light cardboard. The
shockcord length is 18-20", and the streamer length is 24".
I used the 67lb cardstock available at almost any office supply store and I like to use this weight paper because it easily is handled by almost all printers. Sources I use for the light cardboard are cereal boxes, toaster pastry boxes, shoe boxes, cracker boxes, etc. I'm sure you have more than one source laying around the house. Check that trash you forgot to take out last night if you're not sure--and it's better than cutting out a section of a puffed rice cereal box then having someone accidentally dump the contents all over the kitchen!
I get modeling clay from the local dollar store. You can also find it at arts and craft stores. Make sure it's the non-drying type. One box will last you a long time and help make dozens of rockets. I like to use flag tape for streamers because it's very light and you can get a lot at the local hardware store for less than $2.00. It also comes in very bright colors (I prefer pink). Elastic shock cord material can be had at fabric stores for less than $1.00. The whole thing is put together with a $1.00 large size bottle of white glue, except for wood glue used to hold the fins on and secure the shock cord into the nose cone. I also made 2 types of nose cones for the 13mm version: the plain ordinary cone and another I just call the Nasty Nose. Both types work fine and SpaceCad says that the plain cone has a 5ft advantage in height over the Nasty Nose. You can't use the plain cone with the 18mm version because you can't get enough clay in it far enough forward to balance the rocket properly.
Finishing:
Rather than using up my ink cartridges to make the rockets black, which would
also saturated the cardstock with ink and possibly weaken it, I just bought a
can of dollar store flat black. The decals are made from plain copy paper. I
tried using a spray adhesive at first, but I just couldn't stop them from
peeling off. They seem to stick well enough just using the white glue.
Flight:
I have flown both versions. The 13mm with the A10T motors and the 18mm with a
B6's. I used 2 sheets of recovery wadding and the motor is held in place by the
friction fit method. Both rockets few very straight and high!
Recovery:
The length and material of streamer allowed both versions to come down nice and
easy with no damage or wear.
Summary:
The great thing about paper rockets is that you can create more whenever you
like and for almost no cost! This means that if you mess up on a part--even the
whole rocket--or lose it in a tree or other mishap, you can have a replacement
ready in no time. Also, a whole ream of 67lb cardstock can cost less than one
kit today, so you can make several for less than the cost of replacing an
ordinary kit.
If you know how to do any graphic design work, even just the basics with Paint or another program, you can decorate your rocket anyway you like before you even get started. No more paint fumes, mess, or decals needed! Just a little computer skill, and your imagination.
 |
 |