| Manufacturer: | Clone |
| Style: | Futuristic/Exotic |
(Contributed- by Moe Bertrand - 03/23/08)
Brief:
Scratch built Estes Mars Lander based on BT-101. I built this well before the Semroc Mars Lander was available. As a Jr. High School kid, I built and flew an original Estes Mars Lander in 1976. After at least one successful flight, the cool little rocket eventually went by the wayside and ended up in rocket heaven in the late 1970s. By 1989, production of the Mars Lander was history but I was delighted to discover Estes had issued a Mini Mars Lander kit. I built one and flew it several times…in fact it's still in my current fleet. During one of my many distinct periods of BAR activities I discovered JimZ's website…this would have been around 1998 or 1999. I eagerly perused his collection of model rocket plans, amazed that someone had taken the time and effort to collect these gems, scan them and post them to the web. The Mars Lander has always been one of my favorite classic Estes rockets and Jim had the plans online. I decided to try to recreate as close as possible a Mars Lander look-alike (not a true clone) so I could once again have one in my expanding fleet. After downloading and printing the plans, construction began.
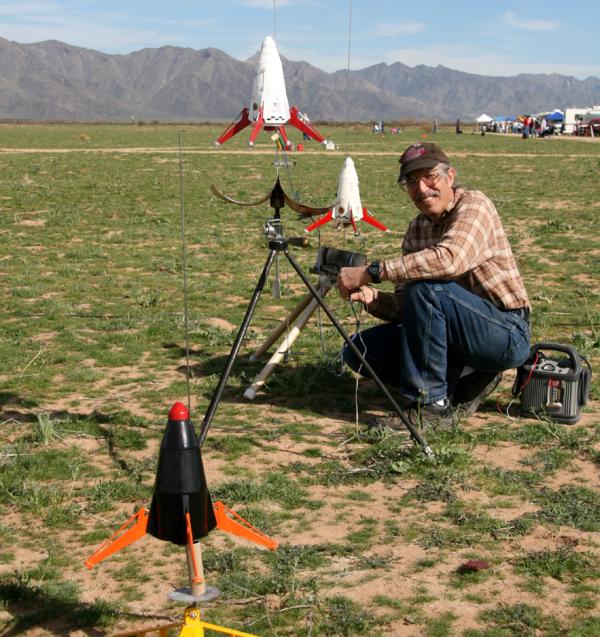
Geoffrey Kerbel poses with three Landers for a proposed drag race
Construction:
The basics:
- A Semroc Mars Lander can be used now that it is readily available.
- Custom "reverse" Mars Lander decals from Tango Papa
- Finishing materials of your choice
- Recommended engine: C6-3
- 18 inch parachute with spill hole.
I'm not sure if the requisite BT-99 for the main body was readily available at the time. I wanted to get started so I based my look-alike on the slightly larger BT-101 which I already had on hand, most likely in the form of a "spare" Estes Saturn V kit. This kit also provided me with the starting point for making the required centering rings. I cut the BT-101 to proper length and started working on the other major components. For the two main shrouds and the other smaller shrouds, I used a modest CAD program that made short work of laying out the radii and angular dimensions. I printed the shrouds on suitable cardstock and as I cut and formed them, the memories of constructing my original Mars Lander started flooding in.
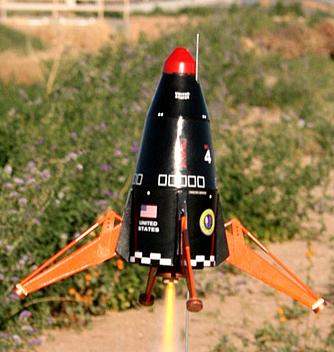
The internal structure was fabricated close to the original specs (modified to my BT-101) using readily available Estes components and parts from the local hobby shop. The nose cone was obtained online from Balsa Machining Service. The decals were a different story…I wasn't sure I could find them. After the build was complete (minus any external detailing/embossing Mars Landers are known for), I decided to forego searching for the proper decals and just paint the main body gloss black. I painted the landing legs orange and the nose cone red. Despite the shortcomings of being a true clone, I was quite pleased with my efforts are creating a Mars Lander look-alike from scratch.
 Fast forward to mid-2006. For the last 7 ½ years most of my rockets and unbuilt kits remained safely packed away through another move, this time to Arizona in 2004. Other interests had put rockets on the back burner but in mid-2006 I decided to unpack a box of rockets. That's all it took for me to get involved in my latest period of BAR activities. Over the years, I'd seen rocketry magazine articles about other people cloning Mars Landers in various sizes. After some internet searching (and through EMRR) I found Tango Papa Decals and Tom Prestia's line of Mars Lander kits. Since I was starting to get into high power rocketry, I quickly ordered Tango Papa's 2x Mars Lander upscale. What a kit – and what a flyer on an I211W!! I'd also picked up a couple Estes Outlanders and with some after-market decals from Sirius Rocketry I painted and finished them in Mars Lander styling. I even ordered Tango Papa's Mars Lander decal sheets for the Estes Mini Marz Lander (Ready to Fly) and did one of those from my stash of Mini Marz Landers.
At some point, one of the legs on the Dark Lander separated at the internal rubber hinge but it was still flyable. In July 2006 the Lander took flight again at a park launch with a couple of friends. It may have been this launch that I first referred to it as the Dark Lander. Geoffrey had an original Mars Lander he flew that day as well. He mentioned he'd managed to do some internal repair work on his Mars Lander. Apparently, the white glue construction on the bottom of the rocket was pretty easy to get into to perform the repairs. I wasn't sure my Lander would be so easy to operate on, so I neglected trying to repair the gimpy leg on mine for at least another year. Sometime in 2007 I got brave with the hobby knife and carefully cut around the lower centering ring and gained access to the insides. The fix was easy and in no time the Dark Lander was back together and sitting correctly on all four legs. I've since flown the Dark Lander a couple more times alongside my Semroc Mars Lander I picked up at NARAM-48 in Arizona. In February 2008 Geoffrey and I tried a triple drag race but my Dark Lander was the only one to initially leap off the pad. The other two eventually launched but the drag race didn't happen the way we wanted it to. At an earlier launch we did successfully drag race the Semroc Mars Lander and Geoffrey's original. At the various launches, folks have commented positively about the different look of my black Mars Lander, but it was about time I did something abut the "naked" look.
In early 2008 I contacted Tom Prestia at Tango Papa Decals and explained my situation. I asked him if he was willing to do a "reverse" set of his standard Mars Lander decals. I was hoping to get a true negative image of the original decal colors but the best Tom would do was reverse the various black portions to white and/or red. I accepted his offer and in due course he sent the reverse decals as part of a larger decal order. One look at the awesome decal sheet and I decided something was wrong…they were too big! I got on the phone with Tom and discussed the problem – he had indeed accidentally printed his 1.6x upscale decals in reverse and sent those! He agreed to do the correct sheet and I told him I would just keep the 1.6x set and maybe do a 1.6x Dark Lander some day using his kit.
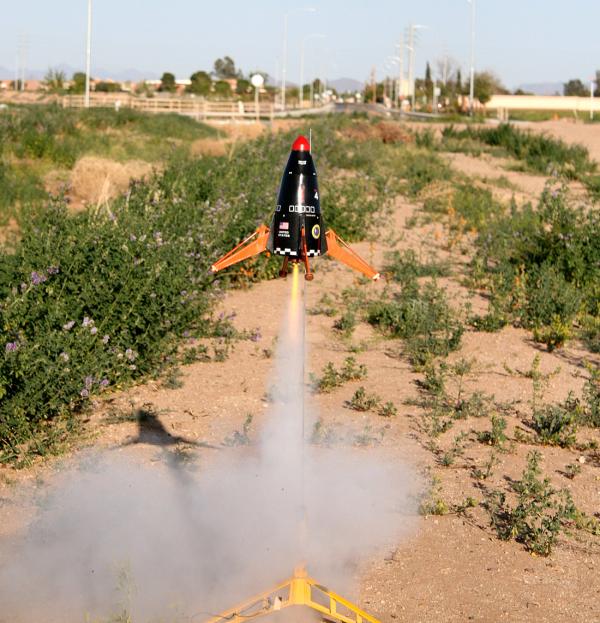
So, as of March 18, 2008 my once-naked Dark Lander finally has some spiffy clothes on. The reverse contrast looks really cool on the Lander and now that I've finally decaled it, I'll finish painting some of the details like the landing pads and shock absorbers and fabricate the two antennae and install those, too. After nearly 9 years, I think it's about time because it sure looks good among all of its brothers sitting on my shelf. Most recently flew it on 23 March 2008 on a leftover C5-3. Great boost and ejection. Swinging a bit on recovery and impacted a bit hard, cracking one of the legs. Easily repairable.
Flight:
During this time period I found a rocketry group in Sacramento (SARG – Sacramento Area Rocketry Group) and decided to join and attend a launch. I packed up some rockets and launch supplies and headed east from my home near Travis AFB. The launch site was about an hour drive and I arrived at the college campus launch site in mid morning. I signed in and filled out launch cards for my rockets. I took few, if any, photos during the launch but I did manage to shoot some video. I think the Lander first flew on an Estes C5-3 and it performed perfectly. I attended at least two SARG launches in late 1999 before packing up the rockets for my USAF transfer to Illinois in early January 2000.
Summary:
Pros:
- At the time (1999) this was a reasonable way to recreate the Mars Lander from scratch.
- Challenging build - a good way to deviate from the 3- or 4FNC rockets.
- Garners attention at the pad - great drag race bird!
- Looks great on the display shelf.
Con:
- Very challenging build - not for the first time scratch builder.
Other:
- Try to build your Mars Lander(s) with a removable bottom. By now (2008) this is probably pretty commonplace but back in the day it was probably an option overlooked by many (including myself.)
#Related Reviews
Related Products
 |
 |