Scratch Deuce's Wild 38 Special Original Design / Scratch Built
Scratch - Deuce's Wild 38 Special {Scratch}
Contributed by Carl Tulanko
| Manufacturer: | Scratch |
Brief:
 For some time now, I have been a customer
of a newer manufacturer, FlisKits, Inc, and have written a few reviews for EMRR
on some of the models this company markets. The Deuces Wild! is by far one of
my favorite kits from this manufacturer and the canted cluster 18mm model is a
great flier! However, when Jim Flis approached me and asked about an HPR
version of the “Deuce”, I just couldn’t resist. I began designs
in different scales and settled on a 4-inch diameter, 38mm version for my
upscale which I appropriately named “Deuces Wild — 38 Special”.
For some time now, I have been a customer
of a newer manufacturer, FlisKits, Inc, and have written a few reviews for EMRR
on some of the models this company markets. The Deuces Wild! is by far one of
my favorite kits from this manufacturer and the canted cluster 18mm model is a
great flier! However, when Jim Flis approached me and asked about an HPR
version of the “Deuce”, I just couldn’t resist. I began designs
in different scales and settled on a 4-inch diameter, 38mm version for my
upscale which I appropriately named “Deuces Wild — 38 Special”.
Construction:
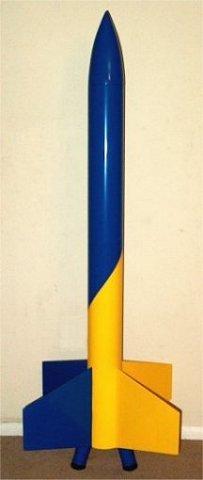
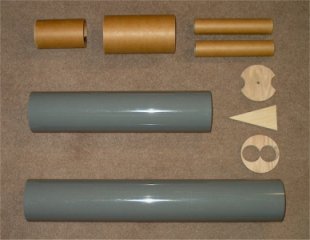
My model wound up being 49.5-inches in height and I used PML 3.9-inch Quantum
tubing for the bodytube and 38mm phenolic for the motor mounts. The dimensions
for the upscale proved that these sizes would be very close to the correct
dimensions. Custom 1/2-inch thick ply Centering rings were made for the motor
mount; deployment section and bulkheads were made for the bodytubes and
1/4-inch ply was used for fins. Stainless steel hardware was used throughout
the model and I opted for PML’s CPR-Max unit for the dual deploy. Finally,
I had my good friend Gordon Agnello from Michigan turn a custom nosecone for
me, which he made from solid poplar. Parachutes, shock cords, Kevlar®
and other extras I already had on hand, so it was time to start building.
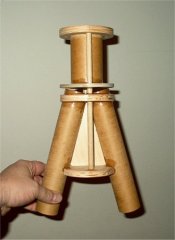
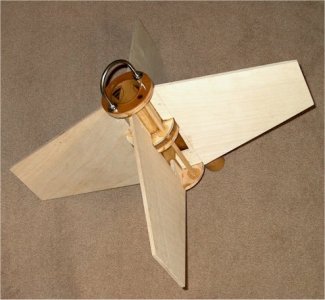
I began by cutting two motor mounts to a length long enough for a three-grain Cesaroni motor. Custom CR’s were next and cut from 9-ply 1/2-inch Birch. They are near exact upscales of the fiber CR’s shape, as supplied in the original’s kit. The angle on each motor mount was 10 degrees and for additional support, I made the triangle piece from 1/4-inch ply for support of the mounts, another copy from the original. Since this assembly would require porting for ejection gases, I built a guide tube from 2.1-inch phenolic to port motor ejection gasses to the lower bodytube section. The top of this assembly was capped with a stainless steel u-bolt for the shock cord. Moreover, 1/2-inch diameter holes were drilled on two sides of each ring and I used 1/2-inch oak wood dowels to hold the whole assembly together.. This allowed me to adjust and reposition the CR’s to my liking for final assembly.
 I purchased some 1/4-inch Birch Ply sheets
from the local hobby shop and cut out four fins from the pattern I had
upscaled. The fins had an extended root on them since this would be built with
thru-the-wall mounting. Each fin was fitted to the motor mount assembly, which
was designed so the bottom and top CR’s “sandwiched” the fins
for additional strength. The entire assembly was epoxied together using West
Systems Epoxy and then set aside to dry. Next, I spent time cutting each body
tube to length. I slotted the bottom BT and cut out the area for each motor
mount using a pattern I made from upscaled dimensions. Two separate upper
bodytubes were cut; one would be used for dual deploy and one would act as a
payload tube for single motor ejection deployment. This versatility allowed the
model to have a broader range of motors available to her and still keep the
altitude respectable.
I purchased some 1/4-inch Birch Ply sheets
from the local hobby shop and cut out four fins from the pattern I had
upscaled. The fins had an extended root on them since this would be built with
thru-the-wall mounting. Each fin was fitted to the motor mount assembly, which
was designed so the bottom and top CR’s “sandwiched” the fins
for additional strength. The entire assembly was epoxied together using West
Systems Epoxy and then set aside to dry. Next, I spent time cutting each body
tube to length. I slotted the bottom BT and cut out the area for each motor
mount using a pattern I made from upscaled dimensions. Two separate upper
bodytubes were cut; one would be used for dual deploy and one would act as a
payload tube for single motor ejection deployment. This versatility allowed the
model to have a broader range of motors available to her and still keep the
altitude respectable.
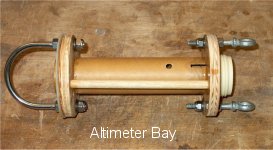 A deployment unit was made from two
1/2-inch thick CR’s I made, along with a piece of 38mm tubing and a
3.9-inch phenolic coupler. I had tons of PML “CPR” altimeter mounts
which I use for other rockets and wanted to use the same, test proven
deployment for this model, so I decided to go with the CPR-Max unit. It was
glued to one end of the 38mm tube and provided very simple way to secure and
seal the altimeter in the bay. Note that my deployment unit resides inside the
coupler for the upper bodytube. As a side note, I really like this CPR-Max unit
and will probably use it quite a bit in the future for other large projects;
it’s a very nice piece of hardware and inexpensive to boot!
A deployment unit was made from two
1/2-inch thick CR’s I made, along with a piece of 38mm tubing and a
3.9-inch phenolic coupler. I had tons of PML “CPR” altimeter mounts
which I use for other rockets and wanted to use the same, test proven
deployment for this model, so I decided to go with the CPR-Max unit. It was
glued to one end of the 38mm tube and provided very simple way to secure and
seal the altimeter in the bay. Note that my deployment unit resides inside the
coupler for the upper bodytube. As a side note, I really like this CPR-Max unit
and will probably use it quite a bit in the future for other large projects;
it’s a very nice piece of hardware and inexpensive to boot!
 A 5/16-inch eye-bolt was installed in the
nosecone and a stainless steel U-bolt was used to connect the shock cord for
the upper section. This U-bolt was mounted to the top CR of the altimeter bay,
while two more eye-bolts were used on the bottom. When assembled, the lower
section contains the drogue chute, while the upper section of BT contains the
main chute, nosecone chute and nosecone. I decided on two separate parachutes
for the upper section, as the nosecone was made from solid Poplar and weighed
in at over 2.5 lbs. With heavier nosecones, I always let them come down under
their own parachute and this helps prevent zippering of the upper bodytube.
A 5/16-inch eye-bolt was installed in the
nosecone and a stainless steel U-bolt was used to connect the shock cord for
the upper section. This U-bolt was mounted to the top CR of the altimeter bay,
while two more eye-bolts were used on the bottom. When assembled, the lower
section contains the drogue chute, while the upper section of BT contains the
main chute, nosecone chute and nosecone. I decided on two separate parachutes
for the upper section, as the nosecone was made from solid Poplar and weighed
in at over 2.5 lbs. With heavier nosecones, I always let them come down under
their own parachute and this helps prevent zippering of the upper bodytube.
After the upper sections and hardware were assembled, the lower fin can was installed in the lower bodytube. I used finishing nails to tack the BT to the fin support planks and bottom CR. Also, Epoxy Putty was used to fill any small gaps around the area where the motor mounts exited the bodytube. The lower area was sanded and 6 ounce glass cloth was used to fiberglass the fin area and motors mounts for additional strength. Additionally, I coated the entire nosecone in epoxy to help prevent shrinkage and cracking.
 The fin area was sanded and blended
together, and then the entire model was fine sanded with 400 grit sandpaper. I
added a few coats of White Krylon Primer, then wet-sanded with 220 grit. This
was followed by a few coats of Gray Krylon Primer; once dried, I used filler
for any small areas. The model was wet sanded again with 320 grit, then a final
set of three coats of White Primer were added for the base-coat. A couple days
were given for the primer to dry, then it was fine sanded with 400 grit and
tack ragged prior to painting.
The fin area was sanded and blended
together, and then the entire model was fine sanded with 400 grit sandpaper. I
added a few coats of White Krylon Primer, then wet-sanded with 220 grit. This
was followed by a few coats of Gray Krylon Primer; once dried, I used filler
for any small areas. The model was wet sanded again with 320 grit, then a final
set of three coats of White Primer were added for the base-coat. A couple days
were given for the primer to dry, then it was fine sanded with 400 grit and
tack ragged prior to painting.
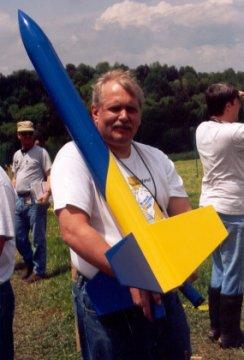
I used Krylon Sky Blue (medium blue) and Yellow Glossy for the colors, as I wanted to follow the paint scheme for the original on the Deuces Wild! package. Three coats of blue were applied to both upper body tubes and the nosecone and left to dry. I cut a small hole in the dual-deploy upper BT and installed a power switch for the altimeter. The lower section was done entirely in yellow, followed by a couple days of drying, some masking and two coats of Krylon Blue. I took my time to mask as I wanted the finish to turn out well. The final assembly resulted in a model weighing 8.5lbs “empty” and very closely resembling the original Deuces Wild! model.
Flight:
I had planned on flying the “Deuces Wild —38 Special” at a
launch in Whitakers, but weather and lack of time prevented this from
happening. As a backup date, I took the Deuce to NSL 2003 in Clark Summit, PA.
Jim Flis and I had a featured event where he launched a MMX, 13mm, 18mm and
24mm version of the “Deuce” and I launched the 38mm version, all in
succession..
 I began by preparing the model. The
altimeter was assembled and installed in the rocket, then the lower shock cords
and drogue chute were installed. The two sections were joined and I began by
packing the upper shock cord, 60-inch PML main parachute, 30-inch PML nosecone
chute, nosecone shock cord and nosecone. It was a tight fit but all went
together. A few pieces of masking were added to the nosecone and coupler to
adjust fit, then I turned to the power plant.
I began by preparing the model. The
altimeter was assembled and installed in the rocket, then the lower shock cords
and drogue chute were installed. The two sections were joined and I began by
packing the upper shock cord, 60-inch PML main parachute, 30-inch PML nosecone
chute, nosecone shock cord and nosecone. It was a tight fit but all went
together. A few pieces of masking were added to the nosecone and coupler to
adjust fit, then I turned to the power plant.
The plan was to use two Cesaroni Pro38 3-grain I212 Smokey Sam motors for power. Both of these were assembled, but I dumped out the BP ejection from one motor and used the DAT tool to cut the ejection of the other motor to 12 seconds. They were then installed in each motor mount and capped using Aeropack retainers. I filled out the flight card and headed to the RSO table to check in the big “Deuce.” The model caught the eye of the RSO; something about bright colors and two big motor mounts canting out of the bottom. I almost fell over when he announced it weighed in at a whopping 13lbs 5oz!!! At this weight, I changed my guesstimate altitude to around 1400 feet.
I had to borrow a rail from one of my friends at the launch and we set up on a “K” pad, far away from the crowd. I wanted it have some safety factor built in case there were problems with motor ignition. This was one of the reasons I chose Pro38 motors as they light very fast and use low power e-matches which would not overtax any launch system. The Deuces Wild — 38 Special was placed on the pad, the altimeter was turned on and I installed the two igniters. Now came the wait…
When it came time, each of the FlisKits models were launched in succession, followed by the big Deuce. When the countdown came though—nothing. I swallowed my heart and headed back out to the pad to see what was wrong. Another guy next to me also did not launch and continuity tested good for both our pads. The main box was disabled and switched to the far away pad for an M motor cert3 launch. The Deuce would have to wait.
 Come to find out, after the big L3 went up,
the electronics expert at the field found a blown fuse in the system, which was
quickly replaced. My launch was back on! It was announced as a “Scheduled
Event/Notable Launch” and all the information for it was read. My good
friend Jim Flis was standing next to me when eyes began to turn to the Deuce as
the LCO started the countdown and pushed the button…
Come to find out, after the big L3 went up,
the electronics expert at the field found a blown fuse in the system, which was
quickly replaced. My launch was back on! It was announced as a “Scheduled
Event/Notable Launch” and all the information for it was read. My good
friend Jim Flis was standing next to me when eyes began to turn to the Deuce as
the LCO started the countdown and pushed the button…
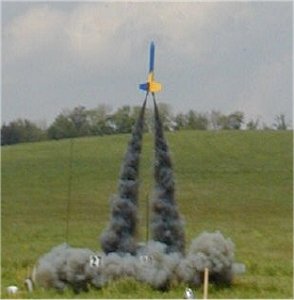
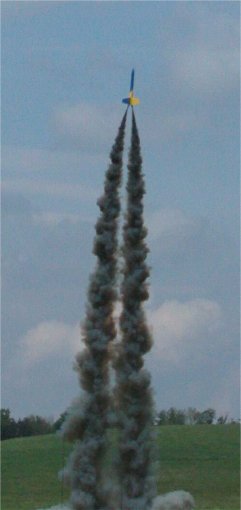
Both motors came to life instantly—I really like those Pro38 Motors!!! The Deuces Wild — 38 Special took off the rail fast and loud, with average impulse totaling a J424 behind it. The smoke trail was absolutely awesome!!! The model went straight up, no rotation, and allowed the audience to view two separate smoke trails that were absolutely incredible!
Recovery:
I faintly heard the applause in the background as it topped over and separated
at apogee—halfway home. The model began to tumble in and I completely
missed the backup charge fire on the one motor. When it hit 750 feet, the main
charge fired, the nosecone came out under chute and the main came out and
filled! The crowd was cheering by now and I could hear them under a breath of
relief that everything went exactly as planned. Both the model and nosecone
came down together, evenly in decent rate and landed about 200 yards out and
straight ahead. It was a perfect launch.
 In the excitement, I had broken the golden
rule and was so busy with people coming up to me, I forgot to watch where the
rocket landed! Fortunately, I had people watching out for me and my friend Doug
Gardei pointed out where it landed. The Deuces Wild — 38 Special was
retrieved and beeping out an altitude of 1372 feet—very close to my
guesstimate I gave the RSO. The model landed without a scratch and I was very
pleased with the stability and performance. After watching the videos, I
noticed it coasted for a while after motor burn out, with it whistling a bit
while flying. I want to thank everyone there for making it a real
“featured” event—It’s great rocketeers that make a great
launch and NSL 2003 was filled with them that day. I do have plans for flying
it once again at NARAM this year, so we will see how that goes, but for now, I
am happy with my first cluster, and a canted one at that!!!
In the excitement, I had broken the golden
rule and was so busy with people coming up to me, I forgot to watch where the
rocket landed! Fortunately, I had people watching out for me and my friend Doug
Gardei pointed out where it landed. The Deuces Wild — 38 Special was
retrieved and beeping out an altitude of 1372 feet—very close to my
guesstimate I gave the RSO. The model landed without a scratch and I was very
pleased with the stability and performance. After watching the videos, I
noticed it coasted for a while after motor burn out, with it whistling a bit
while flying. I want to thank everyone there for making it a real
“featured” event—It’s great rocketeers that make a great
launch and NSL 2003 was filled with them that day. I do have plans for flying
it once again at NARAM this year, so we will see how that goes, but for now, I
am happy with my first cluster, and a canted one at that!!!
Summary:
To summarize, the model was very easy to build and it flew great. About the
only change I would make would be to extend the motor mounts just a bit more,
as they are too short to handle a Pro38 4-grain. Still, with the performance I
had and the altitude that was achieved, I have a hard time changing anything.
The model does deserve an additional touch, something I was holding off on
until I saw how well it worked. I am getting some matching color Skyangle
parachutes for it, hopefully by NARAM, in the yellow and blue.. With the
weight, I figured on a 20-inch drogue, a 30-inch for the nosecone and a 54-inch
with d-bag for the main. This should allow for some better packing in the
forward section. Anyone interested in trying their hand at one of these can
shoot me an email or check out the thread on The Rocketry Forum; all the pics
are there to build this crowd pleaser…the Deuces Wild — 38 Special!
 |
 |