Scratch Dwarf King Original Design / Scratch Built
Scratch - Dwarf King {Scratch}
Contributed by Larry Brand
| Manufacturer: | Scratch |
 Brief:
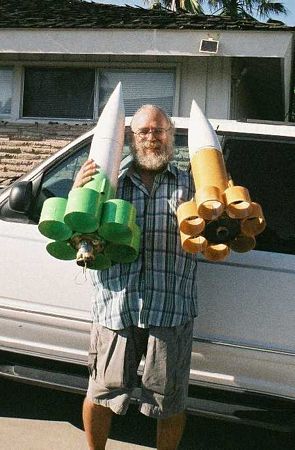
5.5" Dwarf King is a simpler, cut-down version of the huge and fat K445-powered tubefin I presented in
ROCKETS Magazine. It has the option of being built with either 6 tube fins (Mk. 6) or seven tube fins (Mk. 7).
Both versions can fly on up to Cesaroni K445 or K500R power or on as little as an I212SS. The lighter Mk. 7 version can
also fly on H143SS or H153 motors, giving a very easy L1 shot to only 700-800'. This article is part of a series of
tubefin construction designs that support a tubefin aerodynamics article set to appear in Sport Rocketry in late
2009-early 2010.
Construction:
Dwarf King was named after Gimli, the short, fat, bearded guy with the battle axe in the Lord of the Rings
films, whose resemblance to me is purely coincidence. (However, he was actually played by a clean-shaven, skinny,
6'2" Brit, thanks to a fat suit and camera tricks.) Dwarf King is one of the fastest-building, lowest cost K-power
rockets anywhere, kit or scratch. The 6-tube Mk.6 is faster building, simpler and more resistant to landing dings. The
7-tube Mk. 7 looks better (I think) and is lighter by a pound. The rocket body construction is identical for both, so
I'll start with that:
Parts:
- 5.5" glass nose cone from Polecat Aerospace (as used on their Thumper and Phoenix kits, Jack will sell you one separately)
- 19" length of LOC 5.5" tubing
- 2 1/4" plywood centering rings (Polecat or LOC) 5.5" diameter with either a 38mm or 54mm hole
- Motor tube: 14" of 54mm or 38mm LOC tubing, also a 36" length of 1/4" square spruce of basswood
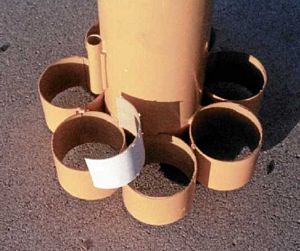
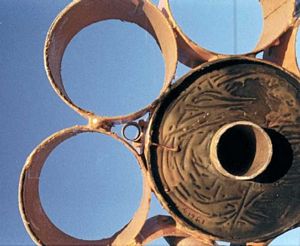
- Mk. 6: six 4" tubes cut from 5.5" stock
- Mk. 7: eleven 3.25" tubes cut from 4" LOC stock for 7 tube fins and 7 half doublers
- 9' of 3/4" nylon webbing for shock cord
- 30" Top Flite X-chute and 54" regular Top Flite chute (I like to have separate chutes on cone and body tube)
- 2.5" of 9/16" brass tube for launch lug (I have also used a plastic Garcia-Vega cigar tube with ends cut off)
- 5-minute epoxy is used throughout
The build:
- Glue centering rings 1.5" from the bottom and 2.5" from the top of the motor tube. Glue a 1/4"
hardwood longer on against either side of the motor tube between the centering rings.
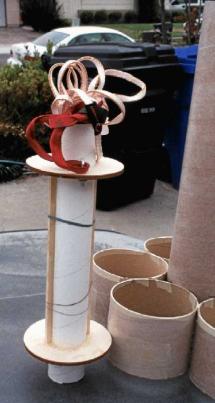
- Attach shock cord anchor to the upper centering ring, either as a 3/16" eye bolt or as a strip of 3/4"
nylon webbing screwed in place with self-taping screws angled inward. This is a bit easier to do before gluing the
rings to the motor tube. Fix the bolts/screws in place with a gob of epoxy. Attach an EZ-link to the anchor or just use
a good bowline knot to tie on the shock cord.
 Glue the motor tube assembly into the body tube using plenty of epoxy. Recess it
about 1/4" inside from the bottom so that extra epoxy can be pooled there to lock it in place. Likewise, slide a
1" ring of scrap 5.5" tubing with a 1" sector cut out downward against the upper centering ring to lock
it in place (do this before the epoxy has set when you install the motor tube assembly). Again, use plenty of epoxy.
Glue the motor tube assembly into the body tube using plenty of epoxy. Recess it
about 1/4" inside from the bottom so that extra epoxy can be pooled there to lock it in place. Likewise, slide a
1" ring of scrap 5.5" tubing with a 1" sector cut out downward against the upper centering ring to lock
it in place (do this before the epoxy has set when you install the motor tube assembly). Again, use plenty of epoxy.
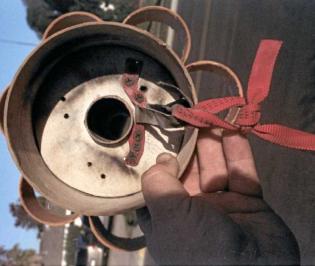
- Glue in place the recovery system attachment disc with U-bolt up forward in the nose cone that came with the Polecat cone, or for simplicity, glue in place in the nose cone a piece of 1" hardwood dowel rod at the hip indentation using scraps of wood and lots of epoxy to anchor in place. Don't worry about the chute getting blasted past the dowel rod upon ejection and lodging up in the cone--it just doesn't happen. The nose cone chute is attached to this, whichever you selected. It is also strong enough to tie to the main chute shock cord if you want to go with a single chute (60" is fine).
- For the Mk. 6 version, the six 5.5" diameter tube fins are attached in pairs in the usual tubefin construction practice, using a flat surface for alignment. First the left-right pair (I use cans of soup to hold them in place), then the top 2 fins, then (when cured) flipped over and bottom pair are glued in place. [Note: See "Auracle 54" article in EMRR for photos of this build method.] The lower outside surface of each tubefin is reinforced with a 2" strip of glass tape and epoxy to protect against flutter and landing dings.
- For the Mk. 7 (7-tube) version, the 4" diameter tube fins are fabricated and attached completely differently. The tube fins are laminated with half doublers and glass cloth as described for the "TeaBird 4.0" article on EMRR. When attaching seven tube fins to a larger diameter body, the first one is glued in place using a flat surface for alignment. [Note: Do not attempt to glue on more than one tube fin at a time here, as you will ruin the alignment and screw up everything!] Then 5 of the 6 remaining tube fins are glued in place one at a time using the last one and the flat surface for alignment, after first gluing to each tube fin a 1/4" wide strip of 1/8" Lite-Ply to use as the contact surface with the adjacent tube fin. These spacers are also needed to precisely fit 7 tube fins around a larger size body tube. Before attaching the last tube fin, trial fit it into the space remaining--you may need to use to up to three 1/8" spacers to get it to fit perfectly. Expect to fiddle with it to get it right. The slight asymmetry matters not for flight or appearance.
- The launch lug is attached with its midpoint 10" below the top pf the body tube and in line with one of the triangular spaces between two of the tube fins. The CG should be above the bottom of the launch lug.
Finishing:
I painted my Dwarf Kings with a simple, freehand, two-color scheme, using Tamiya rattle-can. Note from the photos how
small the DK Mk. 6 is compared to my Ford Explorer! It is however, easy to fit this K-power rocket in your vehicle and
your work shop.
Finished weight of the Mk. 6 version was 2211 grams, owing to the weight of the heavier 5.5" tube fins. The 7-tube version can be built as light as 1660 grams. Dwarf Kings are flown on up to the 1400 gram 54mm K445 with not a bit of nose weight needed.

Flight and Recovery:
To insure perfect deployment with the 2-chute option, which I recommend, I pack the shock cord inside an XL-size
Nomex®,
stuff this into the rocket, then lay the folded main chute on top. The 30" X-chute attached to the cone is then
folded and stuffed between the Nomex®
and the main. Lastly, the nose cone is fitted into place. This way on ejection, the 30" chute will drag out the
54" main. When I began flying these, I used friction fitting of the motors, however, my fellow rocketeers told me
this was an unsafe practice with K motors and above so I bought an Aero Pack retainer and also fabricated a homemade
adjustable retainer, since with this design, the motor casing sticks out 3" or more aft of the airframe (see
"BEEMR" on this website).
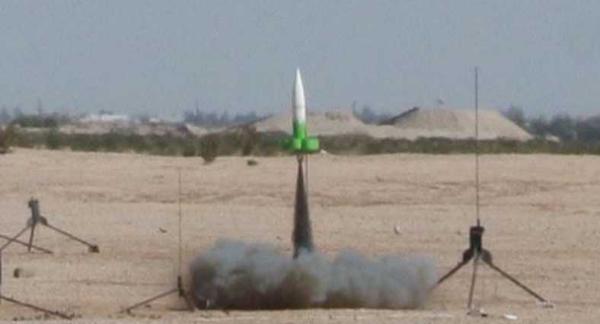
 Dwarf King is a beautiful flier on the Cesaroni K445 with 8 second delay, giving 3416' at
measured Cd=0.82 at 500mph. The very similar K500 Red Lightning reload gave a 3256' boost with Cd=0.86 at 482mph. I
measure altitude with a Perfectflite Alt15K in an external, taped on parasite pod to calculate these values.
Dwarf King is a beautiful flier on the Cesaroni K445 with 8 second delay, giving 3416' at
measured Cd=0.82 at 500mph. The very similar K500 Red Lightning reload gave a 3256' boost with Cd=0.86 at 482mph. I
measure altitude with a Perfectflite Alt15K in an external, taped on parasite pod to calculate these values.
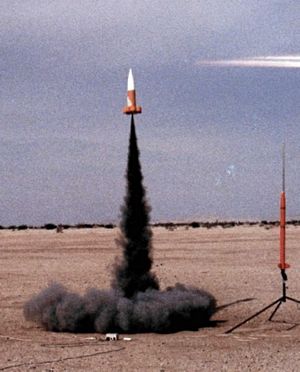
Other Mk. 6 flight results were: 1693' on a J400SS-7 with Cd=0.87 at 379mph, 1366' on a CTI 285-6 with Cd=0.88 at 314mph, and 961' on a CTI I212SS-6 with Cd=0.87 at 223mph. With the Mk. 7 version, the J400SS-7 gave 1785' with Cd=0.81 at 465mph, 1857' on the CTI J330-7 with Cd=0.88 at 428mph, and 1096' on the I212SS-7 with Cd=0.93 at 286mph. The lighter 7-tube Mk. 7 also gave a straight,stable boost on a Cesaroni H143SS-6 to 747' with Cd=0.97 at 206mph.
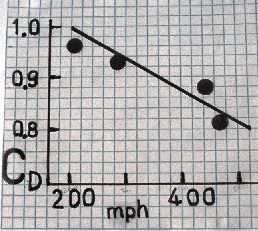 What's clear here is that neither version displays the severe speed dependence
of Drag Coefficient (Cd). Together with the low Cd=0.8-0.9, one can see how these stubby tubefin designs fly almost as
cleanly as 3FNC rockets. With a 700-800' H-motor flight and J-power taking them up to only 1700' to 1900', the Dwarf
kings are ideal for flying L1 and L2 cert flights with the same rocket on the same day--a popular thing to do lately,
although the NAR office frowns on this.
What's clear here is that neither version displays the severe speed dependence
of Drag Coefficient (Cd). Together with the low Cd=0.8-0.9, one can see how these stubby tubefin designs fly almost as
cleanly as 3FNC rockets. With a 700-800' H-motor flight and J-power taking them up to only 1700' to 1900', the Dwarf
kings are ideal for flying L1 and L2 cert flights with the same rocket on the same day--a popular thing to do lately,
although the NAR office frowns on this.
Summary:
PRO: Easy and inexpensive to scratch build, compact to transport (for a K powered rocket!). Fly L1 and L2 with the
same rocket! No need for nose ballast with any motor.
CON: Mk. 7 tube fins are not as strong as Mk. 6 fins and can be dinged on hard landing. Long 54mm cases protrude 3-4" aft of rocket, and your $70 CTI casing protects your $2 tube fins from rocky impacts! Avoid flying these designs at speeds above 500 mph (based on your simulator) or you will be the test pilot!
 |
 |