Scratch EAC Hyperion Original Design / Scratch Built
Scratch - EAC Hyperion {Scratch}
Contributed by Chan Stevens
| Manufacturer: | Scratch |
Brief:
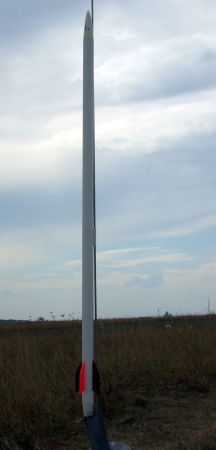
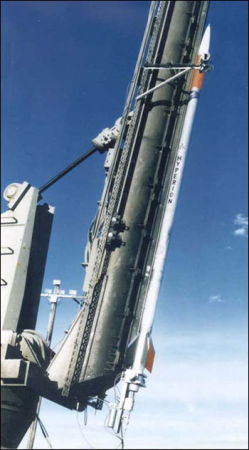
1:8.15 scale of the Environmental Aeroscience Corporation's sounding rocket.
Construction:
This "scale bash" project can easily be built from common parts available in commercial kits. The attached
RockSim file can be used for a shopping list, but the basic parts include:
- PNC-20 Plastic nose cone (4:1 Ogive)
- BT-20 body tube 24.15" long
- 1/16" basswood fins (4)
- 1/8" launch lug
- BT-5 motor tube 4" long
- 5/20 centering rings (2)
- 10.5mm/13mm centering ring motor block
- 12" chute
- 20" 1/8" elastic shock cord
- paper shroud
I got the idea from Peter Alway's Scale Bash book, which included templates and the basic dimensional conversions. I have replicated almost all of that in a RockSim file for simulation and stability analysis.
The attached RockSim file can be used to print out fin patterns, which are cut from 1/16" basswood. Balsa can be used but would possibly flutter a tiny bit at that size. Note that on my model, I went a bit beyond the regular fins and made tiny fin mounting brackets by cutting small slivers from a spare BT-20 motor tube. The slivers are equal to the fin length and are about 3/32" wide.
To print the shroud, I recommend the free online tool linked through the EMRR site. The dimensions are 0.736" front diameter, 0.544 rear diameter, and length of 0.66".
Building the model is a skill level 2 and can be done in about 90 minutes at the worst. Start by inserting the smaller centering ring in the BT-5 using a spent casing to space it correctly--you want to leave 1/4" out for tape retention, as the boat tail leaves no room for a hook.
Next, form the shroud and use white glue to seal it. Slide it over the BT-5 with the aft end flush with the aft of the BT-5. Apply a thin bead of glue to the BT-5 near the forward end of the shroud and slide a 5/20 centering ring down the BT-5 until it just touches the shroud. Glue the other centering ring to the forward end of the BT-5. The completed assembly then slides into the BT-20 and is glued in place.
 Using a wraparound fin guide (again, free online tool linked through EMRR or use an Estes marking tool
if you do this before mounting the boat tail), mark a 4-fin pattern on the BT-20. Mount the fins (and brackets, if you
choose to make them).
Using a wraparound fin guide (again, free online tool linked through EMRR or use an Estes marking tool
if you do this before mounting the boat tail), mark a 4-fin pattern on the BT-20. Mount the fins (and brackets, if you
choose to make them).
Mount a lug about 10" from the aft end on a line between fins.
A standard paper tri-fold for the shock cord should suffice.
Critical step: add a small amount of nose weight. On mine, it needed about 3 grams of clay in the nose to bring the CG to 13.5" from the nose tip (empty). RockSim thinks this is overstable, but long/skinny rockets need extra margin, especially if flying in higher winds.
Finishing:
For finishing, I painted everything with 2 coats of gray primer, then two coats of Krylon white gloss as a base. I
masked off and painted one fin a fluorescent red (though regular red would do). I then masked that fin off, and painted
the remaining 3 fins black.
For the nose cone, the Scale Bash book included a small pattern that could be used to print a shark's mouth and eyes. Rather than figure out how to transfer that to a decal somehow, I just drew it by hand in pencil a couple times before following up with a Sharpie.
Flight and Recovery:
Since it's a 13mm, the motor selection is pretty thin. I'd recommend going all the way up to A10-3T or A3-4T. I flew
mine on an A10-3T on a perfectly calm day. The flight was absolutely straight although it was still coasting up a bit
when the chute popped out. An A3-4T motor might be a better fit with less of a thrust spike for a longer flight and the
longer delay would help.
The model simulates to about 350 feet, although I don't think it got anywhere near that altitude. More like 200-250.
Summary:
For PROs, I think I'd have to rate the simplicity of the construction for an easy scale model and the very nice
flight. It's also a model that doesn't seem to show up in contests or sport flights very often, so it is certainly a
bit off the beaten path.
CONs: somewhat tricky decoration of the nose, limited availability of good scale data, and having gone with 13mm motor, I'd suggest upscaling to 18mm for better motor flexibility would be a good idea.
 |
 |